background image

www.vrisimo.com  

Basic Operation

A. Hook Up Procedure

1. 

Align tractor with implement. Attach lower lift 

arms.

2. 

Attach  upper  3-point  arm.  Adjust  length  for 

desired approach angle.

3. 

Install  PTO,  tube  attached  to  mower,  bar 

attached to tractor.

4.  Connect hydraulic lines to tractor remotes. 

Typical install will require two remotes, one for 

each nozzle control cylinder.

5. 

With the attachment and PTO line connected 

check  the  drive  shaft  through  the  entire 

lifting  range  checking  for  binding,  bottoming, 

uncoupling, or attachment contact.

B. Starting Procedure

1. 

Start  engine  and  set  throttle  to  idle.  Never 

engage the PTO with the motor above idle 

speed.

2.  With the motor at low RPM engage the PTO 

output.

3. 

Slowly bring the throttle up to 540 PTO RPM. 

If the Attachment produces excessive noise or 

vibration, disengage the PTO and shut down the 

Power Unit immediately. Determine the cause 

of the problem and correct it before continuing 

with its operation.

4. 

Check  functionality  of  each  nozzle  control 

cylinder.

5. 

Attachment is ready for operation.

C. Running Your Attachment

1.  Determine ground speed based on terrain and 

material being cut. This will typically fall within 

the 0-5 mph range.

2. 

Adjust  the  hitch  to  the  approximate  desired 

cutting height.

3. 

Adjust blower nozzles to achieve desired effect

4. 

Make sure PTO is properly attached.

D. Shut Down Procedure

1. 

Shut off Power Unit and set parking brake, wait 

for the attachment to stop rotating.

2. 

Disengage  the  PTO  drive  and  position  it  for 

storage or transport (See the “Storage and 

Transport” section for details on proper storage). 

3. 

Visually inspect the PTO shaft, all the bearings 

and gearbox for excessive heat or leaks.

8

Содержание Vrisimo BL Series

Страница 1: ...BL SERIES ORCHARD BLOWER OWNER S MANUAL PO Box 220 2507 Tully Road Hughson CA 95326 800 426 5615 www valleytoolmfg com BL Series Orchard Blower...

Страница 2: ......

Страница 3: ...ction Thank You Warranty Safety Operational Safety Maintenance Safety Installation Installation on LP Version 2 Installation on Sanitizer Installation on LP Version 3 Basic Operation Hook Up Procedure...

Страница 4: ...safety of the operator was one of the primary concerns of Vrisimo Flail Mowers Shredders when designing this attachment Shielding simple adjustments and other safety features were built into this atta...

Страница 5: ...are not limited to gearboxes hydraulic pumps motors cylinders and actuators Our obligation under the warranty is expressly limited at our option to the replacement or repair atValleyTool Mfg ofHughso...

Страница 6: ...machine Operate at a safe speed typically 0 5 mph in consideration of the local terrain moving slower when operating on or near slopes ditches or drop offs Avoid running the machine along the ground i...

Страница 7: ...als It is the owner s responsibility to ensure all individuals involved in maintaining the machine are properly trained in the appropriate language Be sure to inspect all safety devices before each us...

Страница 8: ...ill bit Center punch to match frame rails Recommend using HSS Silver and Deming 135 Split Point 4 Install 6 spline adapter assembly Place belt over pulley Add top shaft 5 Install blower assembly on fr...

Страница 9: ...t Center punch to match frame rails Recommend using HSS Silver and Deming 135 Split Point 4 Install 6 spline adapter assembly Place belt over pulley Add top shaft 5 Install blower assembly on frame Pl...

Страница 10: ...ll frame rails 4 Install 6 spline adapter assembly Place belt over pulley Add top shaft 5 Install blower assembly on frame Place belt over blower pulley 6 Tension belt using 4X jack screws 7 Lock fram...

Страница 11: ...0 PTO RPM If the Attachment produces excessive noise or vibration disengage the PTO and shut down the Power Unit immediately Determine the cause of the problem and correct it before continuing with it...

Страница 12: ...ired tension b There are 4 jack screws used to adjust height turn counterclockwise to lower and clockwise to raise c Adjustment of left or right side more than the other can be used to adjust pulley a...

Страница 13: ...sure the inside of the blower is kept free from mud and compact grass Keep in mind that mud built up on the blower fan can cause imbalance 4 Preserve damaged decals or replace them if they are unread...

Страница 14: ...BL Series Orchard Blower Parts Book www vrisimo com 11...

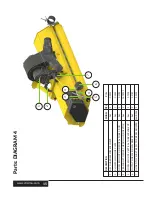
Страница 15: ...SK ADPTR HUB Z6 BARECO B 255 BUSHING SH 1 5 QD SHEAVE B SECTION DESCRIPTION MODEL QTY P N ALL ALL ALL ALL ALL TL 1625 P 1460 06043 TL 1620 P 1462 1 1 1 1 1 5 BELT 3BX 50 HI POWER II ALL B 156A 1 6 LO...

Страница 16: ...MENT LH BUTTERFLY VALVE 8X8 OUTPUT DUCT 8X8 TO ROUND WELDMENT 12 CYL HYD HCI 4IN STRK BEARING 1 5 PILLOW BLOCK LP BERM BLOWER SHAFT 24IN DESCRIPTION MODEL QTY P N ALL ALL ALL ALL ALL ALL 05810 05815 0...

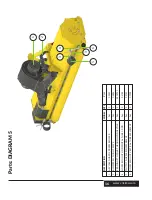
Страница 17: ...Y BUTTERFLY VALVE WELDMENT SHAFT WELDMENT RH BUTTERFLY VALVE 8X8 CYL HYD HCI 4IN STRK SHAFT WELDMENT LH BUTTERFLY VALVE 8X8 DESCRIPTION MODEL QTY P N ALL ALL ALL ALL ALL 6338K572 05809 05810 SPEI004 H...

Страница 18: ...T NOZZLE MOUNT HORIZONTAL TUBE 1 0 OD BLOWER LH MOUNT PLATE ASY GUARD WELDMENT INPUT DESCRIPTION MODEL QTY P N ALL ALL ALL ALL ALL 9578T21 07205 05782 05824 05952 2 2 2 1 1 5 OUTPUT NOZZLE 8IN WELDMEN...

Страница 19: ...TUBE 1 0 OD OUTPUT NOZZLE 8IN WELDMENT FRAMING FTG XOVR THROUGH CONNECTOR BLOWER RH MOUNT PLATE ASY IDLE GUARD LP BERM BLOWER DESCRIPTION MODEL QTY P N ALL ALL ALL ALL ALL 05782 05781 9578T21 05826 05...

Страница 20: ...BL SERIES ORCHARD BLOWER OWNER S MANUAL PO Box 220 2507 Tully Road Hughson CA 95326 800 426 5615 www valleytoolmfg com REVISION BL24 221220...

Отзывы: