


VALLEY FORGE & BOLT MANUFACTURING COMPANY
Phone: (602) 269 - 5748
4410 W. Jefferson St.
•
•
•
•
Phoenix, AZ 85043
•
•
•
•
USA
Fax:
(602) 269 - 7851
SPC4
TM
SYSTEM
•
•
•
•
MODEL 600A
•
•
•
•
USER'S MANUAL
Rev. 1.1
- Page 21 of 27 -
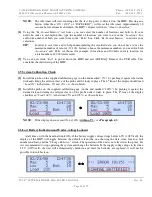
2.7 Checking the Tightness of a Joint
[1]
Begin by checking the calibration of the hand-held unit (see
Paragraph 2.5.
).
[2]
Install the probe on the fastener to be checked for tightness by pushing it against the datum disk and sliding
the exterior sleeve of the probe until it locks in place.
[3]
Read the percentage on the display.
NOTE:
If the probe is not attached to the datum disk of a fastener (or calibration gage), the “
Load
”
indication would not be valid, so the HHU’s display will show “
No Probe Found
”. This is not a
sign of malfunction, unless the “
No Probe Found
” indication does not go away when the probe is
attached to a fastener or to the calibration gage.
[4]
Remove the probe from the datum disk and repeat the step
[2]
and
[3]
, two additional times. In checking the
tightness of a previously tightened joint, it is recommended that three readings be taken to assure uniformity
of the load readings.
[5]
If the three percentage readings are not within ±5% of each other, see
Paragraph 4.3.
[6]
Using the calibration curve for the bolt being checked, determine the load corresponding to the average
percentage reading obtained in step
[4]
.
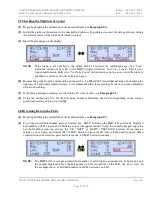
2.8 Recording Data in the Field.
[1]
Begin by checking the calibration of the hand-held unit (see
Paragraph 2.5.
).
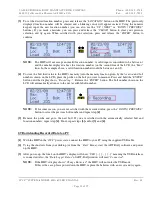
[2]
To set the desired bolt number, press and release the “
BOLT
” button on the HHU. The previously displayed
bolt number will be cleared and a blinking cursor will appear instead. Using the numeric keypad, input the
new bolt number (you can also use the “
UP | NEXT
” or “
DOWN | PREVIOUS
” buttons). If you made a
mistake, you can press and release the “
CLEAR
” button to clear your previous selection and try again. When
satisfied with your selection, press and release the “
ENTER
” button to confirm.
BOLT
NOTE:
The HHU will not accept an invalid bolt number.
A valid input is considered to be between 1 and
the number displayed above the bolt number (on the second line of the LCD, the “
Max
” line). In
the example above, a valid bolt number would be between 1 and 20).


