


808
Thermo AC/DC
8 Repairs
4. If necessary reconnect connectors to the HVIL socket.
5. Check the hook-up again using the wiring in
thru
depending on the heater version.
6. Bundle single wires using cable ties.
7. Install hood (see
8. Connect all supply cables to the vehicle electrical sys-
tem, fix them if required.
9. Perform a function check.
8.9
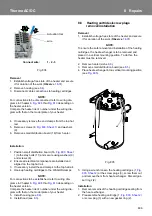
Heater removal/installation
Risk of injuries if coolant temperature is increased.
Removal
1. Establish voltage-free state of the heater and secure
it for duration of the work (
Observe
!
).
2. If installed, close water taps.
3. Close coolant inlet and outlet hoses using pinch off
pliers.
4. Loosen hose clamps on the coolant hoses, pull
coolant hoses from the coolant inlet (12,
) and outlet (11).
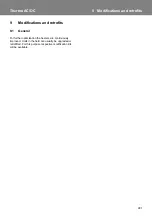
5. Remove hood (see
6. Disconnect power supply and control cables by loo-
sening the appropriate terminal screws from the small
distribution board (16,
).
7. Loosen the cable glands (4, 5) and withdraw the
cables.
8. Unscrew grounding screw (15) and remove grounding
cable, reinstall grounding screw with washer.
9. Install hood (see
10. Loosen and remove bolts, nuts and washers
according to the attachment variant at the stand of the
heat exchanger (13,
11. Remove heater from vehicle.
Installation
NOTE:
Initial situation: The heater is completely pre-assembled.
1. Remove hood (see
2. Place heater in mounting position and secure with
bolts, nuts and washers according to the mounting
variant at the stand of the heat exchanger (13,
), tighten bolts.
3. Unscrew grounding screw (15,
).
Reinstall grounding screw with grounding cable and
washer and tighten it.
4. Feed the cables through the cable glands (4, 5) into
the heater.
5. Connect cables to the corresponding terminals of the
), tighten
screws as prescribed.
NOTE:
For connections to be established, refer to wiring dia-
grams in Chapter
depending on
the heater version.
Compare the heater ident. number under the wiring dia-
gram with that on the model plate of your heater.
6. Check the wiring again using the appropriate wiring
diagram in Chapter
7. Bundle single wires using cable ties.
8. Tighten cable glands (4, 5) as specified.
9. Install hood (see
10. Fit coolant hoses onto the coolant inlet (12,
) and the coolant outlet (11) and secure with
hose clamps.
11. Remove pinch off pliers from coolant inlet and outlet
hoses.
12. Restore power supply as required.
13. Bleed coolant ciruit (see
8.10 Heat exchanger removal/installation
1. Remove heating cartridges and screw plugs (see
).
2. Remove temperature guards (see
) and discard
gasket rings (12).
4. Unscrew screw-in socket (9,
),
discard gasket ring (10).
5. Unscrew screw plug (7), discard gasket (6).
Installation
1. Screw the screw plug (7,
gasket (6) in and tighten.
2. Screw the screw-in socket (9) with a new gasket (10)
in and tighten.
3. Screw the stud bolts (11,
) with new
gasket rings (12) in and tighten.
4. Install temperature guards (see
).
5. Install heating cartridges and screw plugs (see
Risk of scalds!
Caution!


