VALBERG SBS 442 F W742C Скачать руководство пользователя страница 2

EN

WARRANTY CONDITION

This product is guaranteed for a period of 2 years from the date of purchase* against any failure 

resulting from a manufacturing or material defect. This warranty does not cover defects or 

damage resulting from incorrect installation, improper use or abnormal wear of the product.
*as shown on the sales receipt.

FR

CONDITION DE GARANTIE

Ce produit est garanti pour une période de 2 ans à partir de la date d’achat*, contre toute 

défaillance résultant d’un vice de fabrication ou de matériau. Cette garantie ne couvre pas les 

vices ou les dommages résultant d’une mauvaise installation, d’une utilisation incorrecte ou 

de l’usure anormale du produit.
*sur présentation du ticket de caisse.

NL

GARANTIEVOORWAARDEN

Dit product wordt gegarandeerd voor een periode van 2 jaar vanaf de aankoopdatum*, voor 

elke storing die het gevolg is van een fabricagefout of het materiaal. Gebreken of schade door 

slechte installatie, onjuist gebruik of abnormale slijtage van het product worden niet gedekt 

door deze garantie.
*op vertoon van kassabon.

ES

CONDICIONES DE GARANTÍA

El certificado de garantía de este producto tiene una duración de 2 años a partir de la fecha de 

compra* que se limita a los defectos de fabricación y averías del material. Se excluyen de la 

garantía deficiencias o daños originados por una mala instalación, errores en la manipulación 

o por un uso inadecuado.
*previa presentación del comprobante de compra.

MADE IN PRC

ELECTRO DEPOT
1 route de Vendeville
59155 FACHES-THUMESNIL
FRANCE

Содержание SBS 442 F W742C

Страница 1: ......

Страница 2: ...le du produit sur pr sentation du ticket de caisse NL GARANTIEVOORWAARDEN Dit product wordt gegarandeerd voor een periode van 2 jaar vanaf de aankoopdatum voor elke storing die het gevolg is van een f...

Страница 3: ...BS 442 F X742C 967692 SBS 442 F DX742C INSTRUCTIONS FOR USE 02 CONSIGNES D UTILISATION 22 GEBRUIKSAANWIJZINGEN 42 INSTRUCCIONES DE USO 62 2 2 09 2022 V4 Fridge freezer R frig rateur cong lateur Koelvr...

Страница 4: ......

Страница 5: ......

Страница 6: ......

Страница 7: ......

Страница 8: ......

Страница 9: ...Chosen tested and recommended by ELECTRO DEPOT VALBERG branded products are easy to use reliable and of an impeccable standard With every use of this appliance you can be sure of complete satisfaction...

Страница 10: ...ppliance C Useful information B Using the appliance Installation Use Useful hints and tips Cleaning and maintenance Troubleshooting Disposing of your old appliance Recommended ambient temperature Temp...

Страница 11: ...djust the temperature control s of the appliance according to the ambient temperature of the room in which it is being used and respect the climate class Refer to the product sheet to find out the cli...

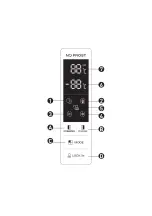
Страница 12: ...rol panel Buttons A Press this button to set the freezer left hand side compartment temperature from 14 C to 22 C B Press this button to adjust the temperature of the refrigeration compartment right h...

Страница 13: ...rtment 7 Displays the temperature set for the refrigeration compartment If one of the doors remains open for 90 seconds an alarm will sound at regular intervals until the door is closed Installation N...

Страница 14: ...ntaining the appliance should be carried out by a qualified electrician or other competent person An approved maintenance centre should carry out maintenance on this appliance Only original spare part...

Страница 15: ...d screwdriver flat screwdriver Make sure that the appliance is unplugged and empty To remove the door you need to tilt the appliance backwards It must rest on a solid surface to prevent it sliding whi...

Страница 16: ...ion de l appareil B 9 EN Using the appliance B 2 Disconnection the cable bundle 3 Unscrew the upper hinge 4 Lift the door and place on a soft padded surface Then remove the other door following the sa...

Страница 17: ...rectly exposed to sunlight Make sure that sufficient space is available so that the doors can be opened easily Choose a place in which the ground is level or almost level Make sure that there is suffi...

Страница 18: ...11 FR Utilisation de l appareil B 11 EN Using the appliance B Levelling and stabilizing the refrigerator Doors At least 50mm At least 50mm...

Страница 19: ...r as possible it is always preferable not to position the appliance under wall cabinets The appliance can be levelled precisely thanks to one or more adjustable feet at the bottom CAUTION It must be p...

Страница 20: ...iod of time Place the fresh food that you wish to freeze in the lower compartment The maximum quantity of food that can be frozen in 24 hours is indicated on the nameplate The freezing process takes 2...

Страница 21: ...from frozen as soon as they are taken out of the freezer In this case they will take longer to cook Accessories Removable shelves The refrigerant walls are fitted with different runners so that you ca...

Страница 22: ...e the temperature of the latter Food which is low in fat keeps better and for longer periods than fatty foods Salt reduces the storage time of food Ice cubes can cause burns linked to the cold if cons...

Страница 23: ...he shelves Fruits and vegetables these products must be washed thoroughly and placed in the specific compartment s provided Butter and cheese these products must be placed in special airtight containe...

Страница 24: ...emperature inside the entire refrigerator unit CAUTION The temperatures inside each compartment may therefore differ from the temperature values indicated on the panel depending on the quantity of foo...

Страница 25: ...d disconnect the plug from the power supply or turn off the circuit breaker or remove the fuse CAUTION Never clean the appliance using a steam cleaner Moisture could accumulate in the electrical compo...

Страница 26: ...terior accessories using a cloth soaked in lukewarm water After cleaning rinse with clean water and dry with a cloth Once everything is dry you can switch the appliance back on again Troubleshooting C...

Страница 27: ...appliance temporarily to a colder temperature The appliance is near a heat source Please consult the section relating to the installation position of the appliance The appliance cools too much The tem...

Страница 28: ...of energy efficiency class G Light source in this product can only be replaced by qualified professionals Please contact after sales service if the light source fails The light source shall be removed...

Страница 29: ...lisation vous apportera satisfaction Bienvenue chez ELECTRO DEPOT Visitez notre site Internet www electrodepot fr www electrodepot be V VO OTRE TRE A AVIS VIS C COMPTE OMPTE PARTAGEZ VOTRE EXPERIE NCE...

Страница 30: ...sponibles sur le site http www electrodepot fr sav notices http www electrodepot be fr sav notices Installation Utilisation Trucs et astuces utiles Nettoyage et entretien D pannage Mise au rebut de vo...

Страница 31: ...stat s de l appareil selon la temp rature ambiante de la pi ce d utilisation et le respect de la classe climatique Veuillez vous r f rer la fiche produit pour conna tre la classe climatique associ e a...

Страница 32: ...on pour r gler la temp rature du compartiment de cong lation c t gauche de 14 C 22 C B Appuyez sur ce bouton pour r gler la temp rature du compartiment de r frig ration c t droit de 2 C 8 C ou pour l...

Страница 33: ...qui tait r gl e avant d activer ce mode est automatiquement r tablie 4 Avec le mode SUPER FREEZING Super cong lation le compartiment de cong lation fonctionne sa temp rature la plus basse pendant envi...

Страница 34: ...acement du produit doivent tre install es contre un mur pour que les utilisateurs ne risquent pas de toucher aux pi ces chaudes ou de s y accrocher compresseur condensateur et ainsi viter toute br lur...

Страница 35: ...forme tournevis plat Assurez vous que l appareil est d branch et vide Pour retirer la porte il est n cessaire d incliner l appareil vers l arri re Il doit reposer sur une surface solide pour viter qu...

Страница 36: ...n de l appareil B 2 D branchez le faisceau lectrique 3 D vissez la charni re sup rieure 4 Soulevez la porte et placez la sur une surface douce et rembourr e Retirez ensuite l autre porte en suivant la...

Страница 37: ...du soleil Veillez pr voir suffisamment de place pour pouvoir facilement ouvrir les portes du r frig rateur S lectionnez un endroit dont le sol est plat ou presque plat Pr voyez suffisamment de place p...

Страница 38: ...31 FR Utilisation de l appareil B Mise niveau et stabilisation du r frig rateur Portes Au moins 50mm Au moins 50mm...

Страница 39: ...s 100 mm Dans la mesure du possible il est toutefois pr f rable de ne pas positionner l appareil sous des l ments muraux Une mise niveau pr cise est possible gr ce un ou plusieurs pieds r glables situ...

Страница 40: ...les aliments frais que vous souhaitez congeler dans le compartiment inf rieur La quantit maximale d aliments qu il est possible de congeler en 24 heures est indiqu e sur la plaque signal tique La proc...

Страница 41: ...encore congel es d s leur retrait du cong lateur Dans ce cas leur cuisson prendra plus de temps Accessoires Clavettes amovibles Les parois du r frig rateur sont quip es de diverses glissi res pour vou...

Страница 42: ...aliments d j congel s car cela entra nerait une augmentation de la temp rature de ces derniers Les aliments maigres se conservent mieux et plus longtemps que les aliments gras Le sel r duit la dur e...

Страница 43: ...doivent tre couverts et peuvent tre plac s sur n importe quelle tag re Fruits et l gumes ces derniers doivent tre parfaitement lav s et plac s dans le les bac s sp cifique s fourni s Beurre et fromag...

Страница 44: ...le de l armoire du r frig rateur ATTENTION Les temp ratures au sein de chaque compartiment peuvent donc diff rer des valeurs de temp rature Indiqu es sur le panneau selon la quantit de denr es entrepo...

Страница 45: ...joncteur ou retirez le fusible ATTENTION Ne nettoyez jamais l appareil L aide d un nettoyeur vapeur De l humidit pourrait s accumuler dans les composants lectriques ce qui pourrait g n rer un risque d...

Страница 46: ...chiffon imbib d eau ti de Apr s nettoyage essuyez l eau froide et s chez l aide d un chiffon sec Une fois que tout est bien sec vous pouvez remettre l appareil en service D pannage ATTENTION Avant to...

Страница 47: ...ture sur un r glage plus froid L appareil se trouve proximit d une source de chaleur Veuillez consulter le chapitre relatif l emplacement d installation de l appareil L appareil refroidit trop Le r gl...

Страница 48: ...tique G La source lumineuse de ce produit ne peut tre remplac e que par des professionnels qualifi s Veuillez vous rapprocher du service apr s vente en cas de d faillance de la source lumineuse Il con...

Страница 49: ...ELECTRO DEPOT We staan garant voor de kwaliteit van de toestellen van VALBERG die uitmunten in hun eenvoudig gebruik hun betrouwbare werking en hun onberispelijke kwaliteit ELECTRO DEPOT beveelt de VA...

Страница 50: ...ische informatie B Gebruik van het toestel Installatie Gebruik Handige tips Reiniging en onderhoud Probleemoplossing Afdanken van uw oude toestel Gebruiks en omgevingstemperatuur Instellen van de ther...

Страница 51: ...ratuur waarin het toestel gebruikt wordt onder voorbehoud van het naleven van de klimaatklasse n Raadpleeg het productinformatieblad om de klimaatklasse te kennen die verbonden is aan de minimale en m...

Страница 52: ...t diepvriescompartiment linkerkant in te stellen tussen 14 en 22 C B Druk op deze knop om de temperatuur van het koelkastcompartiment rechterkant in te stellen tussen 2 en 8 C of om uit te schakelen O...

Страница 53: ...de temperatuur die ingesteld was v r het activeren van deze modus 4 Met de SUPER FREEZING superinvriezings modus werkt het diepvriescompartiment gedurende ongeveer 6 uur aan de laagste temperatuur Na...

Страница 54: ...et product tegen een muur geplaatst te worden zodat de gebruiker de warme onderdelen niet kan aanraken of er vast aan kan komen te zitten compressor condensator en zo alle brandwonden te voorkomen Het...

Страница 55: ...n is het noodzakelijk het toestel naar achter te kantelen Het toestel dient op een stevig oppervlak te rusten om te voorkomen dat het wegglijdt bij het verwijderen van de deur Om de deur te verwijdere...

Страница 56: ...van het toestel B 3 Schroef het bovenste scharnier los 4 Til de deur op en plaats deze op een zacht en opgevuld oppervlak Verwijder de andere deur door dezelfde procedure te volgen 2 Maak de elektrici...

Страница 57: ...aan zonlicht Let erop voldoende plaats te voorzien om de deuren van de koelkast makkelijk te kunnen openen Kies een plek met een vlakke of bijna vlakke ondergrond Voorzie voldoende plaats om de koelka...

Страница 58: ...51 NL Gebruik van het toestel B Waterpas plaatsen en stabiliseren van de koelkast Deuren Ten minste 50mm Ten minste 50mm...

Страница 59: ...andelementen te plaatsen Het perfect waterpas plaatsen is mogelijk dankzij n of meerdere verstelbare poten aan de onderkant van het toestel OPGELET Het dient mogelijk te zijn de stekker van het toeste...

Страница 60: ...e een lange periode Zet de verse voeding die u wenst in te vriezen in het onderste compartiment De maximale hoeveelheid voeding die in 2h uur ingevroren kan worden wordt aangeduid op het typeplaatje D...

Страница 61: ...diepvriezer gehaald worden ook al zijn ze nog bevroren In dit geval zal de bereiding meer tijd in beslag nemen Aecsssairss Afneembare rekjes De wanden van de koelkast zijn uitgerust met verschillende...

Страница 62: ...eveelheid dient te ontdooien Verpak de voeding in aluminiumfolie of papierfolie en zorg ervoor dat de verpakkingen hermetisch zijn Laat de niet ingevronen voeding niet in contact komen met reeds ingev...

Страница 63: ...ast Bedek of verpak de voeding in het bijzonder wanneer ze een uitgesproken geur hebben Advies voor de koeling Handige tips Vergewis u ervan de voeding te verpakken in polyethyleenzakken en plaats dez...

Страница 64: ...de thermostaat op 3 C Als u de temperatuur wilt wijzigen volgt u de onderstaande instructies OPGELET Als u een temperatuur instelt stelt u een gemiddelde temperatuur voor de hele koelkast OPGELET Tem...

Страница 65: ...et toestel uit en onderbreekt u de schakelaar of trekt u de zekering uit OPGELET Reinig het toestel nooit met behulp van een stoomreiniger Er kan zich vocht opstapelen in de elektrische onderdelen dit...

Страница 66: ...ervan met behulp van een in lauw water gedrenkte vod Na de reiniging spoelt u met koud water en droogt u af met een droge vod Zodra alles goed droog is kunt u het toestel in werking zetten Probleemop...

Страница 67: ...vindt zich in de buurt van een warmtebron Gelieve het hoofdstuk met betrekking tot de installatie van het toestel te raadplegen Het toestel koelt te veel De temperatuur staat te koud ingesteld Draai d...

Страница 68: ...De lichtbron in dit product kan alleen worden vervangen door gekwalificeerde professionals Neem contact op met de klantenservice als de lichtbron uitvalt De lichtbron moet aan het einde van de gebruik...

Страница 69: ...s por ELECTRO DEPOT los productos de la marca VALBERG le aseguran una utilizaci n sencilla un rendimiento fiable y una calidad incuestionable Con este dispositivo puede estar s eg uro de que siempre q...

Страница 70: ...ctica B Utilizaci n del aparato Instalaci n Utilizaci n Trucos y consejos tiles Limpieza y mantenimiento Soluci n de problemas C mo desechar su antiguo aparato Temperaturas ambientales de uso Ajuste d...

Страница 71: ...ente de la habitaci n en la que se est usando respetando la s clase s clim tica s Por favor rem tase a la ficha de datos del producto para consultar la clase de clima asociada a las temperaturas ambie...

Страница 72: ...or A Pulse este bot n para ajustar la temperatura del compartimento de congelaci n lado izquierdo desde 14 C hasta 22 C B Pulse este bot n para ajustar la temperatura del compartimento de refrigeraci...

Страница 73: ...gurado antes de activar este modo se restablece autom ticamente 4 Con el modo SUPER FREEZING Super congelaci n el compartimento de congelaci n funciona con la temperatura m s baja durante aproximadame...

Страница 74: ...es del producto deben ser instalados contra una pared para que los usuarios no puedan tocar las piezas calientes o quedarse pegados compresor condensador y as evitar cualquier quemadura El aparato no...

Страница 75: ...ornillador plano Aseg rese de que el aparato este desenchufado y vac o Para quitar la puerta es necesario inclinar el aparato hacia atr s Debe apoyarse sobre una superficie s lida para evitar que no s...

Страница 76: ...zaci n del aparato B 3 Desatornille la bisagra superior 4 Quite la puerta y col quela sobre una superficie suave y acolchada Retire despu s la otra puerta del mismo modo 2 Desconecte el haz de cables...

Страница 77: ...e expuesto a la luz solar Deje espacio suficiente para poder abrir las puertas del frigor fico Seleccione un lugar cuyo suelo sea plano o casi plano Deje suficiente espacio para instalar el frigor fic...

Страница 78: ...71 ES Utilizaci n del aparato B Nivelaci n y estabilizaci n del frigor fico Puertas Al menos 50mm...

Страница 79: ...o posible es preferible sin embargo no colocar el aparato bajo elementos colgados en la pared Puede nivelar correctamente el aparato gracias a una o varias patas regulables situadas en la parte inferi...

Страница 80: ...elar en el compartimento inferior La cantidad m xima de alimentos que es posible congelar en 24 horas viene indicada en la placa de caracter sticas El proceso de congelaci n dura 24 horas no a ada otr...

Страница 81: ...n sacados del congelador En este caso tardar n m s tiempo en cocinarse Accesorios Estantes extra bles Las paredes del frigor fico vienen con diferentes gu as para que pueda colocar Los estantes seg n...

Страница 82: ...ida Envuelva los alimentos en papel de aluminio o papel film y aseg rese de que los envases sean herm ticos No deje que los alimentos frescos no congelados entren en contacto con alimentos ya congelad...

Страница 83: ...quidos que se evaporan en el frigor fico Cubra o envuelva los alimentos particularmente si tienen un sabor fuerte Consejos para la refrigeraci n Consejos tiles Aseg rese de envasar los alimentos en bo...

Страница 84: ...3 C Si desea cambiar la temperatura consulte las siguientes opciones ATENCION Cuando ajuste la temperatura esta se aplicar a todo el compartimento del frigor fico Las temperaturas dentro de cada compa...

Страница 85: ...ible ATENCI N No limpie nunca el frigor fico con un aparato de limpieza convapor Puedeacumularsehumedadenloscomponente el ctricos y esto podr a provocar un riesgo de descarga el ctrica Todo el vapor c...

Страница 86: ...edecido con agua tibia Despu s de limpiarlo l mpielo con agua fr a y s quelo con un trapo seco Una vez que todo est seco puede volver a poner en funcionamiento el aparato Soluci n de problemas ATENCI...

Страница 87: ...atura hasta un ajuste m s fr o El aparato se encuentra cerca de una fuente de calor Consulte el cap tulo relativo al lugar de instalaci n del aparato El aparato refrigera demasiado El ajuste de la tem...

Страница 88: ...ncia energ tica G La fuente de luz de este producto solo puede ser reemplazada por profesionales calificados Si la fuente de luz falla comun quese con el servicio al cliente La fuente de luz debe reti...

Страница 89: ...82 Notes Notities Notas...

Страница 90: ...83 Notes Notities Notas...

Отзывы: