background image

68

69

NL

NL

Gebruik van het toestel

Gebruik van het toestel

B

B

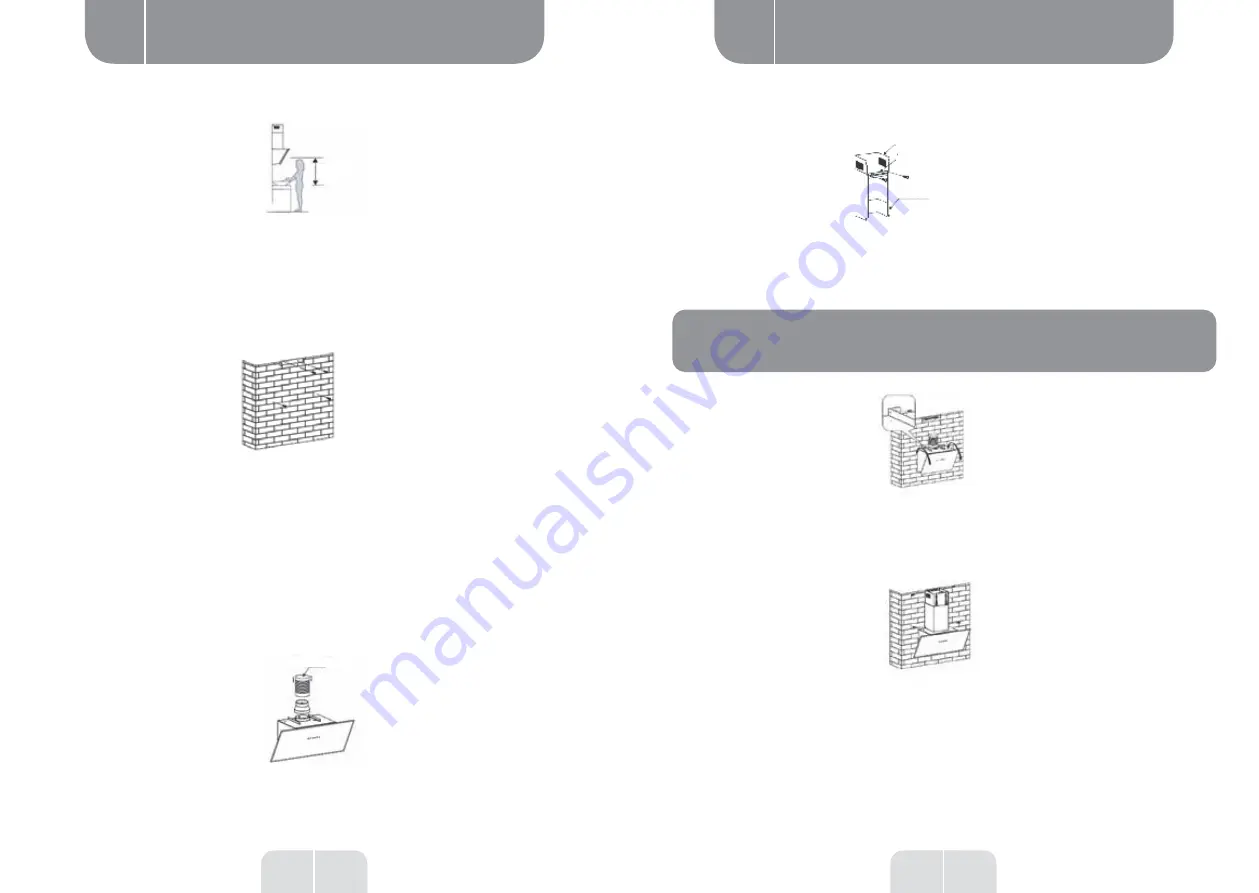
75 cm

65 cm

3. Nadat u de hoogte van de dampkap hebt beslist, meet u de plaatsing van de gaten om de 
dampkap op te hangen, alsook de haak van de binnenste schouw. Boor 4 gaten van 8: 2 voor de 
haak van de binnenste schouw en 2 andere om de dampkap op te hangen, terwijl u erop toeziet 
dat deze laatste waterpas hangt. De positie van de haak van de binnenste schouw komt overeen 
met de plaats van de schouw. Zie afbeelding 2.

Afbeelding 2

4. Schroef twee 4 x 30 mm bouten in de muur met behulp van pennen om de dampkap te 
bevestigen, en gebruik daarna twee 4 x 40 mm bouten om de haak van de binnenste schouw 
te bevestigen. Zie afbeelding 2.

5. Installeer de omvormer en de verlengbuis op de uitlaat. Bevestig de verlengbuis op de omvormer 
door middel van de spanring. Zie afbeelding 3.

Ter herinnering: de verlengbuis wordt niet meegeleverd.

verlengbuis

5. Installeer de haak van de buitenste schouw op de buitenste schouw met behulp van 2 ST4*8 mm 
bouten, en vergewis u ervan dat de binnenste schouw flexibel blijft. Zie afbeelding 4.

binnenste schouw

haak buitenste schouw

buitenste schouw

Afbeelding 4

6. Hang de dampkap aan de muur door zijn positie aan te passen en bevestig deze met behulp 
van 2 ST4*30 mm veiligheidsschroeven.

OPMERKING


Op de achterste behuizing bevinden zich de twee veiligheidsopeningen 

met een diameter van 6 mm. Zie afbeelding 5.

Afbeelding 5

7. Stel de hoogte van de binnenste schouw af op de positie van de haak van de binnenste 
schouw en bevestig alles met 2 ST4*8 mm schroeven. Zie afbeelding 6.

Afbeelding 6

Содержание 970127

Страница 1: ...deerd voor een periode van 2 jaar vanaf de aankoopdatum voor elke storing die het gevolg is van een fabricagefout of het materiaal Gebreken of schade door slechte installatie onjuist gebruik of abnormale slijtage van het product worden niet gedekt door deze garantie op vertoon van kassabon ES CONDICIONES DE GARANTÍA El certificado de garantía de este producto tiene una duración de 2 años a partir ...

Страница 2: ...1 2 3 4 5 6 1 ...

Страница 3: ...echnical features 2 EN 2 EN Thanks Thank you for choosing this VALBERG product Chosen tested and recommended by ELECTRO DEPOT the products of the VALBERG brand are easy to use reliable and of an impeccable standard Thanks to this appliance you can be sure that each use will bring you satisfaction Welcome to ELECTRO DEPOT Visit our website www electrodepot fr www electrodepot be Table of contents A...

Страница 4: ...in accordance with the installation rules so that the appliance can be disconnected from the power supply network whatever the circumstances It is necessary to refer to the diagram of this manual to comply with the following points Dimensions of the space to be provided for the appliance Dimensions and position of the means used to support and fasten the appliance in this space Minimum clearance b...

Страница 5: ...instructions for the gas hob specify a larger distance they must be complied with The regulations concerning the evacuation of air must be respected WARNING Failure to follow instructions for the installation of screws or fastening devices could create electrical hazards If the appliance has a downflow extraction system like so called retractable worktop hoods CAUTION This appliance is not intende...

Страница 6: ... comply with the national regulations in force Remove all parts of the packaging before installation If the appliance does not have a power plug the electrical connection must be made by a qualified electrician only Before connection first cut the power supply via the means of disconnection of the fixed power supply electrical panel fuse circuit breaker etc The power cable must have sufficient dia...

Страница 7: ... normal operation Lwa 62 62 W power consumption in off mode 0 27 0 27 Growth factor over time f 0 8 0 8 41 4 41 4 244 3 244 3 Pbep 349 349 3 h 579 1 579 1 Technical features Trademark Valberg Valberg point Wbep 69 9 69 9 Nominal power inW of lighting system Wl 3 7 3 7 Average brightness in lux of lighting system on the cooking surface Emiddle 83 76 Rated supply voltage inV type of current frequenc...

Страница 8: ...an internal diameter of 150 mm 1 Switch off the appliance and disconnect from the mains prior to installation 2 For optimum results the extractor hood should be installed at a distance of 65 to 75 cm above the cooking surface 75 cm 65 cm 3 After deciding on the height of the extractor hood measure the position of the holes required to suspend the hood as well as the inner duct mount Drill 4 holes ...

Страница 9: ...e of the hood and increase its noise level All installation work must be carried out by a qualified electrician or a competent person Do not connect all the ducts in the hood to an existing ventilation system that is used for another device such as heating gas or hot air ducts The angle of curvature of the ventilation duct shall not be less than 120º you need to position the duct horizontally Othe...

Страница 10: ... speed The LED display will indicate 1 Press the Increase button again when the hood is operating at low speed the backlighting of the Increase Reduce and On Off buttons will come on The hood operates at medium speed and the LED display will indicate 2 Press the Increase button again when the hood is operating at medium speed the backlighting of the Increase button will go out The Decrease and On ...

Страница 11: ...ure to wipe the stainless steel to prevent the appearance of any unsightly scratches Surface of the control panel The coating on the control panel can be cleaned with hot soapy water Make sure the cloth is clean and properly wrung out before cleaning Use a soft cloth to remove any excess moisture left after cleaning IMPORTANT INFORMATION Use neutral detergents and avoid harsh chemicals strong hous...

Страница 12: ... the evacuation version to the recycling version ask your dealer for activated charcoal filters Installing the activated charcoal filter cassette The aluminium filter must be removed to install the activated charcoal filter Open the grating press the locking device and pull the filter downwards Place the activated charcoal filter inside the appliance and fasten it by turning anticlockwise Replace ...

Страница 13: ...mation Useful information C C 1 2 1 2 NOTE Make sure the filter is properly inserted Otherwise it will come out and present a hazard When an activated charcoal filter is installed the suction power is reduced Bulb replacement ...

Страница 14: ...ing defect Dismantle the check valve and seal it using a sealant There is a leak on the connection between the duct and its cover Remove the duct and seal the leak The light is not working The bulbs are defective broken Replace the bulbs in accordance with this manual Insufficient suction The distance between the hood and the stove is too large Reposition the hood at the right distance The extract...

Страница 15: ...ser This is why your appliance as indicated by the symbol on its nameplate or on the packaging should under no circumstances be thrown into a public or private bin intended for household waste The user has the right to take the device to public collection points which selectively sort waste to be either recycled or reused for other applications in accordance with the directive Nosemballagespeuvent...

Страница 16: ...ITS Parce que votre satisfaction est notre priorité nous vous proposons de donner votre avis sur ce produit Il sera transmis et analysé par nos équipes afin d améliorer continuellement le produit Donnez votre avis sur http www electrodepot fr avis client A Aperçu de l appareil C Informations pratiques B Utilisation de l appareil Les notices sont aussi disponibles sur le site http www electrodepot ...

Страница 17: ...ns lors de l installation de cet appareil précisées dans cette notice La fiche de prise de courant doit rester accessible ou un interrupteur doit être installé dans les canalisations fixes conformément aux règles d installation afin de permettre la déconnexion de l appareil au réseau d alimentation en toute circonstance Il convient de se référer au schéma de cette notice pour respecter les points ...

Страница 18: ... utilisé pour évacuer les fumées d appareils utilisant du gaz ou un autre combustible La distance minimale à respecter entre la surface support des récipients de cuisson de la table de cuisson et la partie la plus basse de la hotte de cuisine doit être de 65 cm minimum ATTENTION Si les instructions d installation pour la table de cuisson gaz spécifient une distance plus grande celle ci doit être p...

Страница 19: ... magasins bureaux et autres environnements professionnels Les fermes et l utilisation par les clients des hôtels motels et autres environnements à caractère résidentiel Les environnements du type chambres d hôtes La restauration et autres applications similaires hormis la vente au détail Il convient de ne pas transporter l appareil seul Toute installation ou connexion non conforme aux réglementati...

Страница 20: ...A Efficacité fluidodynamique 33 9 33 9 Classe d efficacité fluidodynamique A A Efficacité lumineuse en lux Watt 22 4 20 5 Classe d efficacité lumineuse B B Efficacité de filtration des graisses en 56 4 56 4 Classe d efficacité de filtration des graisses E E Débit d air en m3 h à la vitesse minimale en fonctionnement normal 178 7 178 7 Débit d air en m3 h à la vitesse maximale en fonctionnement nor...

Страница 21: ...s l extérieur Avant d utiliser l appareil pour la première fois veuillez tenir compte des conseils suivants Montage du clapet anti retour Si la hotte aspirante n est pas équipée d un clapet anti retour 1 assemblé vous devez monter les deux moitiés sur le corps de la hotte Les illustrations ci dessous relatives au montage du clapet anti retour ne sont fournies qu à titre indicatif l évacuation peut...

Страница 22: ...ort de cheminée intérieure Voir figure 2 5 Installez le transformateur ainsi que le tuyau d extension sur la sortie Fixez le tuyau d extension sur le transformateur par l intermédiaire du collier de serrage Voir figure 3 Rappel le tuyau d extension n est pas fourni tuyau d extension 5 Installez le support de cheminée extérieure sur la cheminée extérieure à l aide de 2 vis ST4 8 mm en vous assurant...

Страница 23: ...s que le conduit d évacuation choisi pour l installation respecte les normes applicables et est ignifugé Incorrect Correct Conseils pour l installation du conduit d évacuation AVERTISSEMENT Pour des raisons de sécurité veuillez utiliser uniquement des vis de fixation ou de montage présentant les dimensions recommandées dans ce manuel d utilisation Toute installation des vis ou fixation de l appare...

Страница 24: ...eront illuminés La hotte aspirante fonctionne à vitesse élevée et l affichage LED affichera l indication 3 Si vous appuyez à nouveau sur le bouton Augmenter alors que la hotte fonctionne à vitesse élevée celle ci continuera de fonctionner à vitesse élevée 5 Bouton Diminuer Appuyez sur le bouton Diminuer pour que la hotte diminue d une vitesse l affichage indiquera la vitesse de fonctionnement actu...

Страница 25: ...ulièrement par ex une fois par semaine pour garantir une longue durée de vie Essuyez le à l aide d un chiffon propre et doux Vous pouvez également utiliser un produit de nettoyage spécial pour l acier inoxydable REMARQUE Assurez vous de bien essuyer l acier inoxydable afin d empêcher toute apparition de rayures disgracieuses Surface du panneau de commande Le revêtement du panneau de commande peut ...

Страница 26: ...hotte Poussez le bouton situé sur la poignée du filtre Relâchez la poignée une fois que le filtre est enclenché en position Répétez l opération afin d installer tous les filtres Filtre à charbon non fourni Un filtre à charbon actif peut être utilisé pour neutraliser les odeurs Normalement le filtre à charbon actif doit être changé tous les trois à six mois selon vos habitudes culinaires La procédu...

Страница 27: ... le filtre aluminium Il est conseillé de mettre la hotte en service quelques minutes avant de commencer à cuisiner De même il est conseillé de l arrêter 15 minutes après avoir terminé la cuisson pour éliminer au maximum les odeurs et évacuer l air vicié 1 2 1 2 REMARQUE Assurez vous que le filtre est correctement enclenché Sinon il se détachera et présentera un danger Lorsqu unfiltreàcharbonactife...

Страница 28: ...émontez le clapet antiretour et scellez à l aide d un produit d étanchéité Une fuite se trouve au niveau du raccordement de la cheminée et de son cache Démontez la cheminée et scellez la fuite La lumière ne fonctionne pas Les ampoules sont défectueuses cassées Remplacez les ampoules conformément au présent mode d emploi Aspiration insuffisante La distance entre la hotte et la cuisinière est trop g...

Страница 29: ...ale le symbole apposé sur sa plaque signalétique ou sur l emballage ne doit en aucun cas être jeté dans une poubelle publique ou privée destinée aux ordures ménagères L utilisateur a le droit de déposer l appareil dans des lieux publics de collecte procédant à un tri sélectif des déchets pour être soit recyclé soit réutilisé pour d autres applications conformément à la directive Nosemballagespeuve...

Страница 30: ...e werking en hun onberispelijke kwaliteit ELECTRO DEPOT beveelt de VALBERG toestellen aan en is ervan overtuigd dat u uiterst tevreden zal zijn bij elk gebruik van het toestel Welkom bij ELECTRO DEPOT Bezoek onze website www electrodepot be A Overzicht van het toestel C Praktische informatie B Gebruik van het toestel Installatie afvoer naar buiten toe Tips voor het installeren van de afvoerleiding...

Страница 31: ...en schakelaar geplaatst worden op de leidingen conform de installatievoorschriften zodat het toestel in om het even welke omstandigheden uitgeschakeld kan worden Raadpleeg het schema van deze handleiding om volgende punten te respecteren Afmetingen van de ruimte die voorzien dient te worden voor het toestel Afmetingen en plaats van de middelen om het toestel in deze ruimte te ondersteunen en vast ...

Страница 32: ...ELET Wanneer de installatie instructies voor het gasvuur een grotere afstand specificeren dient deze gerespecteerd te worden De regelingen betreffende luchtafvoer dienen nageleefd te worden WAARSCHUWING Het niet volgen van de instructies voor het installeren van schroeven of bevestigingsvoor zieningen kan tot gevaarlijke situaties leiden op het vlak van elektriciteit Indien het toestel beschikt ov...

Страница 33: ... kleinhandel Transporteer het toestel niet alleen Installaties of aansluitingen die niet conform de nationaal van kracht zijnde voorschriften zijn zijn niet voor rekening van de fabrikant Verwijder alle verpakking voor de installatie Indien het toestel niet beschikt over een netstekker mag de elektrische aansluiting enkel worden uitgevoerd door een gekwalificeerd elektricien Schakel de stroom voor...

Страница 34: ...et licht B B Vetfilteringsefficientie 56 4 56 4 Vetfilteringsefficientieklasse E E Maximaal luchtdebiet tegen minimale snelheid bij normaal gebruik m3 u 178 7 178 7 Maximaal luchtdebiet tegen maximale snelheid bij normaal gebruik m3 u Qmax 523 0 523 0 Luchtstroom bij minimale snelheid tijdens normale werking 44 44 Luchtstroom bij maximale snelheid tijdens normale werking 62 62 Elektriciteitsverbru...

Страница 35: ... toe Monteren van de terugslagklep Indien de dampkap niet uitgerust is met een gemonteerde terugslagklep 1 dient u de twee helften op de dampkap te monteren Onderstaande afbeeldingen over de montage van de terugslagklep worden enkel ter info gegeven de afvoer kan variëren naargelang de modellen en de configuraties Zo monteert u de terugslagklep 1 Monteer de twee helften 2 in de behuizing 6 Richt h...

Страница 36: ...ing 2 5 Installeer de omvormer en de verlengbuis op de uitlaat Bevestig de verlengbuis op de omvormer door middel van de spanring Zie afbeelding 3 Ter herinnering de verlengbuis wordt niet meegeleverd verlengbuis 5 Installeer de haak van de buitenste schouw op de buitenste schouw met behulp van 2 ST4 8 mm bouten en vergewis u ervan dat de binnenste schouw flexibel blijft Zie afbeelding 4 binnenste...

Страница 37: ...die voor de installatie wordt gekozen de gangbare normen respecteert en brandwerend is Fout Juist Tips voor het installeren van de afvoerleiding WAARSCHUWING Gebruik om veiligheidsredenen enkel de bevestigings of montageschroeven met de afmetingen die in deze handleiding worden aanbevolen Wanneer het toestel niet in overeenstemming met deze instructies wordt geïnstalleerd of bevestigd bestaat er e...

Страница 38: ...n De dampkap werkt op hoge snelheid en op het ledscherm zal 3 worden weergegeven Als u nogmaals op de knop Verhogen drukt terwijl de dampkap op hoge snelheid werkt dan zal deze op hoge snelheid blijven werken 5 Knop Verlagen Druk op de knop Verlagen zodat de dampkap een snelheid lager gaat werken op het scherm zal de huidige werkingssnelheid worden weergegeven Als u op de knop Verlagen drukt wanne...

Страница 39: ...rden gereinigd bv een keer per week om een lange levensduur te garanderen Droog het af met een propere en zachte doek U kunt eveneens een speciaal reinigingsproduct voor roestvrij staal gebruiken OPMERKING Let erop dat u het roestvrij staal goed afdroogt om te vermijden dat er lelijke strepen ontstaan Oppervlak van het bedieningspaneel Het oppervlak van het bedieningspaneel kan met warm zeepwater ...

Страница 40: ...knop op de handgreep van de filter Laat de handgreep los wanneer de filter op zijn plaats zit Herhaal de handeling om alle filters te plaatsen Niet meegeleverde koolstoffilter Er kan een actieve koolstoffilter geïnstalleerd worden om geuren op te vangen Normaal gesproken moet de actieve koolstoffilter elke 3 à 6 maanden worden vervangen afhankelijk van uw eetgewoonten De installatieprocedure van d...

Страница 41: ... aluminiumfilter terug Wij raden u aan de dampkap enkele minuten voordat u begint te koken in werking te stellen Zo raden we ook aan de dampkap 15 minuten nadat u gestopt bent met koken uit te schakelen om geurtjes en vieze lucht zo veel mogelijk te verwijderen 1 2 1 2 OPMERKING Zorg ervoor dat de filter correct is aangebracht Anders kan deze loskomen en een gevaar vormen Wanneer de actieve koolst...

Страница 42: ...de terugslagklep en maak dicht met een afdichtmiddel Er zit een lek ter hoogte van de aansluiting van de schouw en de afdekkap Demonteer de schouw en dicht het lek Het licht werkt niet De lampen zijn kapot gebroken Vervang de lampen in overeenstemming met deze gebruiksaanwijzing Onvoldoende afzuiging De afstand tussen de dampkap en het kookvuur is te groot Plaats de dampkap opnieuw op de juiste af...

Страница 43: ...te gebeuren volgens bepaalde regels en vraagt de betrokkenheid van zowel leverancier als consument Daarom mag uw toestel zoals aangegeven wordt door het symbool op het kenplaatje of de verpakking in geen geval in een openbare of private vuilnisbak voor huishoudelijk afval gegooid worden De gebruiker heeft het recht om het toestel naar een openbaar inzamelpunt voor selectieve afvalverwerking te bre...

Страница 44: ...vo puede estar s eg uro de que siempre quedará satisfecho al utilizarlo Le damos la bienvenida a ELECTRO DEPOT Visite nuestra página web www electrodepot es A Descripción del aparato C Información práctica B Utilización del aparato Instalación evacuación hacia el exterior Consejos para la instalación del conducto de evacuación Utilización de la campana extractora Mantenimiento y limpieza Solución ...

Страница 45: ...ruptor en las canalizaciones fijas según las reglas de instalación para que se pueda desconectar el aparatodelacorrienteeléctricabajocualquiercircunstancia Es conveniente consultar el esquema de este manual para respetar los puntos siguientes Dimensiones del espacio necesario para el aparato Dimensiones y posición de los dispositivos para soportar y fijar el aparato en ese espacio Distancias mínim...

Страница 46: ...mo mínimo ATENCIÓN Si las instrucciones de instalación de la placa de cocción de gas indican una distancia mayor se debe considerar esta última Se deben respetar las reglamentaciones relativas a la evacuación de aire ADVERTENCIA Si no respeta las instrucciones para la instalación de los tornillos o los dispositivos de fijación podría provocar daños eléctricos Si el aparato dispone de un sistema de...

Страница 47: ...esidencial Los entornos tal y como alojamientos rurales La restauración y otros usos similares excepto la venta al por menor No se recomienda transportar el aparato solo Cualquier instalación o conexión que no cumpla las normas internacionales en vigor no puede atribuírsele al fabricante Antes de la instalación retirar todos los elementos de embalaje Si el aparato no está equipado con un enchufe l...

Страница 48: ...luidodinámica A A Eficacia luminosa lux Watt 22 4 20 5 Clase de eficacia luminosa B B Eficiencia de filtrado de grasa 56 4 56 4 Clase de eficiencia de filtrado de grasa E E Flujo de aire a velocidad mínima en funcionamiento normal m3 h 178 7 178 7 Flujo de aire a velocidad máxima en funcionamiento normal m3 h Qmax 523 0 523 0 Emisiones acústicas del aire ponderadas al valor de A a la velocidad mín...

Страница 49: ...terior Montaje de la clapeta antirretorno Si la campana no dispone de una clapeta antirretorno 1 montada debe montar las dos mitades en el cuerpo de la campana Las siguientes imágenes relativas al montaje de la clapeta antirretorno se suministran a título indicativo La evacuación puede variar según los modelos y las configuraciones Para montar la clapeta antirretorno 1 Monte las dos medias partes ...

Страница 50: ...el transformador y el tubo de extensión en la salida Fije el tubo de extensión en el transformador utilizando la abrazadera Véase la figura 3 Nota el tubo de extensión no está incluido tubo de extensión 5 Instale el soporte de chimenea exterior en la chimenea exterior utilizando 2 tornillos ST4 8 mm y asegúrese de que la chimenea interior permanezca flexible Véase la figura 4 chimenea interior sop...

Страница 51: ...pete las normas aplicables y sea ignífugo Incorrecto Correcto Consejos para la instalación del conducto de evacuación ADVERTENCIA Por razones de seguridad utilice únicamente los tornillos de fijación o de montaje con las dimensiones recomendadas en este manual del usuario Cualquier instalación de los tornillos o montaje del aparato que no cumpla estas instrucciones supone un peligro eléctrico Util...

Страница 52: ...extractora funciona a velocidad elevada y la pantalla LED muestra la indicación 3 Si pulsa de nuevo el botón Aumentar cuando la campana funciona a velocidad elevada esta seguirá funcionando a velocidad elevada 5 Botón Disminuir Pulse el botón Disminuir para que la velocidad de la campana disminuya la pantalla indicará la velocidad de funcionamiento actual Si pulsa el botón Disminuir cuando la camp...

Страница 53: ...l acero inoxidable se debe limpiar regularmente por ejemplo una vez por semana para garantizar su durabilidad Límpielo con un paño limpio y suave También puede utilizar un producto de limpieza especial para el acero inoxidable OBSERVACIONES Asegúrese de secar bien el acero inoxidable para evitar la aparición de arañazos Superficie del panel de control El revestimiento del panel de control se puede...

Страница 54: ...l botón situado en el asa del filtro Suelte el asa cuando el filtro esté encajado en su lugar Repita la operación para instalar todos los filtros Filtro de carbón no incluido Se puede usar un filtro de carbón activado para neutralizar los olores Normalmente debe cambiar el filtro de carbón activado cada tres seis meses según sus costumbres culinarias El procedimiento de instalación del filtro de c...

Страница 55: ... el filtro de aluminio Se recomienda encender la campana algunos minutos antes de empezar a cocinar Asimismo se recomienda apagarla 15 minutos después de haber terminado la cocción para eliminar al máximo los olores y evacuar el aire viciado 1 2 1 2 OBSERVACIONES Asegúrese de que el filtro esté correctamente enganchado De lo contrario se moverá y supondrá un peligro Cuando se instala un filtro de ...

Страница 56: ...llo de estanqueidad Desmonte la clapeta antirretorno y séllela con un producto adecuado Hay una fuga en la conexión de la chimenea y su tapa Desmonte la chimenea y selle la fuga La luz no funciona Las bombillas están defectuosas o rotas Sustituya las bombillas conforme al presente modo de empleo Aspiración insuficiente La distancia entre la campana y la cocina es demasiado grande Coloque la campan...

Страница 57: ...edor como del usuario Es por ello que su aparato tal y como señala el símbolo que se encuentra en su placa de características o en su embalaje no debe bajo ningún concepto tirarse a un contenedor público o privado de residuos domésticos El usuario tiene derecho a depositar el aparato en un lugar público de recogida selectiva de residuos para que sea reciclado o reutilizado para otras aplicaciones ...

Страница 58: ...112 113 ES ES Notes Notities Notas Notes Notities Notas C ...

Отзывы: