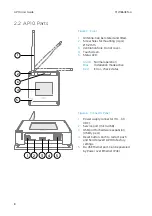


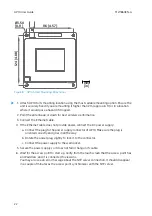


116 [4.57]
124 [4.88]
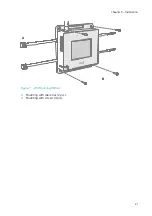
Ø3.50
[0.11]
mm
[in]
Figure 8 AP10 Screw Mounting Dimensions
1. Attach AP10 to its mounting location using the most suitable mounting option. Ensure the
unit is securely fixed if you are mounting it higher than 2 m (approx. 6 ft) or in a location
where it would pose a hazard if dropped.
2. Point the antenna up or down for best wireless performance.
3. Connect the Ethernet cable.
4. If the Ethernet cable does not provide power, connect the DC power supply:
a. Connect the plug to the power supply connector of AP10. Make sure the plug is
oriented correctly and goes in all the way.
b. Rotate the power plug slightly to lock it to the connector.
c. Connect the power supply to the wall socket.
5. Secure the power supply so it does not fall or hang on its cable.
6. Wait for the access point to start up. Verify from the touchscreen that the access point has
an IP address, and it is connected to viewLinc.
You may also see an error message about the NTP server connection. It should disappear
in a couple of minutes as the access point synchronizes with the NTP server.
AP10 User Guide
M211860EN-A
22
Содержание VaiNet AP10
Страница 1: ...M211860EN A User Guide Vaisala VaiNet Access Point AP10...
Страница 46: ...AP10 User Guide M211860EN A 44...
Страница 47: ......
Страница 48: ...www vaisala com...


