background image

VAI6-WN-U_EN - 06/14 - Vaillant

- 9 -

EN

OPERATING INSTRUCTIONS

•  If experiencing difficulties with the remote control 

communicating with the indoor unit, reduce the distance 

between the remote controller and the indoor unit.

• 

Do not drop, throw or hit the remote controller.

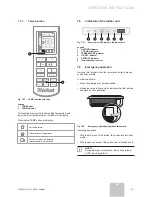
7.3.1 

Remote controller lock

In order to lock the buttons and display of the remote 

controller device:

• 

Press and hold the - & + buttons, at the same time for 

over two seconds.

The rest of the buttons are deactivated.

The lock status indicator appears.

In order to deactivate the lock:

• 

Press and hold the - & + buttons, at the same time again.

The rest of the buttons are activated.

The lock status indicator disappears.

7.3.2 

LIGHT function

Press the LIGHT button for less than 2 seconds to light the 

display of the Indoor Unit. To switch the display back off, 

press the LIGHT button for less than 2 seconds once again.

7.4 

Switching the unit on and off

In order to switch the unit on:

• 

Press the ON button on the remote controller; the unit will 

start to operate.

In order to switch the unit off:

• 

Press the OFF button on the remote controller; the unit 

will stop.

7.5 

Selection of the operation mode

7.5.1 

Automatic mode (AUTO)

In automatic mode (AUTO) the Air to Air heat pump unit 

automatically selects the cooling (COOL) or heating (HEAT) 

mode in accordance with the actual ambient temperature.

• 

In COOL mode the set room temperature is 25º C. Above 

this room temperature the unit will operate in COOL mode.

• 

In HEAT mode the set room temperature is 20º C. Below 

this room temperature the unit will operate in HEAT mode.

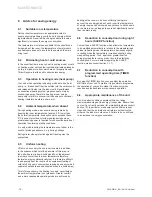
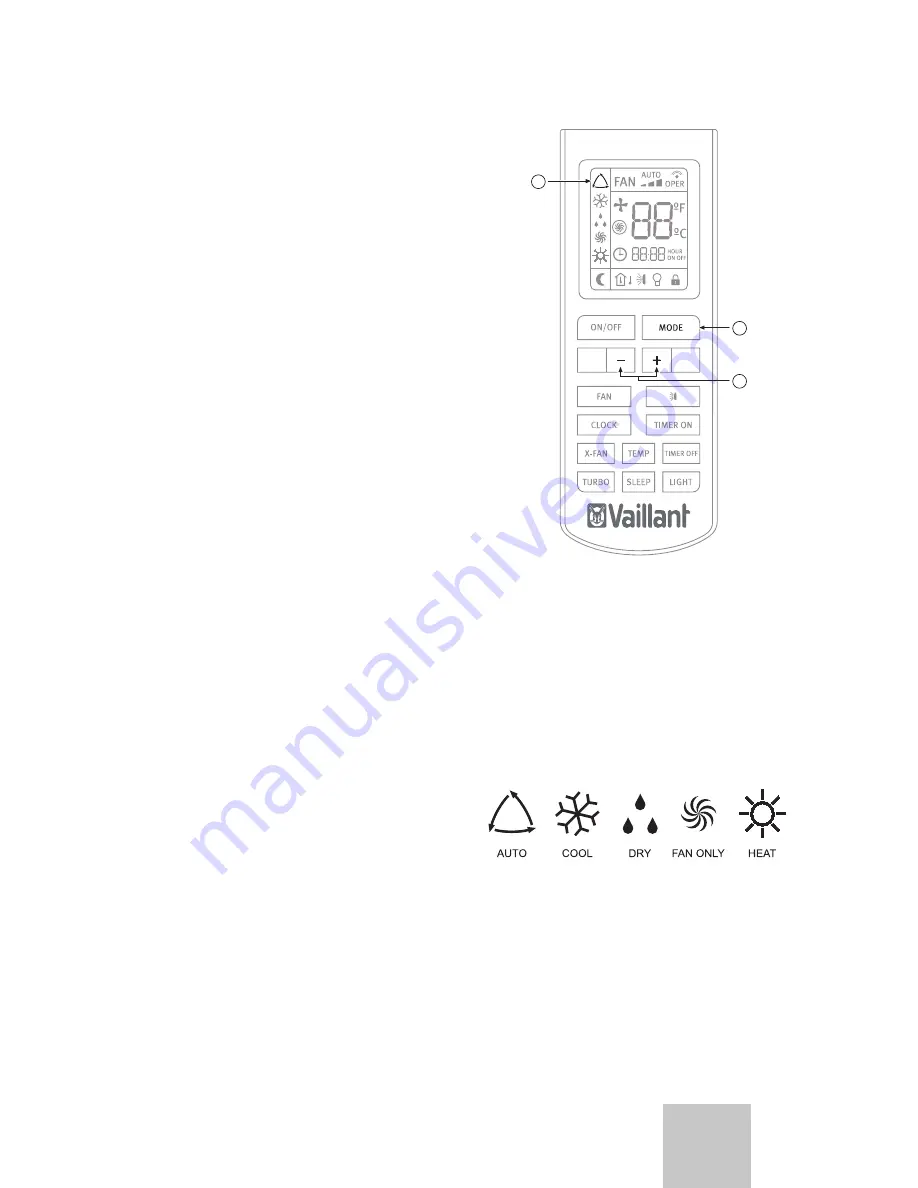
Fig. 7.3 

Automatic mode selection.

Legend

1  MODE button

2  - / + button

3  AUTO mode indicator 

In order to activate:

With the unit switched on (see section 7.4):

• 

Press the MODE button.

The different operation modes are displayed.

Fig. 7.4 

Operation modes.

• 

Select the automatic operation mode (AUTO).

• 

Press the TEMP / TIME buttons to select the temperature 

setting.

When pressing the - / + buttons, the temperature 

configuration will increase or decrease by 1ºC.

When the fan is configured in AUTO mode, the Air to Air heat 

pumps unit automatically sets the fan speed in accordance 

with the actual ambient temperature.

1

2

3

Содержание VAI 6-025 WN

Страница 1: ...User manual For the user EN ES HR IT PT TK User manual VAI 6 025 WN VAI 6 035 WN VAI 6 050 WN VAI 6 065 WN Wall Mounted Units...

Страница 2: ......

Страница 3: ...User manual For the user EN User manual VAI 6 025 WN VAI 6 035 WN VAI 6 050 WN VAI 6 065 WN Wall Mounted Units...

Страница 4: ...function 9 7 4 Switching the unit on and off 9 7 5 Selection of the operation mode 9 7 5 1 Automatic mode AUTO 9 7 5 2 Cooling mode COOL 10 7 5 3 Dehumidifying mode DRY 10 7 5 4 Fan mode FAN 11 7 5 5...

Страница 5: ...nd user manual i NOTE This equipment contains R 410A refrigerant Do not vent R 410A into atmosphere R 410A is a fluorinated greenhouse gas covered by Kyoto Protocol with a Global Warming Potential GWP...

Страница 6: ...ents Directive on the approximation of the law of the member states relating to electromagnetic compatibility Designed and built according to European Standards EN 55014 1 EN 55014 2 EN 61000 3 2 EN 6...

Страница 7: ...dust filter General filter which eliminates much of the dirt and dust circulating through the unit Remote controller Remote controller an infra red device which allows remote access and control to the...

Страница 8: ...operation please remove the batteries and reposition after a few minutes If the unit is going to be out of use for a long period remove the batteries If there is anything still showing in display just...

Страница 9: ...surface If the refrigerant spurts out and gets into your eyes it may result in serious eye injuries Seek immediate medical assistance Do not interrupt the operation of the Air to Air heat pumps unit b...

Страница 10: ...icator 4 TEMPERATURE indicator 5 TURBO indicator 6 TIMER indicator 7 LOCK indicator 8 LIGHT indicator 9 SWING indicator 10 TEMP indicator 11 SLEEP indicator 12 HEAT MODE indicator 13 FAN MODE indicato...

Страница 11: ...er the unit will start to operate In order to switch the unit off Press the OFF button on the remote controller the unit will stop 7 5 Selection of the operation mode 7 5 1 Automatic mode AUTO In auto...

Страница 12: ...des Select the cooling operation mode COOL Press the buttons to select the temperature setting When pressing the buttons the temperature configuration will increase or decrease by 1 C Press the FAN bu...

Страница 13: ...low fan speed to make the most effective mode i NOTE In dehumidifying mode prolonged use of the unit under conditions of considerable air humidity can cause drops of water to fall from the outlet lou...

Страница 14: ...5 Fan speed i NOTE When the unit stops the compressor by thermostat or when the defrost function is performing the indoor units fan will remain stopped to prevent cold air expelled 7 6 Setting the dir...

Страница 15: ...rs to reach the original set temperature i NOTE While the SLEEP function is activated the fan operates at low speed 7 7 2 TIMER ON OFF function SWITCH ON SWITCH OFF using timer The unit can be switche...

Страница 16: ...ton for less than two seconds 7 7 4 X FAN function Fig 7 19 X FAN function selection Legend 1 X FAN button 2 X FAN icon When pressing the X Fan button in COOL or DRY mode the indicator in the remote c...

Страница 17: ...unit Legend 1 HEATING indicator 2 COOLING indicator 3 TEMPERATURE indicator 4 ON OFF indicator 5 DEFROST indicator 6 Infra red signal receiver 7 9 Emergency operation Only use this function when the...

Страница 18: ...this area i e the walls doors windows ceiling and floor the adjacent rooms are cooler than the room temperature therefore thermal energy is unintentionally lost It is therefore difficult to adequately...

Страница 19: ...in cooling mode or excessively low temperature in heating mode Set the temperature properly Obstacle in front of the air inlet or outlet Remove the obstacle to allow the air to circulate properly The...

Страница 20: ...ld water Ensure that the filters are dried completely dry in the shade before putting them back into the unit The activated carbon filters where fitted can be reactivated by placing in direct sunlight...

Страница 21: ...ury and physical damage When disposing of the product ensure that is done safely and in accordance with local by laws and regulations In order to do so follow the steps described in the installation m...

Страница 22: ......

Страница 23: ...Manual de usuario Para el usuario ES Manual de usuario VAI 6 025 WN VAI 6 035 WN VAI 6 050 WN VAI 6 065 WN Murales...

Страница 24: ...n mediante temporizador 16 7 7 3 Funci n TURBO 17 7 7 4 X FAN Function 17 7 7 5 Funci n Temp 18 7 8 Indicadores en la unidad interior 18 7 9 Funcionamiento de emergencia 18 8 Consejos para el ahorro...

Страница 25: ...410A No descargar el R 410A a la atm sfera El R 410A es un gas fluorado de efecto invernadero contemplado en el Protocolo de Kyoto con un potencial de calentamiento global GWP 1975 i NOTA Antes de re...

Страница 26: ...va a la aproximaci n de las legislaciones de los Estados Miembros en materia de compatibilidad electromagn tica Dise ado y fabricado seg n la normativa europea EN 55014 1 EN 55014 2 EN 61000 3 2 EN 61...

Страница 27: ...ma modulante garantizando un gasto energ tico muy bajo El equipo puede funcionar bajo condiciones extremas de temperatura Filtro antipolvo Filtro antipolvo Control remoto Mando a distancia por infrarr...

Страница 28: ...miento de las pilas Coloque nuevamente la tapa Pulse el bot n ON OFF ver figura 7 1 para comprobar que ha colocado correctamente las pilas A B 1 2 1 i NOTA Si despu s de pulsar el bot n ON OFF no se o...

Страница 29: ...tilizando insecticidas o pesticidas Podr an depositarse en la unidad y afectar a personas al rgicas a determinadas sustancias qu micas Evite la exposici n prolongada al aire de refrigeraci n as como a...

Страница 30: ...alificada Si el fusible de la unidad interior est da ado sustit yalo por otro del tipo T 3 15A 250V Si el fusible de la unidad exterior est da ado sustit yalo por otro del tipo T 25A 250V El m todo de...

Страница 31: ...y el receptor Reduzca la distancia entre el mando y la unidad interior en locales con l mparas fluorescentes de encendido electr nico o tel fonos inal mbricos No tire ni golpee el mando 7 3 1 Bloqueo...

Страница 32: ...3 Selecci n del modo Autom tico Leyenda 1 Bot n MODE MODO 2 Bot n 3 Indicador modo AUTO Para activarlo Con el aparato conectado ver apartado 7 4 Pulse el bot n MODE Se visualizar n las diferentes moda...

Страница 33: ...ualizar n las diferentes modalidades de funcionamiento Fig 7 6 Modos de funcionamiento Seleccione el funcionamiento en modo Refrigeraci n COOL Pulse los botones para seleccionar el ajuste de temperatu...

Страница 34: ...tes modalidades de funcionamiento Fig 7 9 Modos de funcionamiento Seleccione el funcionamiento en modo Deshumidificaci n DRY Pulse los botones para seleccionar el ajuste de temperatura Al pulsar los b...

Страница 35: ...DOR 3 Indicador modo FAN Para activar el modo Ventilador FAN Con el aparato conectado ver apartado 7 4 Pulse el bot n MODE Se visualizar n las diferentes modalidades de funcionamiento Fig 7 11 Modos d...

Страница 36: ...AN la velocidad del ventilador se modificar tal y como se muestra ver figura 7 15 Fig 7 15 Velocidad de ventilador i NOTA Cuando la unidad detiene el compresor por termostato o cuando la funci n de de...

Страница 37: ...cada hora respecto a la temperatura configurada durante las dos primeras horas Alcanzado ese punto la temperatura se mantiene durante las siguientes 5 horas para despues volver a descender progresivam...

Страница 38: ...dad pulsando los botones Vuelva a pulsar el boton TIMER ON para fijar la hora Para programar la desconexi n de la unidad Con la unidad encendida pulse el bot n TIMER OFF dos veces El indicador TIMER O...

Страница 39: ...1 Indicador funci n X FAN 2 Bot n X FAN Al pulsar el bot n X Fan tanto en modo COOL o DRY el indicador en el visor del mando a distancia se iluminara y el ventilador de la unidad interior se mantendr...

Страница 40: ...res Legend 1 Indicador HEATING 2 Indicador COOLING 3 Indicador de TEMPERATURA 4 Indicador de ON OFF 5 Indicador de DESESCARCHE 6 Receptor de se ales 7 9 Funcionamiento de Emergencia Use esta funci n n...

Страница 41: ...calienta una sola estancia Adem s de las superficies que delimitan ese ambiente es decir las paredes las puertas las ventanas el techo y el suelo se calientan tambi n de forma incontrolada las estanc...

Страница 42: ...posible elimine la fuente de calor El termostato est ajustado a una temperatura demasiado alta en modo Refrigeraci n o demasiado baja en modo Calefacci n Ajuste la temperatura adecuadamente Presencia...

Страница 43: ...esente en los filtros utilizando una aspiradora o limpi ndolos con agua fr a Aseg rese de que los filtros est n completamente secos antes de volver a colocarlos en la unidad Coloque el filtro correcta...

Страница 44: ...aparato aseg rese de tomar las precauciones adecuadas Para ello siga los pasos inversos a los descritos en el manual de instalaci n y utilice las herramientas y medios de protecci n adecuados El desm...

Страница 45: ......

Страница 46: ......

Страница 47: ...Upute za rukovanje Za korisnike HR Upute za rukovanje VAI 6 025 WN VAI 6 035 WN VAI 6 050 WN VAI 6 065 WN Zidni klima ure aji...

Страница 48: ...uklju ivanje isklju ivanje uz pomo vremenske sklopke 16 7 7 3 Funkcija TURBO 17 7 7 4 Funkcija X FAN 17 7 7 5 Funkcija Temp 18 7 8 Indikatori unutarnje jedinice 18 7 9 Upravljanje u slu aju nu de 18...

Страница 49: ...re aja i NAPOMEMA Informacije vezane za ovaj ure aj podijeljene su na dva priru nika priru nik za instalaciju i priru nik za korisnika i NAPOMEMA Oprema sadr i rashladnog sredstvo R 410A Ne ispu tajte...

Страница 50: ...iva o uskla ivanju zakona dr ava lanica koji se odnose na elektromagnetsku kompatibilnost Ure aj je konstruiran i proizveden sukladno sljede im europskim standardima EN 55014 1 EN 55014 2 EN 61000 3 2...

Страница 51: ...inu prljav tine i pra ine koja cirkulira kroz jedinicu Daljinski upravlja Daljinski upravlja infracrveni ure aj koji omogu ava daljinski pristup i upravljanje funkcijama jedinice Hot start funkcija Un...

Страница 52: ...pretincu za baterije Vratite poklopac na mjesto Pritisnite tipku ON OFF vidi sliku 7 1 kako biste provjerili jesu li baterije ispravno stavljene i NAPOMENA Ako se nakon upotrebe tipke ON OFF ni ta ne...

Страница 53: ...sticide jer bi se mogli talo iti u klima ure aju i ugroziti zdravlje osoba koje alergi no reagiraju na odre ene kemijske supstancije Izbjegavajte du e izravno izlaganje hladnom zraku ili ekstremne tem...

Страница 54: ...a kvalificirana osoba Ako je pregorio osigura na unutarnjoj jedinici zamijenite ga tipom T 3 15A 250V Ako je pregorio osigura na vanjskoj jedinici zamijenite ga tipom T 25A 250V O i enje je potrebno i...

Страница 55: ...Izbjegavajte prepreke izme u upravlja a i prijemnika Smanjite udaljenost izme u daljinskog upravlja a i unutarnje jedinice ako postoje pote ko e u komunikaciji daljinskog upravlja a i unutarnje jedini...

Страница 56: ...tena na 20 C Ispod te temperature ure aj e raditi u re imu grijanja HEAT Slika 7 3 Odabir automatskog re ima rada Legenda 1 tipka MODE 2 tipka 3 indikator re ima rada AUTO za aktiviranje Kada je ure...

Страница 57: ...itisnite tipku MODE Prikazuju se razli iti re imi rada Slika 7 6 Re imi rada Odaberite hla enja COOL Pritisnite tipke kako biste odabrali postavke temperature Pritiskivanjem tipki temperatura e se sma...

Страница 58: ...snite tipku MODE Prikazuju se razli iti re imi rada Slika 7 9 Re imi rada Odaberite re im odvla ivanja DRY Pritisnite tipke kako biste odabrali postavke temperature Pritiskivanjem tipki temperatura e...

Страница 59: ...rada FAN ventilator Za aktiviranje re ima rada ventilatora FAN Kada je ure aj uklju en vidi odlomak 7 4 Pritisnite tipku MODE Prikazuju se razli iti re imi rada Slika 7 11 Re imi rada Odaberite re im...

Страница 60: ...r brzina ventilatora e se promijeniti kao to je prikazano na slici 7 15 Slika 7 15 Brzina ventilatora i NAPOMENA Kada ure aj pomo u termostata zaustavi kompresor ili kada je aktivirana funkcija odmrza...

Страница 61: ...lna temperatura raste za 1 C po satu u odnosu na temperaturu koja je bila postavljena prva dva sata Ta se nova temperatura onda odr ava tijekom narednih 5 sati a zatim se postupno smanjuje tijekom nar...

Страница 62: ...tipke Pritisnite ponovno tipku TIMER ON kako biste potvrdili eljeno vrijeme uklju ivanja Kako biste programirali isklju ivanje ure aja Dok je ure aj uklju en pritisnite tipku TIMER OFF Indikator TIMER...

Страница 63: ...tijekom re ima rada COOL hla enje ili DRY odvla ivanje uklju it e se indikator na pokaziva u daljinskog upravlja a te e ventilator unutarnje jedinice raditi jo otprilike 2 minute ak i nakon isklju iva...

Страница 64: ...dinici Legenda 1 indikator za GRIJANJE 2 indikator za HLA ENJE 3 indikator TEMPERATURE 4 indikator ON OFF uklju ivanje isklju ivanje 5 indikator za ODLE IVANJE 6 prijamnik infracrvenog svjetla 7 9 Upr...

Страница 65: ...o je u ku i zagrijana samo jedna prostorija a povr ine koje ome uju ovo podru je tj zidovi vrata prozori strop i pod susjedne prostorije su hladniji od sobne temperature to zna i da je toplinska energ...

Страница 66: ...pline Termostat je namje ten a previsoku temperaturu u re imu hla enja ili na prenisku u re imu grijanja Pravilno namjestite temperaturu Prepreka pred ulaznim ili izlaznim otvorom Zrak Uklonite prepre...

Страница 67: ...u e su iti u sjeni nakon i enja prije nego to ih ponovno umetnete u ure aj Filtri od aktivnog ugljena gdje postoje mogu se reaktivirati tako da se stave izravno na sunce Ako se i nadalje osjete udni m...

Страница 68: ...2 Zbrinjavanje proizvoda a OPASNOST od ozljeda i fizi kog o te enja Kada zbrinjavate proizvod pobrinite se da to u inite sigurno i u skladu s lokalnim propisima i zahtjevima To mo ete posti i pridr av...

Страница 69: ......

Страница 70: ......

Страница 71: ...Manuale d uso Per l utente IT Manuale d uso VAI 6 025 WN VAI 6 035 WN VAI 6 050 WN VAI 6 065 WN Unit A Parete...

Страница 72: ...3 7 7 3 Funzione TURBO 14 7 7 4 Funzione X FAN 14 7 7 5 Funzione Temp 15 7 8 Indicatori dell unit interna 15 7 9 Funzionamento d emergenza 15 8 Consigli per il risparmio energetico 16 8 1 Temperatura...

Страница 73: ...e refrigerante R 410A Non immettere il refrigerante R 410A nell atmosfera R 410A un gas fluorurato con effetto serra classificato nel Protocollo di Kioto con un potenziale di riscaldamento globale GWP...

Страница 74: ...N 50366 2004 108 EEC compresi gli emendamenti Direttiva concernente il ravvicinamento delle legislazioni de gli Stati membri relative alla compatibilit elettromagnetica Progettato e fabbricato in bas...

Страница 75: ...costi energetici particolarmente bassi Il dispositivo pu funzionare anche a condizioni estreme di temperatura Filtro antipolvere Filtro antipolvere Telecomando Telecomando ad infrarossi Funzione Hot s...

Страница 76: ...do non funziona correttamente rimuovere le batterie e ricollocarle dopo qualche minuto Rimuovere le batterie se il climatizzatore non viene utilizzato a lungo Se sul dispIaycompare ancora qualche mess...

Страница 77: ...non schiacciare n torcere i tubi non grattare via il trattamento superficiale Se il refrigerante fuoriesce penetrando negli occhi pu causare gravi lesioni ocular Non interrompere il funzionamento del...

Страница 78: ...re X FAN 4 Indicazione della TEMPERATURA 5 Indicatore TURBO 6 Indicatore TIMER 7 Indicatore LOCK 8 Indicatore LIGHT 9 Indicatore SWING 10 IndicatoreTEMP 11 Indicatore SLEEP 12 Indicatore HEAT MODE 13...

Страница 79: ...omando l unit inizier a funzionare Per spegnere l unit Premere il pulsante OFF sull unit interna o sul telecomando l unit si arrester 7 5 Selezione della modalit operativa 7 5 1 Modalit automatica AUT...

Страница 80: ...elezionare la modalit operativa Raffreddamento COOL Premere i pulsanti per selezionare l impostazione della temperatura Premendo i pulsanti l impostazione della temperatura aumenter o diminuir di 1 C...

Страница 81: ...ta automaticamente la ventola a bassa velocit per fare il modo pi efficace i NOTA In modalit Deumidificazione l uso prolungato dell unit in condizioni di elevata umidit dell aria pu provocare la cadut...

Страница 82: ...te FAN per selezionare la velocit della ventola Ad ogni pressione del pulsante FAN la velocit della ventola cambia come illustrato in Figura 7 15 Fig 7 15 Velocit della ventola i NOTA Quando l unit si...

Страница 83: ...emperatura impostata inizialmente In modalit HEAT La temperatura ambiente diminuita 1 C ogni ora rispetto alla temperatura impostata durante le prime due ore Raggiunto quel punto la temperatura manten...

Страница 84: ...caldare HEAT MODE rapidamente Fig 7 18 Selezione della funzione TURBO Legenda 1 Indicatore della funzione TURBO 2 Pulsante TURBO Per attivare o disattivare la funzione TURBO Premere il pulsante TURBO...

Страница 85: ...HEATING Riscaldamento 2 Indicatore della modalit COOLING Raffreddamento 3 Indicazione della TEMPERATURA 4 Indicatore ON OFF 5 Indicatore della modalit DEFROST Sbrinamento 6 Ricevitore di segnale 7 9...

Страница 86: ...forme Spesso all interno della casa riscaldata solo una stanza Oltre alle superfici di delimitazione delle stanze ad esempio pareti porte finestre soffitti e pavimenti anche le stanze adiacenti vengon...

Страница 87: ...modalit Raffreddamento o eccessivamente bassa in modalit Riscaldamento Impostare correttamente la temperatura Vi un ostacolo di fronte agli sfiati dell aria Rimuovere l ostacolo per consentire all ar...

Страница 88: ...basso Pulire il filtro rimuovendo la polvere o le impurit presenti per mezzo di un aspirapolvere o pulire i filtri con acqua fredda Assicurarsi che i filtri siano completamente asciutti mettendoli ad...

Страница 89: ...e scopo seguire a ritroso i passi descritti nel manuale di installazione e utilizzare gli strumenti e i mezzi di protezione necessari Assicurarsi che lo smontaggio sia eseguito da tecnici qualificati...

Страница 90: ......

Страница 91: ...Manual de Instru es Para o usu rio PT Manual de Instru es VAI 6 025 WN VAI 6 035 WN VAI 6 050 WN VAI 6 065 WN Murais...

Страница 92: ...Off Ligar Desligar com o temporizador 13 7 7 3 Fun o TURBO 14 7 7 4 Fun o X FAN 15 7 7 5 Fun o Temp 15 7 8 Indicadores da unidade interior 16 7 9 Funcionamento de emerg ncia 16 8 Conselhos sobre poupa...

Страница 93: ...refrigerante R 410A N o fa a ventilar o R 410A para a atmosfera o R 410A um g s verde fluorado protegido pelo Protocolo de Quioto com com um Potencial de Aquecimento Global GWP 1975 i O fluido refrig...

Страница 94: ...108 EEC incluindo as emendas Directiva relativa aproxima o das legisla es dos Estados membros respeitantes compatibilidade electromagn tica Concebido e fabricado de acordo com as seguintes normas euro...

Страница 95: ...ho Controlo remoto Controlo remoto um dispositivo de infravermelhos que permite o acesso e o controlo remoto s fun es do aparelho Fun o arranque quente A ventoinha da unidade interior s funciona quand...

Страница 96: ...i AVISO Se o controlo remoto n o funciona adequada mente durante a opera o por favor retire as pilhas e reponha as alguns minutos mais tarde Retire as pilhas no caso de o ar condicionado est fora de u...

Страница 97: ...o revesti mento da superf cie Se o l quido refrigerante esguichar e atingir os olhos poder provocar ferimentos graves nos olhos N o interrompa o funcionamento do arcondi cionado puxando o cabo Evite...

Страница 98: ...Legenda 1 Indicador de velocidade do VENTILADOR 2 Indicador de TRANSMISS O 3 Indicador X FAN 4 Indicador de TEMPERATURA 5 Indicador TURBO 6 Indicador TIMER 7 Indicador LOCK 8 Indicador LIGHT 9 Indicad...

Страница 99: ...ontrolo remoto o aparelho come a a funcionar Para desligar o aparelho Prima o bot o de desligar na unidade interior ou no controlo remoto o aparelho p ra de funcionar 7 5 Selec o do modo de funcioname...

Страница 100: ...MODE S o apresentados os diferentes modos de funcionamento Fig 7 6 Modos de funcionamento Seleccione o modo de funcionamento de arrefecimento COOL Prima os bot es para seleccionar a defini o da temper...

Страница 101: ...onfigura o da temperatura aumenta ou diminui 1 C Quando a ventoinha configurada no modo DRY o aparelho de ar condicionado define o ventilador de baixa velocidade para fazer o caminho mais eficaz i AVI...

Страница 102: ...namento Seleccione o modo de funcionamento de aquecimento HEAT Prima os bot es para seleccionar a defini o da temperatura Quando premir os bot es da temperatura a configura o da temperatura aumenta ou...

Страница 103: ...com rela o temperatura estabelecida durante as primeiras duas horas Atingido esse ponto a temperatura mantida para os pr ximos cinco horas ent o gradualmente diminuiu novamente durante as pr ximas du...

Страница 104: ...bot es Pressione o bot o TIMER OFF para definir o tempo Para cancelar Pressione o TIMER ON ou TIMER OFF novamente i AVISO REPEAT fun o dispon vel Se o programa n o cancelado vai ser repetido diariamen...

Страница 105: ...de apaga se automaticamente e o indicador do modo COOL na unidade interior acende se de forma intermitente de 10 em 10 segundos Esta ac o expulsa a humidade do interior da unidade de forma a mant la s...

Страница 106: ...un o s deve ser utilizada quando o controlo remoto est avariado ou quando n o o consegue encontrar Para activar Prima o bot o de funcionamento de emerg ncia emitido um aviso sonoro que indica que a fu...

Страница 107: ...ela o 8 5 Aquecimento uniforme Numa casa frequentemente s uma divis o aquecida Al m das superf cies que delimitam esta rea ou seja paredes portas janelas tecto e ch o as divis es adjacentes tamb m s o...

Страница 108: ...fonte de calor O term stato est definido para uma temperatura excessivamente elevada no modo de arrefecimento ou excessivamente baixa no modo de aquecimento Defina adequadamente a temperatura Obst cu...

Страница 109: ...ros com um aspirador ou lavando os com gua fria Certifique se de que os filtros est o completamente secos antes de os voltar a colocar no aparelho Coloque o filtro corretamente e verifique se est tota...

Страница 110: ...nc ndios 12 Retirar o produto da circula o a PERIGO de ferimentos e danos f sicos Quando deitar fora o produto certifique se de que s o tomadas as precau es necess rias Para isso siga os passos descri...

Страница 111: ......

Страница 112: ......

Страница 113: ...Kullan m k lavuzu Kullan c i in TK Kullan m k lavuzu VAI 6 025 WN VAI 6 035 WN VAI 6 050 WN VAI 6 065 WN Duvar Tipi Klima...

Страница 114: ...3 7 7 2 ZAMANLAYICI A MA KAPAMA i levi Zamanlay c kullan larak A MA KAPAMA 13 7 7 3 TURBO i levi 14 7 7 4 X FAN i levi 14 7 7 5 S cakl k i levi 15 7 8 nite g stergeleri 15 7 9 Acil durum al t rmas 15...

Страница 115: ...ve kullan m k lavuzu i NOT Bu cihaz R 410A so utucu ak kan kullan r R 410A so utucu ak kan atmosfere bo altmay n R 410A K resel Is nma Potansiyeli GWP 1975 olan ve Kyoto Prokol kapsam na giren bir fl...

Страница 116: ...rin elektromanyetik uyumlulu a ili kin kanunlar n n yak nla t r lmas na ili kin direktif Avrupa Standartlar na uygun olarak tasarlanm ve imal edilmi tir EN 55014 1 EN 55014 2 EN 61000 3 2 EN 61000 3 3...

Страница 117: ...rine uzaktan eri ime ve bu i levlerin kontrol ne izin veren bir k z l tesi cihazd r S cak ba latma i levi nite fan yaln zca i nite serpantini belirli bir s cakl a ula t ktan sonra al r B ylece s tma m...

Страница 118: ...ur ise pilleri kar p 10 sn bekleyiniz ve pilleri tekrar do ru kutuplarda tak n z nite uzun bir s re kullan lmayacaksa pilleri kart n Ekranda hala bir eyler g r nt leniyorsa s f rlama d mesine basman...

Страница 119: ...eya b k lmemeli veya herhangi bir y zeye s rt nmemelidir So utucu ak kan p sk r r ve g zlerinize temas ederse ciddi g z yaralanmalar na neden olabilir Derhal t bbi yard m al n Havadan havaya s pompas...

Страница 120: ...IK g stergesi 5 TURBO g stergesi 6 ZAMANLAYICI g stergesi 7 K L T g stergesi 8 I IK g stergesi 9 KANAT g stergesi 10 SICAKLIK g stergesi 11 UYKU MODU g stergesi 12 ISITMA MODU g stergesi 13 FAN MODU g...

Страница 121: ...may a k konuma getirmek i in Uzaktan kumanda zerindeki A MA d mesine bas n klima al maya ba lar Klimay kapal konuma getirmek i in Uzaktan kumanda zerindeki KAPAMA d mesine bas n klima durur 7 5 al ma...

Страница 122: ...6 al t rma modlar So utma al t rma modunu COOL se in d melerini kullanarak s cakl k ayar n se in d melerine her bas ld nda s cakl k de eri 1 C artar veya azal r Fan devrini se mek i in FAN d mesine ba...

Страница 123: ...devrini se er i NOT Nem alma modunda kliman n y ksek nem ko ullar nda uzun s re kullan lmas k panjurlar ndan su damlamas na neden olabilir 7 5 4 Fan modu FAN Fan modunda FAN UYKU i levi devre d b rak...

Страница 124: ...sine her bas ld nda fan devri ekil 7 15 de g sterildi i gibi de i ir ekil 7 15 Fan devri i NOT Klima kompres r termostat ile durdurdu unda veya defrost i levi ger ekle tirilirken so uk havan n i ortam...

Страница 125: ...s cakl a eri ilene kadar sonraki iki saat boyunca tekrar kademeli olarak y kseltilir i NOT UYKU i levi etkin konumdayken fan d k devirde al r 7 7 2 ZAMANLAYICI A MA KAPAMA i levi Zamanlay c kullan lar...

Страница 126: ...mesi 2 TURBO simgesi TURBO i levini etkinle tirmek veya devre d b rakmak i in TURBO d mesine iki saniyeden daha k sa s re bas n 7 7 4 X FAN i levi ekil 7 19 X FAN i levinin se imi A klamalar 1 X FAN d...

Страница 127: ...A klamalar 1 ISITMA g stergesi 2 SO UTMA g stergesi 3 SICAKLIK g stergesi 4 A IK KAPALI g stergesi 5 DEFROST g stergesi 6 K z l tesi sinyal al c 7 9 Acil durum al t rmas Bu i levi yaln zca uzaktan kum...

Страница 128: ...indeki duvarlar kap lar pencereler tavan ve zemin vb gibi y zeylere ek olarak yandaki odalar bu odadan daha serin olur ve bu nedenle istenmemesine kar l k termal enerji kay plar ya an r B yle bir duru...

Страница 129: ...bir s cakl a veya s tma modunda a r d k bir s cakl a ayarlanm t r Termostat uygun ekilde ayarlay n Hava giri i veya k n nde engel vard r Havan n do ru ekilde sirk lasyonu i in engeli kald r n Ortam s...

Страница 130: ...a temizleyin Klimaya geri takmadan nce filtrelerin tamamen kurudu undan g lgede kurutulmal d r emin olun Etkinle tirilmi karbon filtreleri tak l ysa do rudan g n na konularak yeniden etkinle tirilebil...

Страница 131: ...meydana gelebilir 12 r n n imhas a Yaralanma ve hasar TEHL KES r n atacaksan z bu i lemin g venli ve y r rl kteki kanun ve y netmeliklere uygun ekilde yap ld ndan emin olun Bunun i in montaj k lavuzun...

Страница 132: ......

Страница 133: ......

Страница 134: ......

Страница 135: ...ice Vaillant se reserva el derecho de introducir modificaciones sin previo aviso Vaillant zadr ava pravo promjene bez prethodne najave Vaillant si riserva il diritto di apportare modifiche senza preav...

Страница 136: ...Derbyshire DE56 1JT Telephone 0845 602 2922 www vaillant co uk info vaillant co uk Vaillant Isi Sanayi ve Ticaret Ltd Sti Bah elievler Mah Bosna Bulvari No 146 engelk y sk dar Istanbul PK 34688 Tel 0...

Отзывы: