VADDIO PRODUCTION VIEW 999-5650-000 Скачать руководство пользователя страница 10

ProductionVIEW HD


ProductionVIEW HD Manual 341-759 Rev. C 


               Page 10 of 24 

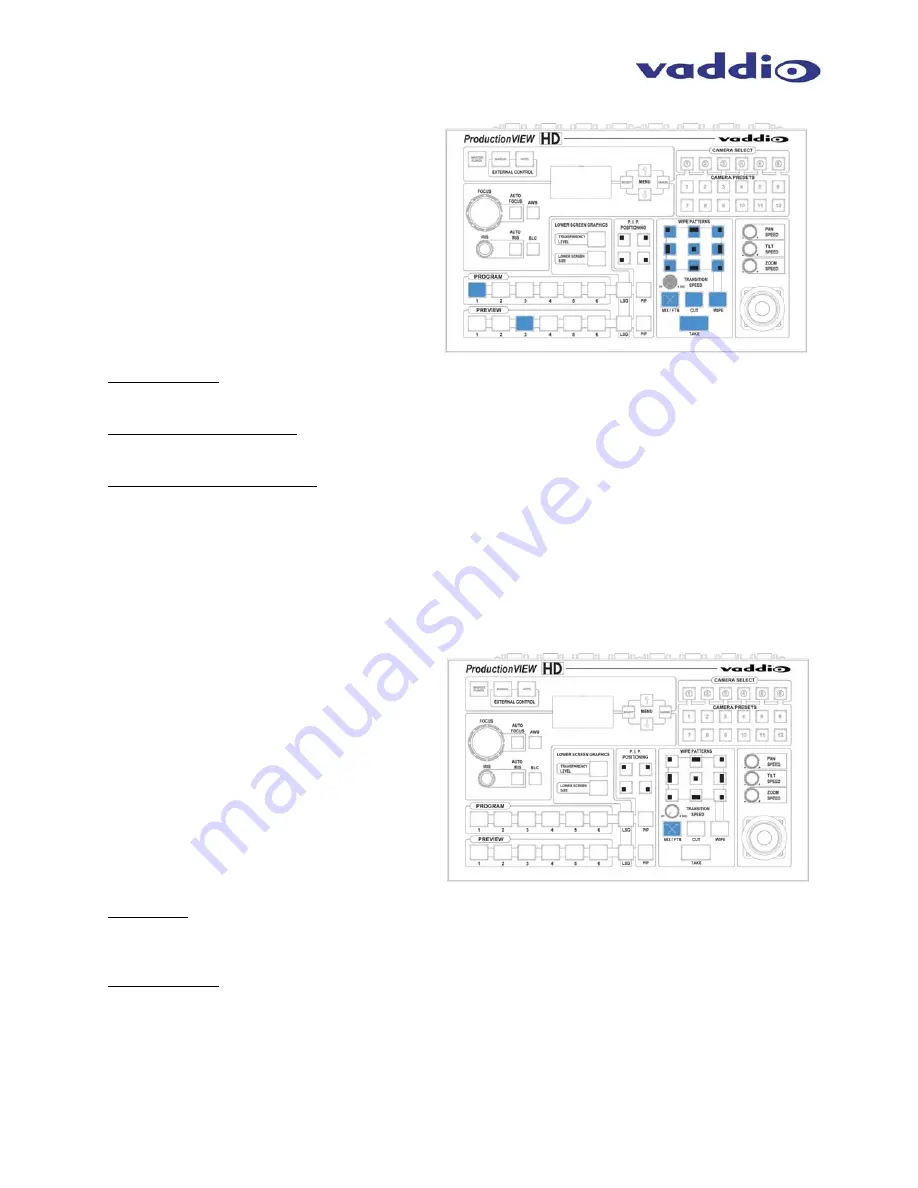
Wipe, Dissolve or Cut 

 
To set up the switcher to transition from the 
current input selected as the Program output to 
another input, select a different video signal on 
the Preview bus.  In the example to the right, 
Program is on Input 1 and Preview is on Input 3.   
 
Select the type of effect (wipe, cut or mix) that 
the switcher will use to transition from one input 
to the other.  Pressing the Take button will 
execute the transition from one input to the 
other, using the selected transition (mix, cut or 
wipe).   
 
Changing Effect:  To change the type of transition -- Wipe, Cut or Mix -- select that effect above the Take 
button.   
 
Changing Transition Speed:  Both the Mix and Wipe effects can be adjusted from .01 to 4 seconds, by 
adjusting the Transition Speed knob, which is located above the Mix button.     
 
Transitions in Dual Bus Mode:  Both Program and Preview will allow for transitions (the same type of 
transition will occur on both outputs).  To select the input that will replace the current output on each bus, 
press the input that will become the next signal sent to the output for either both buses, or one bus.  The 
signal that each bus will switch to will flash.  Press the Take button, and the transition will occur from the 
current output to the next one on each bus, one after the other.  The other option for making a transition is 
to press the flashing button a second time, which will execute the switch from the current (solid lit button) 
video signal, to the next video signal (flashing button).   


Fade To Black 

 
The Fade To Black feature allows a user to fade 
the Program and Preview outputs to black, and 
then fade the outputs up from black.  To have 
the outputs fade to black, press and hold the 
MIX/FTB button for more than one second.  The 
outputs will start fading to black.   
 
At the point where it is appropriate to fade up 
from black, press and hold the MIX/FTB button 
again, and the Preview and Program outputs will 
return to their selected video inputs that were 
selected prior to pressing FTB.   
 
FTB Speed:  The speed at which the signal fades in and out can be adjusted through the internal menu of 
ProductionVIEW HD.  Speed ranges from 01 to 40 (.01 to 4.0 seconds).  See the ProductionVIEW HD 
Menu Structure section of this manual for the location of the internal menu that adjusts FTB timing.   
 
Dual Mode FTB:  Pressing and holding FTB in Dual Mode allows both the Preview and Program outputs 
to fade to black, just as it will in Single Mode operation.   
 

Note:  FTB transition time is adjusted via the internal menu of ProductionVIEW HD, not from the Transition Speed knob.   


Содержание PRODUCTION VIEW 999-5650-000

Страница 1: ...Guide VADDIO PRODUCTIONVIEW HD Camera Control Console with HD SD Video Switching Video Transitions Up Down Converting of Inputs and Outputs Lower Screen Graphics and Automated Control Functionality Model Number 999 5600 000 NTSC Model Number 999 5600 001 PAL Camera and Electronic Products for Integrators ...

Страница 2: ...raphics may be inserted as lower thirds using the Lower Screen Graphics LSG feature LSG can be set up to cover the bottom or full screen with 10 adjustable steps of transparency levels between the graphic and the video image behind it Anything In Anything Out The inputs and outputs have discrete video resolution settings See the specifications on page 20 for additional information on all of the re...

Страница 3: ...ductionVIEW HD please read the entire manual thoroughly The system was designed built and tested for use indoors and with the provided power supply and cabling The use of a power supply other than the one provided or outdoor operation has not been tested and could damage the camera and or create a potentially unsafe operating condition Important Safeguards Read and understand all instructions befo...

Страница 4: ...llows the Program output to fade to black Transition Speed allows a wipe or fade to be adjusted up to 4 seconds 6 Take Button Pressing the Take button switches the input selected from Preview to Program in Single Bus mode In Dual Bus mode it switches the input to the input that is flashing 7 Joystick PTZ Camer a a nd Speed Controls Sony Canon and Vaddio PTZ cameras can be controlled via the 3 axis...

Страница 5: ...table via internal menu on both VGA connectors See the Video Resolutions table on page 20 for all signals and resolutions supported 15 Program Outputs Delivers the same SD composite or Y C HD Y Pb Pr or RGBHV signal selectable via internal menu on both VGA connectors See the Video Resolutions table on page 20 for all signals and resolutions supported 16 Tally Outputs Allows for connecting Producti...

Страница 6: ...l be displayed next to the menu item that is currently selected Press the Arrow Down Button adjacent to the LCD screen until the chevron is next to VIDEO OUTPUT MENU and then press the SELECT button Select PROGRAM OUTPUT which will display your options for video output resolution for the PROGRAM OUTPUT Arrow down to the appropriate resolution that is compatible with your video monitor then press t...

Страница 7: ... YPbPr RGBHV breakout cable male BNCs 6 foot 440 5600 003 15 pin to HD Component YPbPr RGBHV breakout cable female BNCs 7 inch NOTE Strain relief for the 15 pin connectors is recommended on the back of the ProductionVIEW HD WallVIEW CCU HD 18 Figure 6 Sample configuration of a WallVIEW CCU connected to ProductionVIEW HD with video control and tally cabling RS 232 Control Tally Video Figure 4 Optio...

Страница 8: ...ProductionVIEW HD Camera Control System Examples The ProductionVIEW HD is ideal for controlling multiple cameras or more complicated systems external control system SD and HD PTZ cameras a computer and DVD player with StepVIEW mats and an AutoVIEW IR as external triggers as outlined above ...

Страница 9: ...presets press and hold the Camera Select button for three seconds The Camera Presets buttons 1 thru 12 will begin to flash Move the camera to the desired PTZ position and select one of the Camera Presets buttons to store the position Repeat the process for each preset position that is required to be stored up to 12 total positions per PTZ camera A non flashing preset button has a location stored b...

Страница 10: ...ll flash Press the Take button and the transition will occur from the current output to the next one on each bus one after the other The other option for making a transition is to press the flashing button a second time which will execute the switch from the current solid lit button video signal to the next video signal flashing button Fade To Black The Fade To Black feature allows a user to fade ...

Страница 11: ...ote This feature does not work in Dual Bus mode LSG In Dual Bus Mode In Dual Bus Mode where seamless switched outputs with effects and transitions can be delivered out of both the Preview and Program outputs select the Input on each bus that will be the background image Next select the input that has the computer graphics that will be displayed the second button that is pressed on each bus will fl...

Страница 12: ...nVIEW HD is set up for Dual Mode independently switched live feeds on Preview and Program buses select the background source Next select the PIP source which will flash Press the PIP button for that specific bus and the window will be displayed Press the PIP button to remove the window from the screen PIP is discrete for the Program and Preview buses when the system is in Dual Mode Master Power Ma...

Страница 13: ...activate the Rescan Video function in the Main Menu to reset the video input priorities ProductionVIEW HD Menu Structure The ProductionVIEW HD has an 8 line LCD that displays the system menus The menus are traversed with the up down arrows select and cancel buttons The menu structure is as follows 1 st Screen ProductionVIEW HD V01 00 00 software version Rescan Cameras Video Output Video Input Defa...

Страница 14: ...nverts the Joystick Pan Direction Inverted left right Port 01 Normal or Invert Port 02 Normal or Invert Port 03 Normal or Invert Port 04 Normal or Invert Port 05 Normal or Invert Port 06 Normal or Invert Select Returns to Main Menu Tilt Dir Menu Tilt Direction Menu Select All Ports Normal or Invert default is Normal Inverts the Joystick Tilt Direction Inverted up down Port 01 Normal or Invert Port...

Страница 15: ...ect method Direct Cam Ctrl or CCU Port 03 Select method Direct Cam Ctrl or CCU Port 04 Select method Direct Cam Ctrl or CCU Port 05 Select method Direct Cam Ctrl or CCU Port 06 Select method Direct Cam Ctrl or CCU NOTE When Vaddio Quick Connect CCUs are used with ProductionVIEW HD CCU mode disables Iris functions AWB and BLC on the ProductionVIEW HD console allowing the user to control these funct...

Страница 16: ...eater chance that a blue screen will appear on the Program output when the video is switched quickly and repeatedly In most applications this will not be an issue In Single Bus Mode a faster Settle Time will also create a video roll on the Preview output which again in most situations will not be an issue FTB Time Default is 10 Select 10 to 40 Note FTB Time allows the user to set up a length of ti...

Страница 17: ...igital apparatus does not exceed the Class A limits for radio noise emissions from digital apparatus set out in the Radio Interference Regulations of the Canadian Department of Communications Le présent appareil numérique n emet pas de bruits radioélectriques dépassant les limites applicables aux appareils numeriques de la classe A préscrites dans le Règlement sur le brouillage radioélectrique édi...

Страница 18: ...de of the box when returning the product Voided warranty The warranty does not apply if the original serial number has been removed or if the product has been disassembled or damaged through misuse accident modifications or unauthorized repair Cutting the power supply cable on the secondary side low voltage side to extend the power to the device camera or controller voids the warranty for that dev...

Страница 19: ...D Inputs 1 6 Component Y Pb Pr RGBHV S Video Y C or Composite DE 15 female x 6 RS 232C Port RJ 45 x 6 Preview Out Component Y Pb Pr RGBHV S Video Y C or Composite DE 15 female x 2 Program Out Component Y Pb Pr RGBHV S Video Y C or Composite DE 15 female x 2 Control Port DB 9 F Triggers 14 pin Phoenix type connector Tally Outputs 7 pin Phoenix type connector ...

Страница 20: ...60Hz UXGA 75 162 1920 x 1200 60 HZ WUXGA 74 038 154 With reduced blanking with monitor support on VGA input Support of 1080p component video YPbPr required on third party equipment Certain equipment my not supply appropriate resolutions and therefore may not function properly ProductionVIEW HD Part Numbers 999 5600 000 NTSC 999 5600 001 PAL Compatible Cameras Vaddio Panasonic Sony Canon see page 3...

Страница 21: ...n Store x Store Preset 1 12 lsgSize x Lsg Size 0 3 WipeSel x Effect select 0 8 lsgDen x Lsg Density 0 9 0 Wipe UL LR 1 Wipe Top Bot BLC x BacklightComp On Off 2 Wipe UR LL 3 Wipe L R 4 Wipe Cnt Out AWB x AutoWhiteBal On Off 5 Wipe R L 6 Wipe LL UR 7 Wipe Bot Top PipLoc x x Location size 0 2 8 Wipe LR UL 0 UL 1 UR 2 LL 3 LR Joystick Pan Tilt Zoom JPanDir x x Port 0 6 Invert Normal JPanSpd x x Port ...

Страница 22: ...lsgDen lsgDen 9 cr Set LSG density 0 9 LSgSize LsgSize 9 cr LSG Size 0 3 Mix Mix cr Select Mix FTB mode Move Move Up Down Left Right Stop cr Move camera OnCamInit OnCamInit Home Preset12 cr Set initialization preset Home camera or content of preset12 PanSpeed PanSpeed 9 cr Set Preset Pan Speed PipLoc PipLoc 9 9 cr Select Pip location 0 3 Size 0 2 Power Power On Off cr Power system On Off Preset Pr...

Страница 23: ...232 on RJ 45 Connectors PIN Signal 1 Unused 2 Unused 3 Unused 4 Unused 5 Unused 6 GND 7 TXD to RXD of camera 8 RXD from TXD of camera Pin RGBHV YPbPr Y C Composite Adapter Cable 1 Red Pr 2 Green Y 3 Blue Pb 4 ID 5 N C 6 Red GND Pr GND 7 Green GND Y GND 8 Blue GND Pb GND 9 No Pin 10 GND GND 11 ID Y Luminance 12 ID C Chrominance 13 H Sync 14 V Sync 15 N C Composite 12345678 ...

Страница 24: ...ProductionVIEW HD ProductionVIEW HD Manual 341 759 Rev C Page 24 of 24 ...

Отзывы: