background image

 &+0RELOH'956\VWHPV                                                   8VHU0DQXDO

18

I. 

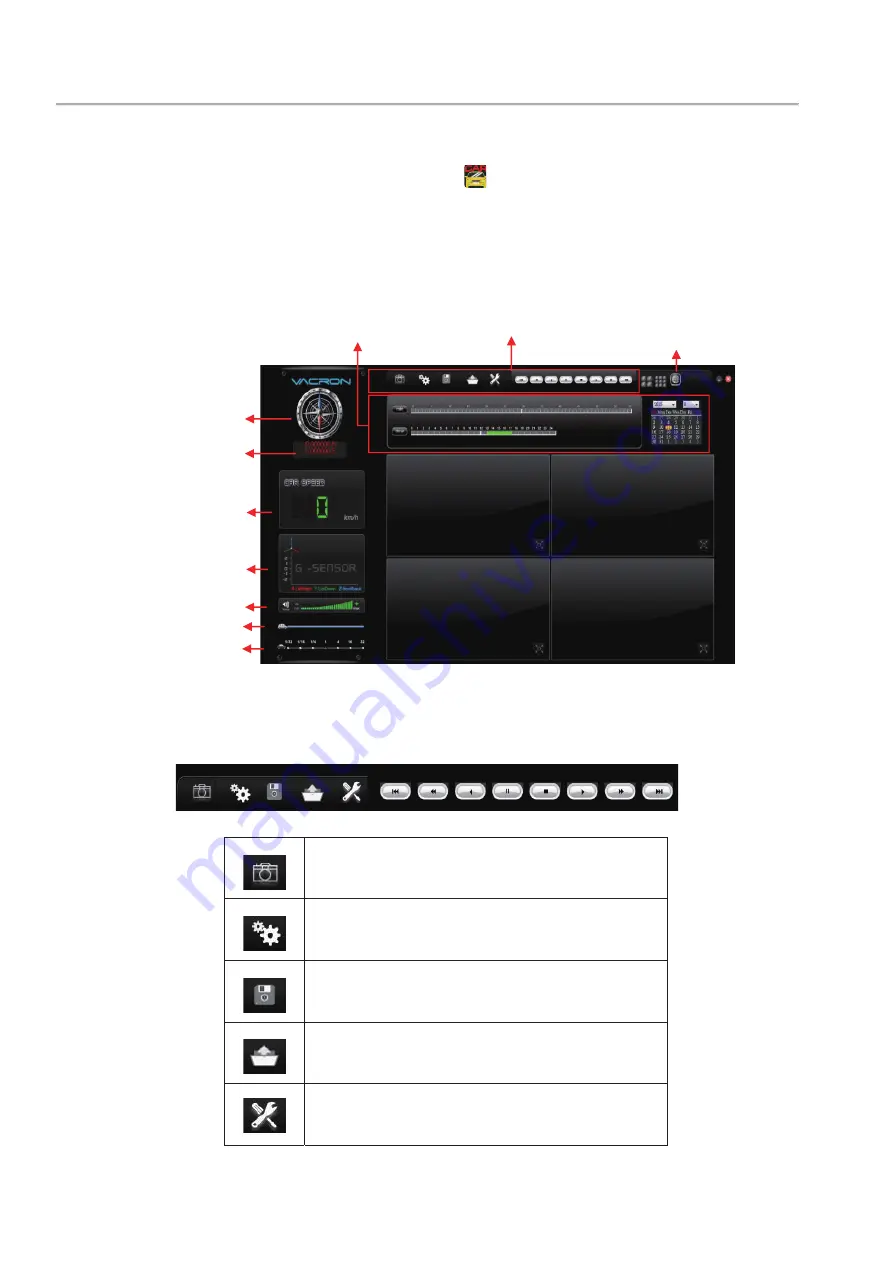
Computer Player

Run the player software CarBox2.exe     

interface as the figure below

˜

Note: DirectX 9.0 or above is required.

z

Operation Interface

(1). Tools

snapshot: Capture and save the picture
as a picture file
Configuration: Set machine related
settings
Start backup: Select the path to be
backed up for file storage
Playback : Select a video file stored on a
hard disk or computer to play it

Format: Hard disk formatting, language 

setting

*RRJOH0DS

&RQWURO,QWHUIDFH

*6HQVRU

Play Speed

Play Bar

9ROXPH

Coordinates

Speed

Playback Date Selection

/DWLWXGHDQGORQJLWXGH

Содержание VVH-MDE43E83

Страница 1: ...tems 2019 JULY V1 0 optional WIFI 4G G MOUSE optional The company reserves the right to modify this product manual without prior notice The product screen display and operation content should be based on the actual machine ...

Страница 2: ...e alter or apply heat to the product Avoid dropping or subjecting the product to severe impacts To avoid the risk of injury do not touch the interior of the product if it has been dropped or otherwise damaged Stop using the product immediately if it emits smoke a strange smell or otherwise behaves abnormally Do not use organic solvents such as alcohol benzene or thinner to clean the product Do not...

Страница 3: ...he characteristics and functions without permit Use low power radio frequency device shall not affect flight safety and interfere with legal communications when there is interference happened should be immediately suspended and improve without interfering may continue to use Legal communication means operation of radio communication in accordance with the provisions of the Telecommunications Act L...

Страница 4: ...t D Accessories E Physical Appearance F Power On Power Off G Remote Control H System Interface and Operation I Computer Player Format the hard disk For detailed operation instructions please refer to the Format Restore Hard Disk instructions 25 J Format Restore Hard Disk K 4G Network Settings ...

Страница 5: ...pport power and max 128 sensor signals of the external equipment such as temperature sensor i Button RFID readers etc 8 Support two GPS which can power up by the built in battery 7 1 Use the built in GPS GLONASS and AGPS functions of the 4G module for faster and more accurate positioning information 7 2 Support one GPS Mouse to get a stronger GPS signal 9 Built in CAN Bus 2 0A B interface for inte...

Страница 6: ... max 60V x 13 A ACC x1 B Tachometer x 1 C Speedometer x 1 D trigger x 10 3 Output x 2 max withstand 50V A Out 1 Sink current 1A max B Out 2 Sink current 0 5A max Audio Input Output Support condenser MIC and speakers Ƌ4Ω 2Wƌ Amplifier circuits are not required for MIC and speakers Communication Interface 1 CAN bus 2 wires x 1 2 RS232 2 wires x 2 3 Dual SIM cards MCU switch 4 RJ45 optional Storage D...

Страница 7: ...AP Mode 802 11b g n Application Wi Fi Connection Battery Type Lithium Battery 3 7V 2200mA Display 1 4 9CH Simplex Mode Record Playback Control Interface GUI Language English Traditional Chinese Simplified Chinese Display Mode 1 4 9CH Disconnect Detection Yes Power Specifications Operating Mode 8 60 VDC 6W 12V 0 6A Cameras and LED monitor Not connected Sleep Mode 10mA 12 6V Output Max 12V 1 35A Wei...

Страница 8: ... 0RELOH 95 6 VWHPV 8VHU 0DQXDO 4 C System Support ...

Страница 9: ...z The following accessories include in the standard package 1 5A fuse power cable x 1 2 I O cable x 2 3 Remote Control x 1 4 GPS GNSS active antenna x1 z Optional accessories 1 7 LCD Monitor 2 G MOUSE 3 Temperature 4 RFID Reader 5 IR Extension Cable ...

Страница 10: ... 0RELOH 95 6 VWHPV 8VHU 0DQXDO 6 E Physical Appearance 5 5HFHLYHU 6 0 6ORW 3RZHU 5HFRUG LJKW 60 LJKW 36 LJKW 6 DUG 6ORW 6 DUG 6ORW XVW RYHU 6 DUG 6ORW 5 WHQVLRQ DFN ...

Страница 11: ... 0RELOH 95 6 VWHPV 8VHU 0DQXDO 7 G Mouse 4G Wi Fi Optional 0RXVH QWHQQD 5HVHUYHG a DPHUD 3RUWV XQFWLRQDO 2 3RUWV 3RZHU 3RUW 9LGHR 2XWSXW 9 9 6 a DPHUD 3RUWV 6LJQDO 2 3RUWV 86 6ORW QWHQQD 36 166 QWHQQD 5 ...

Страница 12: ... D 4 IN3 IN3 D 5 IN5 IN5 D 6 IN7 IN7 D 7 IN9 IN9 D 8 GND P 9 FUEL Fuel analog1 A 10 OPT R P M D 11 IN2 IN2 D 12 IN4 IN4 D 13 IN6 IN6 D 14 IN8 IN8 D 15 IN10 IN10 D 16 5V 5V Output always P Note 1 IN1 10 Alarm Function Definition Note 2 Signal source definition A is an analog signal D is a digital signal P is power signal ...

Страница 13: ...ce D 3 MIC Microphone IN Ai 4 MIC GND D 5 RS232 TX1 RS232 TX1 Do 6 RS232 TX2 RS232 TX2 Do 7 CAN L CAN Bus_L D 8 GND P 9 OUT1 OUTPUT1 sink 1A 50v 10 OUT2 OUTPUT2 sink 0 5A 50v 11 SPK Audio out Ao 12 SPK Audio out Ao 13 RS232 RX1 RS232 RX1 Di 14 RS232 RX2 RS232 RX2 Di 15 CAN H CAN Bus_H D 16 5V 5V Output controlled P ...

Страница 14: ... 0RELOH 95 6 VWHPV 8VHU 0DQXDO 10 Note Signal source definition A is an analog signal D is a digital signal P is power signal i o are in and out respectively Output example load signal ...

Страница 15: ...and playback the recording files in computer 3 LED Lights z Record Light red Not flashing Not recording Light flashing Recording Rapid flashing Event recording z GPS Light blue Light flashing Not connected Light On Connected z Network Light green Light Off Not connected Light flashing Connected Light On Connected to the server 4 SD Card Mode When both cards are empty cards the recording priority i...

Страница 16: ...ation Remote control button Introduction Item Descripton Item Description 1 Split screen display 7 Enter 2 Force recording 8 Reverse 3 Quad full screen display 9 Fast forward 4 Speaker mute button 10 Playback mode play button 5 Menu 11 Pause 6 Navigation 12 Stop and Exit 1 2 3 4 Check if there are fluorescent lamps are used nearby ...

Страница 17: ...4 single channel display switch between display by menu selection or remote control To display quad screen press the button quad To open the menu press the menu button To play mode press the play button 2 Illustration Indicates video recording Indicates video recording Indicates audio recording Indicates event recorded Indicates Internet connected Alarm triggered ...

Страница 18: ...etting current speed and speed unit settings in the live screen Plate settings Enterable text range 烉A Z 0 9 Operating mode Set the channel mode of the system at startup Audio Recording ON OFF Recording duration after ACC off Alarm Settings Alarm trigger mode System protection Low voltage protection triggered in ACC mode Disk protection tips 4G Network 4G ON OFF and display the current setting inf...

Страница 19: ...nd clear the original settings Format hard disk After formatting the hard disk the footage will be deleted Firmware update The firmware update program is stored in the SD card and the firmware is updated by the device Keep power on during firmware update After the update is completed it will automatically reboot If both SD cards are inserted SD1 is mainly used to update the storage location ...

Страница 20: ...ile list Select the file to played back press the enter key to enter playback z Computer playback Read the hard disk for playback The hard disk that contains the video file is read by the computer and then the playback software CarBox2 exe is executed Click the icon to enter playback mode After selecting the hard disk the file list will appear and the playback will start according to the video fil...

Страница 21: ... 0RELOH 95 6 VWHPV 8VHU 0DQXDO 17 Note In use of WIN7 OS if it is not possible to read the video list Solution Right click on the CARBOX icon and execute the player as the system administrator ...

Страница 22: ...t Capture and save the picture as a picture file Configuration Set machine related settings Start backup Select the path to be backed up for file storage Playback Select a video file stored on a hard disk or computer to play it Format Hard disk formatting language setting RRJOH 0DS RQWURO QWHUIDFH 6HQVRU Play Speed Play Bar 9ROXPH Coordinates Speed Playback Date Selection DWLWXGH DQG ORQJLWXGH ...

Страница 23: ...te move the video to the next frame Next video Play the next video Snapshot Snapshot click the icon 炻The system will capture the video on screen And store in bmp file After the storage is complete the backup folder will be automatically displayed The default link is Snapshot data under the player folder Configuration Hard disk format setting Please use a computer to read the hard disk before recor...

Страница 24: ...on Video Frame Rate Resolution setting range 5 30 fps Car Information Enter the license plate number or driver s name applicable to company cars taxis and fleet UIMode Set the size of the player Password This feature encrypts the hard disk to prevent others from accessing any data Set the password to 15 characters Use the file setting and format the disk after entering the password to enter the pa...

Страница 25: ...it to display Km h Mile h Knot G sensor Sensitivity G sensor mode and Sensitivity Settings Daylight saving time Applicable to countries implementing daylight saving time zones Backup Start Backup Store video data on your hard drive on your computer for easy playback Click The disk backup will appear as below start backup menu screen ...

Страница 26: ...lect backup data access format Backup format SD Format 6DYH DV VG ILOH AVI Format 6DYH DV DYL ILOH Note Backing up in SD file format the file format will include the speedometer position table latitude and longitude and G SENSOR record data If you back up in avi format only the video and audio data is available so it is recommended to use SD format ...

Страница 27: ... 0RELOH 95 6 VWHPV 8VHU 0DQXDO 23 Step 4 Backup the video file according to the requirements and set the required time range Step 5 Select he path to the backup folder Step 6 Start the backup ...

Страница 28: ... 0RELOH 95 6 VWHPV 8VHU 0DQXDO 24 Playback Playback video Select a video file stored on a hard disk or computer to play it 1 SD Card 6HOHFW WKH ILOH WR SOD ...

Страница 29: ...operation instructions please refer to the Format Restore Hard Disk instructions 2 GPS Coordinates latitude and longitude Coordinate latitude and longitude Display driving direction and latitude and longitude need to display with G Mouse function Coordinates Latitude Longitude ...

Страница 30: ...e left and right levels of the sensor body Y烉 Changes in front and rear levels of the sensing body Z烉Inducing changes in the body 4 Volume Volume Control Tool Use the left mouse button to click or to adjust the volume 5 Play Bar Play Bar Left and right can be used to move the player car quickly select the playback time 6 Play Speed Play Speed Adjustable 2x 16x fast playback and 1 2x 1 16x slow pla...

Страница 31: ... 0RELOH 95 6 VWHPV 8VHU 0DQXDO 27 7 Playback Date Selection Playback Date Selection Divide by date and time to show the video file time on the hard disk Date Search ...

Страница 32: ...med first Ɉ Before formatting please note if there is important data in the hard disk not backup yet The format of the hard disk can be divided into local format and computer format local format The local computer performs the formatting of the hard disk as follows Step 1 Use remote control to enter menu and press Format Disk Step 2 Select and press OK for hard disk formatting Step 3 When the scre...

Страница 33: ...ing the hard disk from the computer use the computer to read the hard disk and then execute the computer side playback software CarBox2 exe Step 2 Click Enter format tool menu Select the corresponding storage device Step 3 Click Format Step 4 Select Yes ...

Страница 34: ...e host computer is used is moved to other storage applications the hard disk must be restored before it can be used for general storage purposes Before performing the restore action please note that if there is any important data on the hard disk not backup yet 1 Hard Drive Restore Hard disk restore steps are as follows Sept 1 After removing the hard disk from this unit use a computer to read the ...

Страница 35: ...0DQXDO 31 6WHS W WKLV SRLQW 5HVWRUH WKLV GLVN ZLOO GLVSOD 3UHVV HV WR UHVWRUH WKH KDUG GLVN Step 4 System pops up the format window check Quick Format and press start Step 5 Restore this disk will display Press OK to format it ...

Страница 36: ...RELOH 95 6 VWHPV 8VHU 0DQXDO 32 Step 6 After format completed Format completed will display Press OK and close format disk window Step 7 After the completion Disk Restore Successful will display Press OK ...

Страница 37: ...following uses HUAWEI s CHT E180 model 3 5G USB wireless network adapter as an example 炸 Step 1 After installing the 4G network card on the SIM card connect the 4G network card to the computer and the system will automatically execute the Mobile Partner Step 2 When the program opens go to Tools Æ ÆPIN Operation Æ Disable PIN Verification ...

Страница 38: ...4 Confirm PIN cancellation PIN code completed Step 5 After completing the above actions insert the SIM card into the SIM card slot on this unit and turn on the power before connecting 3G Network Settings Set the relevant parameters of this machine 3G Network ˤ Step 1 First open following page will open ...

Страница 39: ...erver Port default 13579 APN 4G Network access point name Default is APN used by Taiwanese telecom operators If other areas need to use please consult with APN used by local telecom operators Dial Up Number 4G dial up connection setting The default is the dial up connection code used by Taiwanese telecom operators If you need to use in other areas please consult the dial up connection settings use...

Страница 40: ...s SD1 port and restart the unit After booting If you successfully update the parameters after about 10 seconds after entering the system it will automatically restart Step 5 After the automatic reboot enter the 3G 4G network page in the main menu to confirm that the parameters have been modified successfully When the update is completed the information will show the current Internet information ab...

Страница 41: ...Made in Taiwan ...

Отзывы: