background image

- 2 -

GETTING STARTED

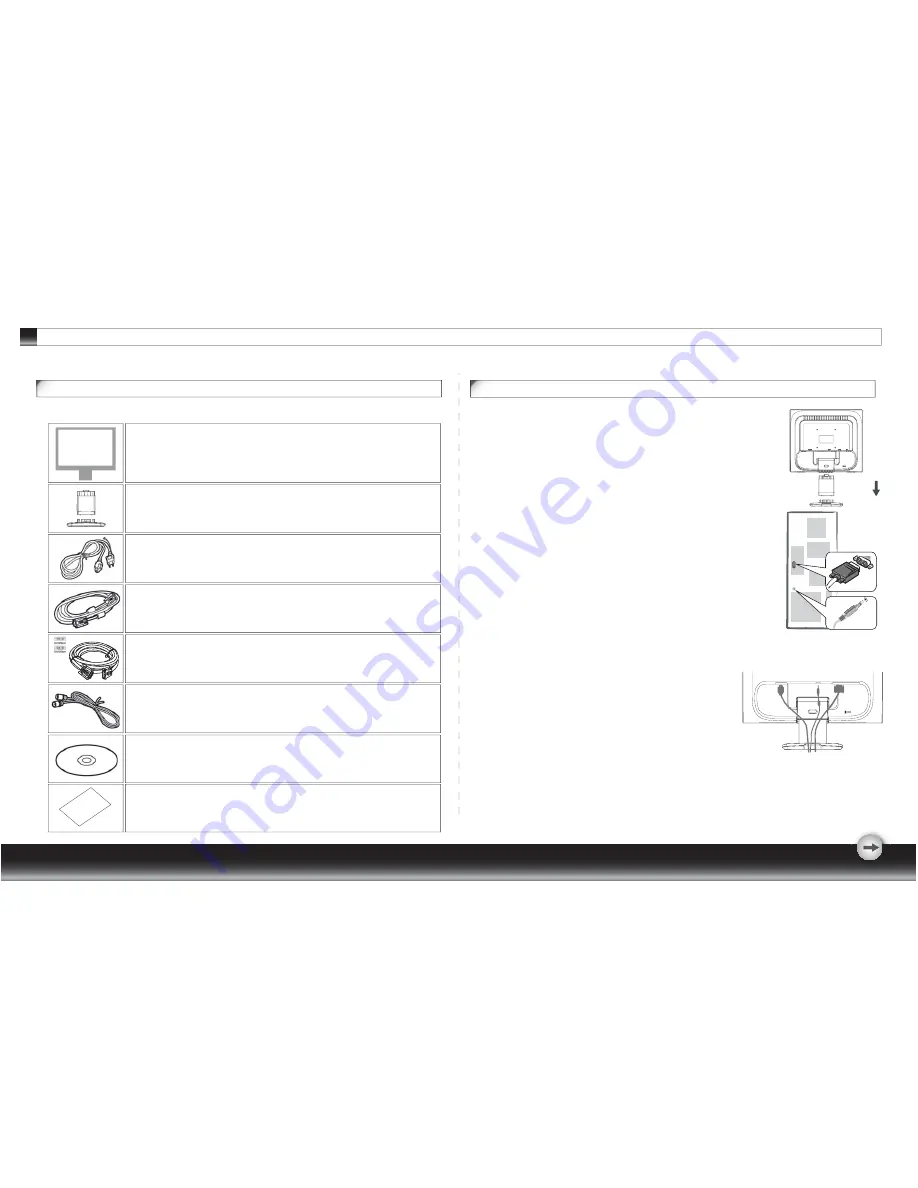
1.Setting up the monitor
   1.1 Take out the monitor, stand and monitor base from the package.

   1.2 Place the monitor base on the desk and then slide the neck 
         into the slots of base. (Make sure the direction of the neck is 
         correct.)
   1.3 Grasp the monitor with both hands and then slide the 
         monitor into the neck. (Make sure the direction of the neck 
         is correct)

2.Connecting signal cable
   2.1 Switch off your computer.
   2.2 Connect the signal cable to the D-SUB or DVI port at the 
         rear of the monitor and tighten the connector screws
   2.3 Connect the other end of signal cable to the computer's 
         VGA port or DVI port and tighten the connector screws.
   2.4 Note: Ensure the display setting does not exceed 
         1280x1024, 75Hz.
3.Connecting audio cable (with audio option)
   3.1 Plug the audio cable into the AUDIO port at the rear of 
         the monitor.
   3.2 Plug the other end of the audio cable into the audio 
         port of your computer or other audio source.

Monitor installation

Package contents

Before beginning, ensure that the carton contains the following items:

1. LCD Monitor

2. Monitor Base and Neck

(the shape of base may vary according to the monitor model)

3. Power Cord

(plug may vary according to the electrical standards

     for your area)

4. Analog Signal Cable

5. Digital Signal Cable

(optional)

6. Audio Cable

(optional)

7. CD-ROM

(contains user manual)

8. Quick Installation Guide

4.Connecting power
   4.1 Plug the female end of the power cord into the 
         POWER port at the rear of the monitor.
   4.2 Plug the male end of the power cord into a power outlet.
5.Switching on

   5.1 Switch on your computer.
You should now be able to see the picture. If not , refer to the trouble shooting section of 
this guide.

POWER

AUDIO

D-SUB

DVI

Содержание D1711-N6

Страница 1: ...17 19 LCD Monitor User Manual English Deutsch Fran ais Italiano Espa ol 3 FF Svenska Suomi Dansk Polski Nederlands...

Страница 2: ...1 Transporting the monitor 1 GETTING STARTED Package contents 2 Monitor installation 2 Identifying parts and controls 3 Customizing your Monitor 3 3 Introduction to Hotkeys 4 OSD icon list 5 Troubles...

Страница 3: ...rgy saving mode after a certain time beneficial both for the user and the environment Electrical safety Emissions Electromagnetic fields Noise emissions Ecology The product must be prepared for recycl...

Страница 4: ...se to heat sources such as radiators or air ducts or in a location exposed to direct sunlight excessive dust mechanical vibration or shock 3 The apparatus shall only be used between 5 tilted forward a...

Страница 5: ...with audio option 3 1 Plug the audio cable into the AUDIO port at the rear of the monitor 3 2 Plug the other end of the audio cable into the audio port of your computer or other audio source Monitor...

Страница 6: ...show that a button represents different functions in different levels of the architecture Customizing your Monitor Important Important The On Screen Display OSD system provides a full range of customi...

Страница 7: ...le OSD system is like a map This tree like directory can help you to become aware of the whole system During the whole process you need to know the following actions 1 Activate the OSD main menu Under...

Страница 8: ...ance the graphic effects according to the different situations of the display contents THEME MODE OSD MENU LANGUAGE Select your own preference of language of OSD menu COLOR TEMPERATURE Adjust the mech...

Страница 9: ...press a key on the keyboard to wake up the computer 3 Check if the video signal cable is properly connected to the monitor and computer Symptom Check Items 1 Check if your computer is turned on 2 Chec...

Страница 10: ...4 Normalization of VGA card s deviation will be acceptable 5 Horizontal Frequency 6 Vertical Frequency 7 Technical Features and Specifications Interface Frequency 30 82KHz 56 76Hz Net Net Tilt Angle A...

Страница 11: ...not only save electricity but extend the life of the lights 3 Working principle of the Monitor Life Extension function To minimize the impact of frequent turn on and turn off of LCD monitor the Life...

Страница 12: ...sleeping mode Even though comparing the advantages of both conditions we still recommend you strongly to set your monitor in Advanced Power Saving mode 5 How to engage the Monitor Life Extension funct...

Страница 13: ...tructions may cause harmful interference to radio communications However there is no guarantee that interference will not occur in a particular installation If this equipment does cause harmful interf...

Отзывы: