background image


GERMAN

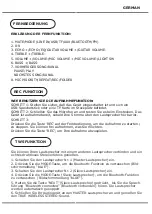
Sie können Ihren Lautsprecher mit einem anderen Lautsprecher verbinden und ein 

echtes drahtloses Stereoerlebnis genießen.

1. Schalten Sie den Lautsprecher Nr. 1 (Master-Lautsprecher) ein.

2. Drücken Sie die MODE-Taste, um die Bluetooth-Funktion zu vertauschen (Bild-

schirmmeldung "bLUE").

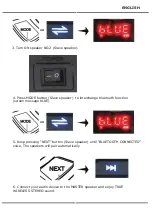
3. Schalten Sie den Lautsprecher Nr. 2 (Slave-Lautsprecher) ein.

4. Drücken Sie die MODE-Taste (Slave-Lautsprecher), um die Bluetooth-Funktion 

zu vertauschen  (Bildschirmmeldung "bLUE").

5. Halten Sie die Taste "NEXT" (Slave-Lautsprecher) gedrückt,  bis Sie die Sprach-

führung "Bluetooth connected" (Bluetooth verbunden) hören. Die Lautsprecher 

werden automatisch gekoppelt.

6. Schließen Sie Ihr Audiogerät an den MASTER-Lautsprecher an und genießen Sie 

den TRUE WIRELESS STEREO-Sound.


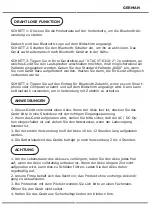
DRAHTLOSE FUNKTION

SCHRITT 1: Drücken Sie die Modustaste auf der Vorderseite, um die Bluetooth-An-

wendung zu starten.

Dadurch wird das Bluetooth-Logo auf dem Bildschirm angezeigt.
SCHRITT 2: Schalten Sie den Bluetooth-Schalter ein, um ihn zu aktivieren. Das 

Gerät sucht automatisch nach Bluetooth-Geräten in der Nähe.

SCHRITT 3: Tippen Sie in Ihrer Geräteliste auf "V-TAC VT-6310-2". Je nachdem, an 

welches Gerät Sie den Lautsprecher anschließen möchten, muß möglicherweise ein 

Paßcode eingegeben werden. Geben Sie den Standard-Paßcode „0000“ ein, wenn 

Sie vom Gerät dazu aufgefordert werden. Warten Sie dann, bis Ihr Gerät erfolgreich 

verbunden wurde.

SCHRITT 4: Tippen Sie auf den Eintrag für Bluetooth-Zubehör, wenn es vom Smart-

phone oder Computer erkannt und auf dem Bildschirm angezeigt wird. Dann kann 

es Bluetooth verwenden, um in Verbindung mit Zubehör zu arbeiten.

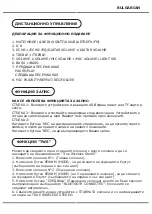
ANWEISUNGEN

1. Dieses Gerät verwendet einen Akku. Wenn der Akku leer ist, stecken Sie das 

Gerät bitte in eine Steckdose mit der richtigen Eingangsspannung.
2. Wenn das Gerät aufgeladen wird, stellen Sie bitte sicher, daß die AC / DC-Op-

tion eingeschaltet ist und ziehen Sie den Netzstecker, wenn der Ladevorgang 

beendet ist.
3. Bei der ersten Verwendung muß der Akku 10 bis 12 Stunden lang aufgeladen 

werden.
4. Die Batterielaufzeit des Geräts beträgt je nach Verwendung 2 bis 4 Stunden.

ACHTUNG

1. Um die Lebensdauer des Akkus zu verlängern, laden Sie den Akku jedes Mal 

auf, wenn der Akku vollständig entladen ist. Wenn der Akku längere Zeit nicht 

aufgeladen wird, kann dies zu Schäden führen. Laden Sie den Akku daher 

regelmäßig auf.
2. Unsere Firma behält sich das Recht vor, das Produkt ohne vorherige Ankündi-

gung zu aktualisieren.
3. Bei Problemen mit dem Produkt wenden Sie sich bitte an einen Fachmann.
Öffnen Sie das Gerät nicht selbst.
4. Halten Sie das Gerät aus Sicherheitsgründen von Kindern fern.

Содержание VT-6310-2

Страница 1: ...OW 9B INTRODUCTION WARRANTY Multi Language Manual QR CODE Please scan the QR code to access the manual in multiple languages Thank you for selecting and buying V TAC Product V TAC will serve you the b...

Страница 2: ...oslu iti na najbolji mogu i na in Molimo pa ljivo pro itajte ove upute prije instalacije i spremite upute za budu u uporabu Ako imate dodatnih pitanja molimo obratite se na emprodava u ili lokalnom tr...

Страница 3: ...rzeczyta t instrukcje uwa nie przed przyst pieniem do zainstalowania i zachowa j do u ytku w przysz o ci Je li masz jakie pytania prosz skontaktowa si z naszym Przedst awicielem lub z dystrybutorem od...

Страница 4: ...ENGLISH ENGLISH P M P O 15 Charging The led light will be in red color Full When full charged the led light will be in green color Charging Time 5 to 6 hours Working Time 2 to 4 hours...

Страница 5: ...DE LINE IN USB TF AUX BLUETOOTH FM 2 0 9 3 ECHO ECHO EQ GUITAR VOLUME GUITAR VOLUME 4 TREBLE TREBLE 5 VOLUME VOLUME MIC VOLUME MIC VOLUME LIGHT SW 6 BASS BASS 7 PREVIOUS SONG CHANNEL PAUSE PLAY NEXT S...

Страница 6: ...is audible from the speaker STEP 3 Press the button REC on the remote control to start stop recording you are freely to rec what you want Press the button REC to play your recording REC FUNCTION REC...

Страница 7: ...unction screen message bLUE 5 Keep pressing NEXT button Slave speaker until BLUETOOTH CONNECTED voice The speakers will pair automatically 6 Connect your audio device to the MASTER speaker and enjoy T...

Страница 8: ...tion with accessory INSTRUCTIONS 1 This unit uses a rechargeable battery When the battery power is depleted please plug the device to an electric socket with the correct input voltage 2 When the unit...

Страница 9: ...eur esclave pour changer la fonction Bluetooth message l cran bLUE 5 Continuez appuyer sur la touche NEXT haut parleur esclave jusqu ce que BLUETOOTH CONNECTED soit activ Les haut parleurs s accoupler...

Страница 10: ...Ce dispositif utilise une batterie rechargeable Lorsque la batterie est puis e veuillez brancher le dispositif une prise lectrique avec la tension d entr e correcte 2 Lorsque le dispositif est en char...

Страница 11: ...die Bluetooth Funktion zu vertauschen Bildschirmmeldung bLUE 5 Halten Sie die Taste NEXT Slave Lautsprecher gedr ckt bis Sie die Sprach f hrung Bluetooth connected Bluetooth verbunden h ren Die Lauts...

Страница 12: ...in Verbindung mit Zubeh r zu arbeiten ANWEISUNGEN 1 Dieses Ger t verwendet einen Akku Wenn der Akku leer ist stecken Sie das Ger t bitte in eine Steckdose mit der richtigen Eingangsspannung 2 Wenn da...

Страница 13: ...TAR VOLUME GUITAR VOLUME 4 TREBLE TREBLE 5 VOLUME VOLUME MIC VOLUME MIC VOLUME LIGHT SW 6 BASS BASS 7 PAUSE PLAY 8 MIC PRIORITY REPEAT REC FOLDER BULGARIAN True Wireless Stereo 1 1 2 MODE 3 2 4 MODE 5...

Страница 14: ...BULGARIAN 1 Bluetooth Bluetooth 2 Bluetooth Bluetooth 3 V TAC VT 6310 2 0000 4 Bluetooth Bluetooth 1 2 AC DC 3 10 12 4 2 4 1 2 3 4...

Страница 15: ...u nik br 2 slave zvu nik 4 Pritisnite tipku MODE na slave zvu niku za izbor funkcije bluetooth poruka na zaslonu je plave bojea 5 Pritisnite tipku SLJEDE E slave zvu nik dok se ne uje zvu na obavijest...

Страница 16: ...ete koristiti Bluetooth za rad s dodatnom opremom UPUTE 1 Ovaj ure aj koristi punjivu bateriju Kada se baterija isprazni uklju ite ure aj u elektri nu uti nicu s odgovaraju im ulaznim naponom 2 Dok p...

Страница 17: ...o bot o MODE MODO no Altifalante subordinado para alterar a fun o bluetooth a mensagem na tela azul 5 Prima o bot o SEGUINTE Altifalante subordinado at que a mensagem BLUE TOOTH CONNECTED BLUETOOTH C...

Страница 18: ...Este dispositivo usa uma bateria recarreg vel Quando a bateria estiver esgotada conecte o dispositivo a uma tomada el trica com tens o de entrada apropriada 2 Enquanto carrega o dispositivo ligue a op...

Страница 19: ...n el altavoz subordinado para cambiar la funci n bluetooth el mensaje en pantalla es azul 5 Presione el bot n SIGUIENTE Altavoz subordinado hasta que se reproduzca el mensaje BLUETOOTH CONNECTED BLUET...

Страница 20: ...orio INSTRUCCIONES 1 Este dispositivo utiliza una bater a recargable Cuando se agote la energ a de la bater a conecte el dispositivo a una toma el ctrica con el voltaje de entrada correcto 2 Cuando el...

Страница 21: ...angsz r 4 Nyomja meg a MODE gombot al rendelt hangsz r a Bluetooth funkci cser j hez bLUE k perny zenet 5 Tartsa lenyomva a NEXT gombot al rendelt hangsz r am g a BLUETOOTH CONNECTED hang megsz lal A...

Страница 22: ...egy tt m k dhet UTAS T S 1 Ez az egys g jrat lthet akkumul tort haszn l Ha az akkumul tor lemer lt csatlakoztassa az eszk zt a megfelel bemeneti fesz lts g elektromos aljza thoz 2 Ha a k sz l k t lt...

Страница 23: ...e subordinato per modificare la funzione bluetooth il messaggio sullo schermo di colore blue 5 Continuare a premere il pulsante NEXT dell altoparlante subordinato fino a quando viene riprodotto il mes...

Страница 24: ...e Bluetooth per operare in combinazione con l accessorio ISTRUZIONI 1 Questa unit utilizza una batteria ricaricabile Quando la batteria scarica collegare il dispositivo a una presa elettrica con una t...

Страница 25: ...EQ GUITAR VOLUME GUITAR 4 TREBLE TREBLE 5 VOLUME VOLUME MIC VOLUME MIC VOLUME LIGHT SW 6 BASS BASS 7 8 MIC REPEAT REC FOLDER GREEK True Wireless Stereo 1 1 2 MODE Bluetooth 3 2 4 MODE Bluetooth 5 BLUE...

Страница 26: ...GREEK 1 Bluetooth Bluetooth 2 Bluetooth Bluetooth 3 V TAC VT 6310 2 0000 4 Bluetooth smartphone Bluetooth 1 2 AC DC 3 10 12 4 2 4 1 2 3 4...

Страница 27: ...nij przycisk TRYB MODE na g o niku podrz dnym aby prze czy funkcj Bluetooth komunikat b kitnego koloru na wy wietlaczu 5 Naci nij przycisk NEXT na g o niku podrz dnym a us yszysz komunikat d wi kowy...

Страница 28: ...o pracy z akcesorium INSTRUKCJE 1 To urz dzenie wykorzystuje akumulator Gdy bateria jest na wyczerpaniu pod cz urz dzenie do gniazdka elektrycznego o odpowiednim napi ciu wej cio wym 2 Podczas adowani...

Страница 29: ...donate ca s schimba i func ia bluetooth comunicarea pe ecran este de culoarea albastr 5 Ap sa i pe butonul URM TORUL Box subordonat i ine i l ap sat p n nu auzi i semnalul sonor pentru comunicarea BLU...

Страница 30: ...ia simultan a accesoriului INSTRUC IUNI 1 Acest dispozitiv folose te baterie re nc rcabil C nd bateria se descarc conecta i dispozitivul la o priz electric cu o tensiune de intrare potrivit 2 n timpul...

Страница 31: ...e reproduktor 2 Pod zen reproduktor 4 Stisknut m tla tka MODE Pod zen ho reproduktoru zm n te funkci Bluetooth zpr va na obrazovce je modr 5 Stiskn te tla tko NEXT Pod zen reproduktor dokud nezazn zpr...

Страница 32: ...e pou t Bluetooth pro pr ci s p slu enstv m POKYNY 1 Toto za zen pou v dob jec baterii Kdy je baterie vybit zapojte za zen do elektrick z suvky s odpov daj c m vstupn m nap t m 2 P i nab jen za zen za...

Отзывы: