


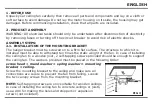


2.5. BLADE ASSEMBLY
Insert the blades through the motor
housing’s side slots and align them with
the 3 holes.
Secure the blades with 3 blade screws
and ensure that the 3 blade screws are
tightened properly. Do not over tighten
the screws as this can damage the
blades. Repeat this process for all
blades.
NOTE:
if installing more than 1 fan, be
careful not to mix blades and screws as
each model is designed with specific
materials and parts.
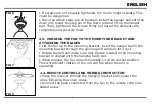
2.6. INSTALLING THE LED LIGHT AND GLASS SHADE
ENGLISH
FIG 10
Содержание VT-6052-5
Страница 33: ...8 8 8 2 3 m 45 kg 8 3 mm BULGARIAN...
Страница 34: ...150 mm 6 BULGARIAN...
Страница 35: ...BG V TAC 2 10 12 24 BULGARIAN...
Страница 36: ...1 1 2 3 4 5 6 7 8 1 2 2 1 3 3 2 9 10 11 12 13 14 15 BULGARIAN...
Страница 37: ...2 2 4 U 4 5 U U 5 5 6 6 2 3 7 7 7 2 4 8 9 BULGARIAN...
Страница 38: ...2 5 3 10 3 10 10 2 6 LED 11 3 12 H M L BULGARIAN...
Страница 39: ...1H 1 2H 2 4H 4 8H 8 1 2 1 A23 12V 3 4 1 2 BULGARIAN...
Страница 40: ...5 1 2 1 2 3 4 5 6 7 1 2 3 1 2 BULGARIAN...
Страница 81: ...8 8 8 2 3 45 kg 8 GREEK...
Страница 82: ...3 mm 150 mm 6 GREEK...
Страница 83: ...EL V TAC V TAC 2 10 12 24 GREEK...
Страница 84: ...1 1 2 3 4 5 6 7 8 1 2 2 1 3 3 2 9 10 11 12 13 14 15 GREEK...
Страница 85: ...2 2 4 U 4 5 U U 5 5 6 6 2 3 2 4 8 9 2 5 3 10 GREEK...
Страница 86: ...3 10 10 2 6 LED 11 3 12 H M L 1H 1 2H 2 4H 4 8H 8 GREEK...
Страница 87: ...1 2 A23 12V 3 4 1 2 GREEK...
Страница 88: ...5 1 2 1 2 3 4 5 6 7 1 2 3 1 2 GREEK...