background image

BioSpectrum Imaging System 


14 

Hardware Installation 

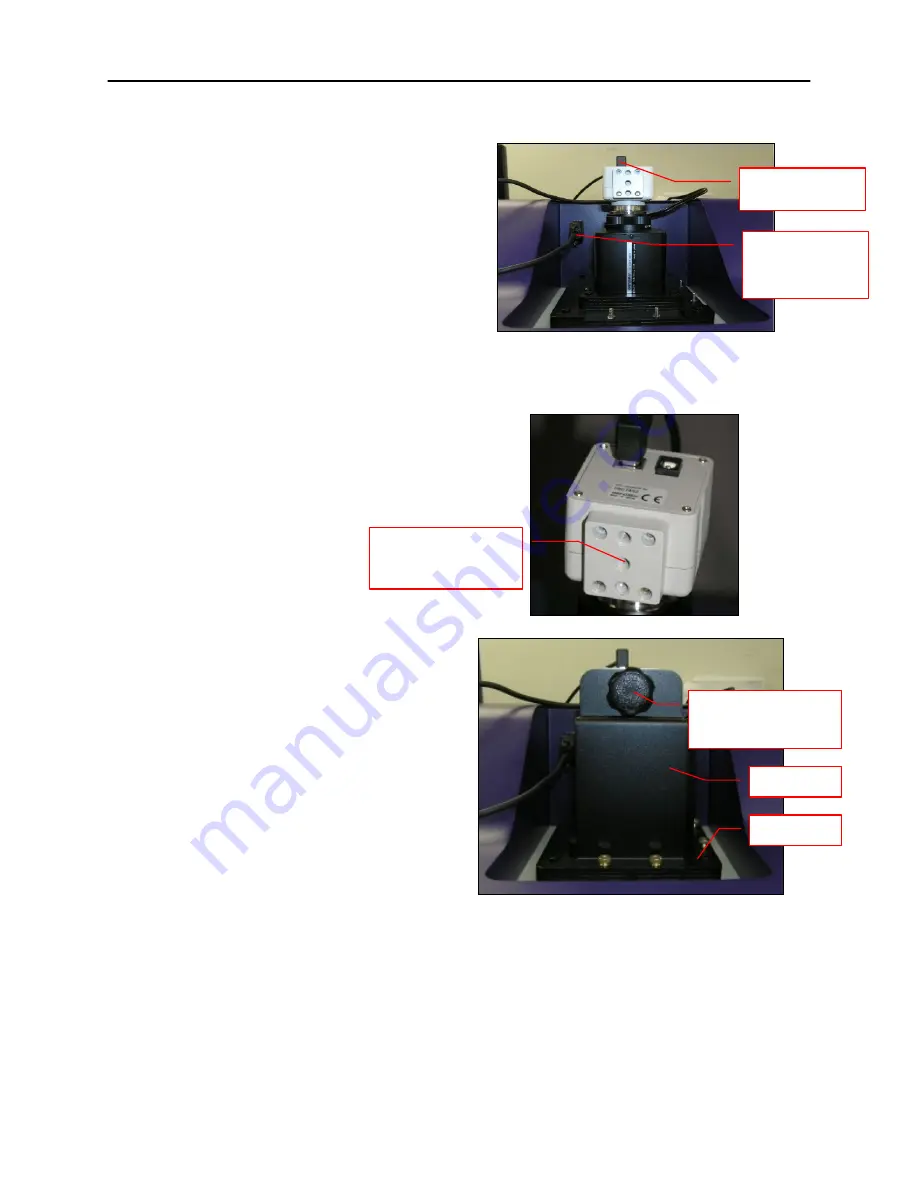
1.  Slide the camera and lens assembly 

into the camera base. The base comes 
installed to the darkroom from the UVP 
factory. 

2.  Plug the serial cable from the 

motorized lens into the darkroom.  

3.  Plug the 90 degree USB cable into the 

top of the camera. Leave the other end 
unplugged until ready to install the 
VisionWorksLS CD.    


NOTE: 

Camera may be a different color or 

size than shown. 


4.  Place the bracket on the mounting 

base aligning the holes on the bracket 
with the all-thread screws protruding 
from the camera base. Using the four 
brass thumb screws provided, secure 
the bracket to the base. 


5.  Insert and tighten the black thumb 

screw and washer to secure the 
camera to the bracket. 

Be sure to 

position the screw in the central 
hole in the camera.


Bracket and base securing camera 


90 degree USB 

cable 

Serial 

connection for 

motorized lens 

Insert black thumb 

screw into the  

central hole 

Black thumb screw 

for attaching camera 

to bracket 

Bracket 

Base 

Содержание BioSpectrum Imaging System

Страница 1: ..._______________________________ UVP LLC 2066 W 11th Street Upland CA 91786 Tel 909 946 3197 800 452 6788 Fax 909 946 3597 Web Site www uvp com Ultra Violet Products Ltd Unit 1 Trinity Hall Farm Estate Nuffield Road Cambridge CB4 1TG UK Tel 44 0 1223 420022 Fax 44 0 1223 420561 81 0346 01 Rev F ...

Страница 2: ...ionWorks LS Software 7 BioLite Access Ports 7 Installation 8 Installing VisionWorksLS Software 8 Registering the Software 8 Hardware Installation 9 Camera Installation 13 GelCam 310 Camera 13 MegaCam 810 OptiChemi 610 and BioChemi 510 Cameras 15 Operation 17 Using the System 17 Capturing Images 20 Focusing the Lens Using Image Preview 20 Capturing Images 20 Service Procedures 21 Return Procedure 2...

Страница 3: ...sLS software for automated control The darkroom has a UV blocking window built in overhead 365nm UV Visi Blue 480nm and white light UV transilluminator LED White Light Illuminator chemiluminescence tray and five position emission filter wheel with three emission filters included The Automated BioSpectrum includes a software controlled lift platform while the Manual BioSpectrum includes a manually ...

Страница 4: ...ks LS Software Refer to the packing slip for a complete equipment list System components may vary The system may additionally include a computer and monitor printer or BioLite MultiSpectral Light Source CCD camera and lens are housed under the camera cover Five position filter wheel with Ethidium Bromide SYBR Green and SYBR Gold filters included Epi illumination with white light 480nm and 365nm UV...

Страница 5: ...the top of darkroom generate high resolution images The camera and motorized lens are controlled by VisionWorksLS software Refer to the packing slip for the camera configured with your system Note camera shown to the right may appear different Refer to the Cameras section of this manual for installation and operation instructions for the camera shipped with your system UV Safe Gel Viewer Window Th...

Страница 6: ...oefficient of variance CV Store the White Light Illuminator in the exterior darkroom side pocket when not in use Chemi Tray The chemi tray creates a dark background for placement of bioluminescent or chemiluminescent samples such as Western blots shown here placed on top of the FirstLight UV Illuminator UV Transilluminator The system may be configured with a UV transilluminator to fluoresce sample...

Страница 7: ... Source for directed lighting ranging from visible to near IR note the Automated BioSpectrum has two access ports while the Manual BioSpectrum has one access port The access panel on the back of the darkroom provides access for connecting additional equipment within the darkroom Minimum Computer Requirements Processor Pentium 4 1 6 GHz or higher RAM 2GB 4GB Preferred Display 1024 x 768 Operating S...

Страница 8: ...tware registration is required To immediately activate the software online choose On the Fly activation If the computer is not connected to the Internet select Offline activation and proceed to the following page of this manual or call UVP to register the software 3 Click Next to continue 4 The Already have an activation ID option is useful when reloading the software after receiving an initial ac...

Страница 9: ...ion 3 Place the UV transilluminator on the pull out tray and connect the power jumper cable to the interior of the darkroom and to the back of the transilluminator See UV Transilluminator Setup for more information 4 Place the chemi tray on top of the UV transilluminator Remove the tray when not required 5 Unpack the LED White Light Illuminator and place it on top of the UV transilluminator Place ...

Страница 10: ...ium Bromide 570 640nm Camera and Lens Assembly Camera Setup There are several camera options Detailed camera and bracket assembly instructions for each camera are listed in the Camera Installation section of this manual Proceed to this section now to continue BioSpectrum installation Sample Camera with Base and Lens on Top of the Darkroom Fixed Lens Controller Setup The fixed lens controller is at...

Страница 11: ...ive devices UV Transilluminator Setup 1 Plug the power jumper cord into the back of the transilluminator 2 Place the transilluminator on the tray 3 Plug the other end of the transilluminator power jumper cord into the darkroom outlet on the inside top rear of the darkroom as shown below LED White Light Illuminator Setup 1 Position the LED White Light Illuminator inside the darkroom so that the FRO...

Страница 12: ...next section To install the printer 1 Plug the power cable from the printer into a power source 2 Press the button to open the lid of the printer and load the paper by allowing the loose end of the roll to come off the top of the roll 3 Tear off the excess paper that is visible after shutting the printer lid 4 Plug the USB cable from the printer into the computer 5 Load the driver CD for the print...

Страница 13: ...GelCam 310 BioChemi 510 OptiChemi 610 MegaCam 810 Refer to the packing list for the camera included with your specific system GelCam 310 Camera Camera Specifications Specifications GelCam 310 Camera Type CCD Monochrome Resolution 1600 x 1200 Bit Depth 16 bit Quantum Efficiency NA Cooling None Binning None PC Interface USB Components GelCam 310 Camera Motorized lens 2 diopter Bracket Base typically...

Страница 14: ...fferent color or size than shown 4 Place the bracket on the mounting base aligning the holes on the bracket with the all thread screws protruding from the camera base Using the four brass thumb screws provided secure the bracket to the base 5 Insert and tighten the black thumb screw and washer to secure the camera to the bracket Be sure to position the screw in the central hole in the camera Brack...

Страница 15: ...am 810 OptiChemi 610 and BioChemi 510 Cameras Camera Specifications Specifications MegaCam 810 OptiChemi 610 BioChemi 510 Type CCD Monochrome CCD Monochrome CCD Monochrome Resolution 3296 x 2472 2184 x 1472 2 1MP Bit Depth 16 bit 16 bit 16 bit Quantum Efficiency 50 peak 86 peak 50 peak Cooling 35 C from Ambient 50 C from Ambient 35 C from Ambient Binning Yes 1x1 thru 8x8 Yes 1x1 thru 10x10 Yes 1x1...

Страница 16: ...ttaching it through the hole at the top of the bracket 4 Note When looking at the darkroom from the front the MegaCam 810 OptiChemi 610 and BioChemi 510 cameras attach to the bracket with the Black Thumb Screw at the right of the system The USB and power cables will extend from the front of the camera facing the user Software Installation Install the Camera Driver 1 All of the software required to...

Страница 17: ...lp files or the software manual PDF file for additional software information Lens Control The motorized lens is controlled via the Lens Controls section of the Lighting Menu in VisionWorksLS The lens is motorized for adjusting aperture zoom or focus settings 1 In the lens area adjust the Aperture by moving the slider to the left to let more light into the camera s CCD or to the right to decrease t...

Страница 18: ... exposure times Lighting and Emission Filter Selection The lighting in the BioSpectrum darkroom is controlled via the Lighting Filters section of the Lighting Menu in VisionWorksLS 1 Select the appropriate emission Filter from the drop down menu 2 Select the appropriate Epi Illumination source from the buttons Plates cover the lights to prevent any reflective light when lighting is not required Wh...

Страница 19: ...orm above the base position Position markings are located along the darkroom opening Pivot the lift platform up slightly to disengage it from the pawl in the back of the darkroom and slide it up or down on the two metal rods Once the desired position has been located pivot the lift platform back down to a flat horizontal level and make sure the platform has reengaged with the pawls in the back of ...

Страница 20: ... Settings for Short Exposures and Focusing 1 Increasing the Binning will increase the camera s refresh rate and sensitivity However it also exponentially decreases overall image resolution Binning works by combining smaller pixels into one larger pixel For example 2x2 binning will take a 2x2 area of pixels 4 pixels all together and combine them into one large pixel 4x4 binning will combine a 4x4 a...

Страница 21: ... the ends 5 There is a timer that turns off the transilluminator automatically after 20 minutes of use Use VisionWorksLS to deactivate and restart the transilluminator Replacement Parts and Accessories Replacement parts and accessories part numbers are shown below To order accessories or replacement parts contact UVP s offices listed under Technical Support Part Description Part Number Power Cord ...

Страница 22: ...ca South America East Asia or Australia If you are in Europe Africa the Middle East or Western Asia Call 800 452 6788 or 909 946 3197 and ask for Technical Support during regular business days between 7 00 am and 5 00 pm PST Call 44 0 1223 420022 and ask for Customer Service during regular business days between 9 00 am and 5 30 pm E mail your message to info uvp com or techsupport uvp com E mail y...

Отзывы: