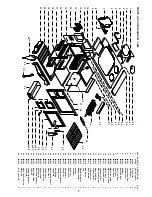
Illustrations
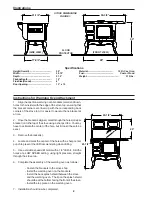
Specifications
Height (Overall)......................................
30"
Material............................................
100% Cast Iron
Width......................................................
34.75"
Fuel....................................................
Coal or Wood
Depth......................................................
21.5"
Weight.........................................................
313 lbs.
Firebox Depth.........................................
15"
Flue Size (Round)....................................
6"
Door Opening.........................................
13" x 10
2
Instructions for Warming Oven Attachment
1. Align the cast iron warming oven brackets (small end down,
holes to the inside) with the edge of the stove top, ensuring that
the bracket corners are lined up with the corresponding back
corners of the stove top. It is easier to work with one bracket at
a time.
2. Once the bracket is aligned, mark through the holes (one per
bracket) on to the top of the stove using a sharp scribe. You may
have to estimate the center of the hole, but it doesn't have to be
exact.
3. Remove the bracket(s).
4. Locate and mark the center of the hole with a sharp center
punch to prevent the drill from wandering when drilling.
5. Use a variable speed drill motor with a 1/4" drill bit. Drill the
holes at a LOW SPEED setting, using light pressure, straight
through the stove top.
6. Complete the assembly of the warming oven as follows:
- Fasten the brackets to the stove shop
- Install the warming oven on the brackets
- Install the back splash shield between the stove
and the warming oven. The lip on the splash shield
should be at the bottom facing the front of the stove.
- Install the top piece on the warming oven.
7. Installation should now be completed.
STOVE DIMENSIONS
FIGURE 1.
21-1/2"
(FRONT VIEW)
(SIDE VIEW)
17-3/4"
28"
FLOOR
PROTECTOR
34-3/4"
30"
25"
61-1/2"
29-1/2"


