usha HO 3515i Скачать руководство пользователя страница 5

5

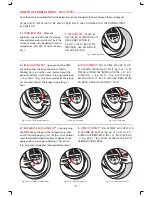
HOW TO USE DIGITAL PANEL

lapkyu funsZ'ku

250    30

29

240

28

230

Fig-1. Stand-by Mode

Fig-2a. Press 'TIME' for adujstment

Fig-3a. Press 'TEMP' for adjustment

Fig-2b. Increase time

Fig-3b. Increase temperature

Fig-2c. Decrease time

Fig-3c. Decrease temperature

1. 

STAND-BY MODE 

– 

When the 

appliance is powered on, the LCD displays 
time and temperature symbols. This is the 
stand- by mode with the default time and 
temperature set at 250° C and 30 minutes. 
Fig - 1.

1. 

LVS.M&ckbZ&eksM 

– 

midj.k dk 

ikoj pkyw gksus ij ,ylhMh le; vkSj 
rkieku izrhdksa dks n'kkZrk gSA  
;g 

250° C

 vkSj 

30

 feuV ij fu/

kkZfjr fMQ+kWYV le; vkSj rkieku ds 
lkFk LVS.M&ckbZ eksM gSA

2. 

le; lek;kstu

*

– 

iSuy ij 

'TIME'

 cVu nckus ij 

LCD  

ij le; izrhd txexkuk 'kq: dj nsrk gS 

(Fig - 2a)

A

 1

 ls 

60 

feuV rd dk ,sfPNd le; fu/kkZfjr djus ds fy, $ ;k & cVu 
dk iz;ksx djsaA ^$* 

(Fig - 2b) 

;k ^&* 

(Fig - 2c)

 cVu dks nckus 

vkSj idM+s j[kus ij 

10

 feuV ds vUrjky rd fu/kkZj.k dh xfr 

rst+ gksrh gSA lcls yEck le; fu/kkZj.k 

?kaVk gSA

3.

 rkieku lek;kstu

*

– 

iSuy ij 

‘TEMP’

 cVu nckus ij 

LCD 


ij le; izrhd 'kq: dj nsrk gS 

(Fig - 3a) 

50

 ls 

250° C

 rd 

dk ,sfPNd le; fu/kkZfjr djus ds fy, $ ;k & cVu dk iz;ksx djsaA 
^$* 

(Fig - 3b) 

;k ^&* 

(Fig - 3c) 

cVu dks nckus vkSj idM+s j[kus ij 

lek;kstu dh xfr rst+ gksrh gSA

2.

 TIME ADJUSTMENT

*

– 

Upon pressing the ‘TIME’ 

key on the panel, the time symbol on LCD starts 
blinking (Fig - 2a). Use the + and – buttons to set the 
desired time from 1 to 60 minutes. Pressing and holding 
‘+’ (Fig - 2b) or ‘-‘ (Fig - 2c). button accelerates the setting 
to 10 minutes interval. The longest time setting is 1 
hour.

3.

 TEMPERATURE ADJUSTMENT


*

– 

Upon pressing 

the ‘TEMP’ key on the panel, the temperature symbol 
on LCD starts blinking (Fig - 3a). Use the + and – buttons 
to set the desired temperature from 50 degree to 250 
degree Celsius. Pressing and holding ‘+’ (Fig - 3b) or ‘-‘ 
(Fig - 3c) button accelerates the speed of adjustment.

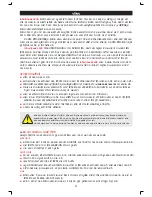
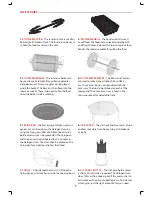
,d ckj vksou ds Hkkxksa dks tksM+us ds ckn vksou dks daVªksy iSuy ds ek/;e ls lapkfyr djus ds fy, fuEufyf[kr funsZ'kksa 
dk vuqlj.k djsaA

Once the oven is assembled, follow the below instructions to operate the oven through the control panel.

30

250

Содержание HO 3515i

Страница 1: ......

Страница 2: ...l carefully before using Please call Usha customer care for any queries and concerns BestWishes fiz xzkgd eqckjdckn ge vkidks vusd izdkj ds iz ksxksa ls qDr vR k kqfud kkuk idkus ds midj kksa esa ls d...

Страница 3: ...ion Any damage to the cord may expose the wiring Immersing the cord in water or any liquid must be avoided Both may result in an electric shock Disconnect the power cord when the oven is not in use or...

Страница 4: ...esa fdlh Hkh izdkj kfr ok fjax dks kksy ldrh gSA rkj dks ikuh k fdlh nzo esa Mwcus ls vo cpk saA nksuksa ls fctyh dk Vdk yx ldrk gSA vksou dks bLrseky ugha djus ds nkSjku k iz ksx djus ds rqjUr ckn i...

Страница 5: ...ck le fu kkZj k 1 kaVk gSA 3 rkieku lek kstu iSuy ij TEMP cVu nckus ij LCD ij le izrhd kq dj nsrk gS Fig 3a A 50 ls 250 C rd dk sfPNd le fu kkZfjr djus ds fy k cVu dk iz ksx djsaA Fig 3b k Fig 3c cVu...

Страница 6: ...ds vUnj dk rkieku 100 C rd fxjus rd kwerk jgsxkA fn vki CANCEL nckus ds ckn Hkh idkus dh izf k tkjh j kuk pkgrs gSa bls le rkieku dks iqu lsV djds vkSj START dks nckdj fd k tk ldrk gSA 6 jksVhLlsjh j...

Страница 7: ...rods provided with the accessory The food is positioned on each of the skewer and the entire accessory is fixed in the rotisserie socket for delectable tikka 5 FRYING PAN Shallow frying of chicken pr...

Страница 8: ...cukus ds fy fd k tkrk gSA Dlsljht ds lkFk 8 LD wvj NM sa iznku dh tkrh gSaA kkus dks izR sd LD wvj ij j kk tkrk gS vkSj Lokfn V fVDds ds fy iwjh Dlsljh dks vksou ds vUnj j kk tkrk gSA 5 kbax iSu fpdu...

Страница 9: ...Step 1 Wipe with a clean and dry cloth Step 2 4 OIL SPRAY BOTTLE Fill the oil spray bottle with oil Step 1 Spray oil over the food as desired Step 2 Ddu dks can djuk fdukjs ij fn x s PUSH cVu dks nck...

Страница 10: ...n the screws as indicated Step 2 Place inside the pot Step 3 7 ROTESSERIE BASKET Insert the rotisserie stick inside the rotisserie basket as shown Step 1 and 2 Place the rotisserie basket inside the p...

Страница 11: ...p 1a Lock each of the skewer head as indicated on the second plate Step 1b Place the skewer assembly inside the pot Step 2 jksVsLljh LD wvlZ kkus dks jksVsLljh LD wvlZ esa yxkus ds ckn LD wvj jksM dks...

Страница 12: ...as not been opened or tampered with by any unauthorized person THIS WARRANTY DOES NOT APPLY FOR 1 Damages due to chipping peeling plating and denting 2 Breakage or damage to components made out of Bak...

Отзывы: