PRODUCT SAFETY & DISCLAIMER
READ ALL INSTRUCTIONS CAREFULLY BEFORE INSTALLING, FAILURE TO DO SO MAY CAUSE
PERSONAL INJURY OR DAMAGE TO PRODUCT AND/OR PROPERTY
•
This document is provided as a GENERAL installation guide, some vehicles vary and may
require additional steps. We do not accept responsibility for third party labor charges or
modifications. Exercise due-diligence when installing this product.
•
We do not accept any responsibility for vehicle damage or personal injury resulting from
the installation of this product.
•
Careless installation and operation can result in equipment damage
.
Requirements
CD changer controlling radio
Introduction
Many have aftermarket stereos with Auxiliary inputs jacks (RCA) or factory
radios with an auxiliary input adapter for their audio devices. With the A2D-RCA
add-on you no longer have to deal with plugs and connectors. The A2D-RCA
automatically connects to Smartphone, Kindle, or Tablet upon entering vehicle.
Stream turn-by-turn directions, music Apps (e.g. Pandora, Spotify) directly into
Stereo. This leaves no wires or clutter on or around dashboard and is a welcome
upgrade for those with Bluetooth enabled devices.
See Frequently Asked question
at the end of this guide for details.
Installation
All Radios (factory or aftermarket) must have RCA Audio inputs or an
auxiliary input adapter for the A2D-RCA to work.
1.
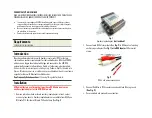
Remove radio from dash or locate auxiliary input adapter in trunk, center
armrest, glove box etc. Auxiliary input adapters are available from USASpec,
Blitzsafe, PIE, Peripheral, iSimple, PAC and others (See
Fig. 1
)
Fig. 1
Auxiliary input adapter
(not included)
2.
Connect male RCA’s from
module (See
Fig. 2
) to RCA inputs of existing
auxiliary input adapter (See
Fig. 1) or to RCA Inputs
of Aftermarket
stereo.
Fig. 2
RCA’s and
power connections
3.
Connect Red Wire to 12V Accessory supply and black Wire to ground
(
See Fig. 2)
4.
Secure module and proceed to next section.


