


44-000063
UPDATED
1
2
.
12
.
20
17
US LED
| 6807 PORTWEST DR | HOUSTON, TX 77024 | T 866 972 9191 | F 713 972 9393 | [email protected] |
www.usled.com
Turn off power to the light pole at circuit breaker.
Pole Mount
A.
The Universal Nut Plate can accommodate most hole patterns. If the pole has no holes use drill pattern shown in
(FIGURE B).
B.
Remove pole cap and lower Universal nut plate inside pole until threaded holes align with proper mounting holes.
C.
Screw upper mounting bolt into Universal nut plate. Do not tighten Upper Bolt all the way as the fixture mount has a
key hole slot that needs to slide over the Upper Bolt and washer (FIG 2).
D.
Slide fixture Key hole slot over Upper Bolt and washer to support fixture during wiring.
E.
Remove bottom mount cover (see FIG 3). Bottom cover is tethered to fixture.
F.
Install lower bolt into Universal Nut Plate. Tighten both Upper and Lower bolts.
G.
Fish power leads into Dorado
Pole mount
housing.
H.
Follow wiring diagrams to make electrical connections per local and national electric codes.
I.
Use supplied wire ties to tie the wires to the top half of the Pole mount housing.
J.
Insure all holes in pole and pole cap are sealed water tight. Insure gaskets are
sealed. If any doubt, caulk the seam.
K. Turn power on to fixture and verify it illuminates properly.
The installation must only be performed by a licensed electrician.
To prevent death, injury or damage to property, this product must be installed in accordance to
National Electrical Code (NFPA70) in the US or Canadian Electrical Code (CSA22.1) in Canada.
Disconnect power before installing the product or servicing it.
Wait until fixture has cooled down before installing or servicing the fixture.
Water in the fixture voids warranty.
MIN. 90°C SUPPLY CONDUCTORS
Read and follow installation instructions. Improper installation will void warranty.
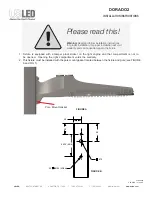
INSTALLATION INSTRUCTIONS
DORADO
2
Upper bolt
Key hole slot
Universal Nut Plate
F
IG
1
F
IG
2
F
IG
3
Pole Mount
Gasket