background image

©

U

.S

B

LA

ST

ER

D

es

ig

n

-U

SA

-P

.O

.B

ox

53

76

-C

ar

ef

re

e

-A

Z

85

37

7.

USB 7392 - 7393

Microphone systems

FREQUENCY SETTING CHANGE 

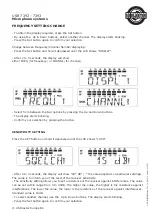
- To obtain the display required, press the Set button.  

- By using the  Up & Down buttons, select another channel. The display starts blinking. 

- Press the Set button again to confirm your selection. 

Change between Frequency/Channel Number displaying: 

- Press the Set button and hold it depressed until the LCD shows "DISPLAY".

- After 2 to 3 seconds, the display will show  

either FREQ (for frequency) or CHANNL (for channel).

- Select from between the two options by pressing the Up and Down buttons. 
- The display starts blinking. 
- Confirm your selection by pressing the button. 

SENSITIVITY SETTING 

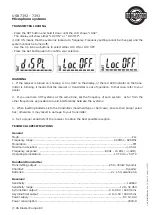
Press the SET button and hold it depressed until the LCD shows “LOCK”.

- After 2 to 3 seconds, the display will show "XX* dB" ( * the value depends on particular settings).
The value is to inform you of the level of the receiver sensitivity. 
- The sensitivity setting allows you to set a resistance of the receiver against interferences. The value
can be set within range from 0 to 40dB. The higher the value, the higher is the resistance against
interferences. The lower the value, the lower is the resistance of the receiver against interferences.
Standard value is 15dB. 
- To select another channel, use the  Up & Down buttons. The display starts blinking. 
- Press the Set button again to confirm your selection. 

© US Blaster Europe BV

Содержание USB 7392

Страница 1: ... U S BLASTER Design USA P O Box 5376 Carefree AZ 85377 OWNERS MANUAL MICROPHONE SYSTEMS USB 7392 7393 ...

Страница 2: ...ance Only clean the appliance with a slightly moist dust free cloth Do not use cleaning products or solutions The appliance contains no components other than those mentioned in the user guide that can be repaired or replaced by the user If the appliance is defective it must be repaired by a US Blaster qualified repairs company Keep the equipment out of the reach of children Keep the packaging safe...

Страница 3: ... the sound may be distorted Note If volume setting is too high when the system operates near speakers it may result in Larsen effect in the speakers 2 LED Display Displays for each channel indicate all indications necessary to a proper function of the HF system frequency being used number of the channel corresponding to the frequency being used RF reception level AF audio signal level Receiving ae...

Страница 4: ...you to turn the receiver on or off 1 A Aerial Connector Connect the aerial supplied with the microphone set to this socket 2 Power Supply Connector Connect the DC 12V power supply supplied with the microphone set to this socket Note Do not connect other types of power supply an AC one or a DC one supplying more than 12V Otherwise it may result in damage to the receiver 3 B Channel Symmetrical Outp...

Страница 5: ...s for each channel and then confirm the frequencies by pressing the Set button Note Receiver are specifications are included below in this operating manual To turn the receiver off press the On Off button 2 and hold it depressed for 1 to 2 seconds The LCD will show SYSOFF LCD DISPLAY DESCRIPTION 1 RF Indicator It indicates the level of RF signal the signal received from the microphone 2 AF Indicat...

Страница 6: ...isplay starts blinking Confirm your selection by pressing the button SENSITIVITY SETTING Press the SET button and hold it depressed until the LCD shows LOCK After 2 to 3 seconds the display will show XX dB the value depends on particular settings The value is to inform you of the level of the receiver sensitivity The sensitivity setting allows you to set a resistance of the receiver against interf...

Страница 7: ...frequency value the value depends on particular settings To select a channel of another frequency use the Up and Down buttons channel numbers range from 1 to 99 The display starts blinking Press the Set button to confirm your selection Warning If you do not press the Set button to confirm your selection the changes will not be confirmed Use the same frequency as that set for the receiver Change be...

Страница 8: ...use more UHF systems at the same time set the frequency of each system as far from the other frequencies as possible to avoid interferences between the systems 3 When inserting batteries into the transmitter handheld type or belt case ensure their proper polari ties otherwise it may result in damage to your transmitter 4 Set a proper sensitivity of the receiver to obtain the best possible receptio...

Страница 9: ...2 AA batteries into the battery slot putting battery s polarity on different ends may damage system and your warranty may be terminated if damage does occur because of it 5 Battery power indicator light If this light is flashing it means the battery power is low and must be replaced 6 up and down buttons Adjustment buttons to change system statuses 7 Set button Opens the different statuses your sy...

Страница 10: ...different colors green blue yellow silver orange and black Sold separately NOTE If you or anyone do any damage either accidental or incidental on the transmitter microphone head s grille we have the right void your warranty NOTE When twisting back on the handle don t twist it too firmly or it may damage the transmitter wire less microphone NOTE Damage because of improper usage will void your warra...

Страница 11: ...just on the transmitter and up and down to select Press SET again to confirm when the battery is low the light above the lcd screen will be flashing To modify the other modes press SET to that mode and the up or down button to select the adjustments Press SET again to confirm NOTE Match your frequency on the transmitter to those on the receiver s for a better signal NOTE If you do not press SET to...

Страница 12: ...frequency signal s actual units while channel displays a substitute letter or number Keep pressing set until LCD screen displays DISPLAY After 1 2 seconds the screen will show FYE 9 u for frequency or CHAnnl for channel Note Current display depends on settings Press the up or down but ton to switch between the two Then the LCD screen will flash Press SET again to confirm if you don t confirm no ad...

Страница 13: ...sière légèrement humide uniquement Ne pas utiliser de produits d entretien A l exception de ceux mentionnés dans le manuel de l utilisateur l appareil ne contient pas d au tres composants qui puissent être réparés ou remplacés par l utilisateur Si l appareil est défectueux il doit être réparé par une société de réparation agréée US Blaster Tenir l équipement hors de portée des enfants Conserver l ...

Страница 14: ... Trop près des enceintes un niveau trop élevé peut entraîner un effet de larsen dans les enceintes 2 Afficheur LeD Les afficheurs de chaque canal indiquent toutes les indications utiles au bon f onctionnement du système HF la fréquence utilisée le numéro de canal correspondant à la fréquence utilisée Le niveau de réception RF Le niveau du signal audio AF Indicateur d antenne de réception 1 ou Il I...

Страница 15: ...uton On Off Ce bouton vous permet d allumer ou d éteindre le récepteur 1 Connecteur antenne A Connectez sur cette prise une antenne fourni avec le kit 2 Connecteur d alimentation Connectez sur cette prise l adaptateur secteur DC 12V fourni avec le kit Note Ne branchez pas un autre type d adaptateur secteur AC ou DC supérieur à 12V sinon vous risquez d endommager le récepteur 3 Sortie symétrique ca...

Страница 16: ... Down puis validez la fréquence en appuyant sur le bouton set Note les différents paramètres du récepteur seront décris plus loin dans le mode d emploi Pour éteindre le récepteur appuyez pendant 1 à 2 secondes sur le bouton marche arrêt 2 L afficheur indiquera SYSOFF DESCRIPTION DE L AFFICHEUR LCD 1 Indicateur RF Vous indique le niveau du signal RF signal reçu du micro 2 Indicateur AF Vous indique...

Страница 17: ...s deux L afficheur clignote alors Appuyez sur Set pour confirmer votre choix REGLAGE SENSIBILITE Appuyez et laissez appuyer sur le bouton SET jusqu à ce que l afficheur indique LOCK Après deux à trois secondes l afficheur indique XX dB la valeur dépend du paramètre en cours Cette valeur vous indique le niveau de sensibilité du récepteur La sensibilité permet d ajuster la résistance du récepteur pa...

Страница 18: ...canal ou 750 000 la valeur de la fréquence la valeur dépend du paramêtre en cours Utilisez le bouton changement pour sélectionner un canal fréquence différent le numéro de canal va de 1 à 99 L afficheur clignote alors Appuyez sur le bouton Set pour confirmer votre choix Attention Si vous n appuyez pas sur Set pour confirmer votre choix les changements ne seront pas validés Utilisez la même fréquen...

Страница 19: ...re revendeur 2 Si vous utilisez plusieurs système UHF en même temps réglez les fréquences de chaqun des systèmes les plus éloignées les unes par rapport aux autres pour éviter les interférences entre les systèmes 3 Lorsque vous insérez les piles dans l émetteur main ou ceinture respectez bien la polarité sinon vous risquez d abîmer votre émetteur 4 Ajustez correctement la sensibilité du récepteur ...

Страница 20: ...es faute de quoi vous risquez d endommager l appareil La garantie ne s applique pas à un endomma gement consécutif au non respect de cette consigne 5 Indicateur de l état des piles Ce témoin allumé indique que les piles sont quasi déchargées et qu il est nécessaire de les remplacer 6 Boutons de correction UP DOWN Les boutons de correction servent à la modification du réglage du système 7 Bouton de...

Страница 21: ...six couleurs de couvercle verte bleue jaune argen tée orange et rouge Ces couvercles sont vendus séparément AVERTISSEMENT Le fabricant se réserve le droit d annuler la garantie en cas d endommagement inten tionnel ou involontaire de la grille de l appareil microphone par vous ou par une tierce personne AVERTISSEMENT Ensuite retirez le loquer pour découvrir l écran LCD du microphone AVERTISSEMENT V...

Страница 22: ...uels du microphone que vous souhaitez régler Utilisez pour le réglage les boutons UP et DOWN Pour confirmer la sélection pressez à nouveau le bouton SET Si les piles sont presque déchargées le témoin LED situé au dessus de l écran LCD sera allumé AVERTISSEMENT Vérifiez que le loquet est complètement retiré Pour modifier d autres modes pressez le bouton SET jusqu à la sélection du mode souhaité Ens...

Страница 23: ... unités actuelles du signal de fréquence alors que CHANNEL affiche le numéro ou la lettre de remplacement Pressez le bouton SET jusqu à ce que l écran affiche DISPLAY Après 1 à 2 secondes l écran affiche FYE 9 pour la fréquence ou CHAnnl pour le canal AVERTISSEMENT L affichage actuel dépend du régla ge Pressez les boutons UP et DOWN pour commuter entre les deux réglages décrits ci dessus Ensuite l...

Страница 24: ...Reinigen Sie das Gerät nur mit einem leicht feuchten staubfreien Tuch Verwenden Sie keine Reinigungs oder Lösungsmittel Neben den im Benutzerhandbuch erwähnten enthält das Gerät keine Komponenten die vom Benutzer repariert oder ersetzt werden können Falls das Gerät defekt ist muss es von einem Reparaturbetrieb repariert werden der von US Blaster dazu berechtigt wurde Bewahren Sie das Gerät außerha...

Страница 25: ...n den Klang deformieren Vermerk zu hoher Pegel in der Nähe der Lautsprecher kann in diesen den Larsen Effekt verursachen 2 LED Dislay Die Displays vom jeden Kanal geben alle zum richtigen Funktionieren von VF System unerlässlichen Indizien an benutzte Frequenz Kanalnummer der der benutzten Frequenz entspricht Empfangspegel RF Audiosignalpegel AF Anzeiger der Empfangsantenne 1 oder Il Anzeiger der ...

Страница 26: ...en Empfänger ein oder ausschalten 1 Steckverbindung der Antenne A In diese Steckdose schließen Sie die Antenne an geliefert mit dem Satz 2 Speisesteckverbindung n diese Steckdose schalten Sie den Netzadapter DC 12 V geliefert mit dem Satz an Vermerk schließen Sie kein anderes Typ des Netzadapters an AC oder DC höher als 12V sonst droht die Empfängerbeschädigung 3 Symmetrischer Ausgang Kanal B Dies...

Страница 27: ...ie die Frequenz durch das Drücken der Set Taste Vermerk Die Empfängerparameter sind weiter in der Betriebsanleitung beschrieben Zwecks des Empfängerausschaltens drücken Sie für die zeit von 1 bis 2 Sekunden die Taste EIN AUS 2 Das Display wird SYSOFF anzeigen LCD DISPLAYBESCHREIBUNG 1 Anzeiger RF gibt den RF Signalpegel an aus dem Mikrophon empfangenes Signal 2 Anzeiger AF gibt den AF Signalpegel ...

Страница 28: ...das Display beginnt blicken bestätigen Sie die Wahl durch das Tastedrücken EINSTELLUNG DER EMPFINDLICHKEIT Drücken Sie und halten gedrückt die Set Taste bis das Display LCD den Anschrift LOCK anzeigt verlaufenen Parametern ab Dieser Wert informiert Sie über den Pegel der Empfängerempfindlichkeit die Empfindlichkeit ermöglicht die Empfängerbeständigkeit hinsichtlich der Interferenzen einzustel len ...

Страница 29: ...requenzwert der Wert hängt von den verlaufenen Parametern ab darstellt Zur Kanalauswahl der anderen Frequenz benutzen Sie die Änderungstaste die Kanalnummer sind von 1 bis 99 Das Display blickt Drücken Sie die Set Taste zur Bestätigung Ihrer Auswahl Achtung wenn Sie die Set Taste zur Bestätigung Ihrer Auswahl nicht drücken die Änderungen werden nicht bestätigt benutzen Sie die gleiche Frequenz wie...

Страница 30: ...en Sie sich bitte auf Ihren Verkäufer 2 Benutzen Sie gleichfalls mehrere UHF Systeme stellen Sie die Frequenzen jedes Systems hinsichtlich der anderen Frequenzen am weitesten ein Sie vermeiden so den Interferenzen zwischen den Systemen 3 Bei dem Batterieeinlegen in den Sender manueller oder Bandsender wahren Sie die Polarität sonst droht die Beschädigung Ihres Senders 4 Stellen Sie richtig die Emp...

Страница 31: ...erien im Widerspruch mit der Polarität ein kann zur Gerätbeschädigung zukommen Im Fall dass zur Beschädigung in Folge solcher Einschaltung zukommt verfällt die Garantie 5 Batteriestandindikator leuchtet diese Kontrollleuchte bedeutet es dass die Batterie fast entladen ist und ist aus zutauschen 6 Korrektionstasten UP DOWN Korrektionstasten dienen zur Änderung der Systemeinstellung 7 Die Einstellta...

Страница 32: ...ie Klinke zur Wahl Sie haben die Möglichkeit unter sechs verschiedenen Deckelfarben zu wählen grüne blaue gelbe silberne orange und schwarze Diese Deckel sind separat verkauft VERMERK wenn Sie oder andere Personen auf irgendwelche Weise absichtlich oder unbeabsichtigt das Empfängernetz des Mikrofons beschädigen behält sich der Hersteller das Recht der Garantieannullierung vor US Blaster Europe BV ...

Страница 33: ...wählen Sie zwischen den einzelnen Mikrofonmoden die Sie einstellen möchten Für die Einstellung benutzen Sie die Tasten UP und DOWN Für die Wahlbestätigung drücken Sie nochmals die SET Taste Ist die Batterie fast entladen wird die über das LCD Display untergebrachte Leuchte leuchten Zur Regelung von weiteren Moden drücken Sie die SET Taste bis Sie den gewünschten Modus nicht aus wählen Danach stell...

Страница 34: ...retende Nummer oder Buchstabe dar Drücken Sie die SET Taste bis auf dem Display DISPLAY dargestellt wird Nach 1 bis 2 Sekunden wird auf dem Display FYE 9 für Frequenz oder CHAnnl für Kanal angezeigt VERMERK aktuelle Darstellung hängt von der Einstellung ab Durch das Drücken der Tasten UP und DOWN schalten Sie zwischen den oben beschriebenen zwei Einstellungen um Dann wird das LCD Display angemacht...

Отзывы: