


USB 4111
TFT LCD MONITOR
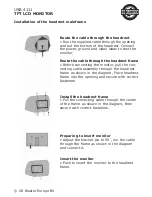
Installation of the headrest mainframe
© US Blaster Europe BV
Route the cable through the headrest
• Run the supplied cable through the opening
and out the bottom of the headrest. Connect
the power, ground and video leads to test the
monitor.
Route the cable through the headrest frame
• Before connecting the monitor, pull the con-
necting cable assembly through the headrest
frame as shown in the diagram, Place headrest
frame into the opening and secure with correct
fasteners.
Install the headrest frame
• Pull the connecting cable through the center
of the frame as shown in the diagram, then
secure with correct fasteners.
Preparing to insert monitor
• Adjust the bracket pin to 90
o
, run the cable
through the frame as shown in the diagram
and connect it.
Insert the monitor
• Push to insert the monitor to the headrest
frame.


