
Installation Instructions
Montageanleitung
CADET
KHC-10
ceramic | Keramik | horizontal
EN
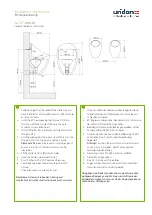
1.
Take the height from the center of the waste pipe and
mark the holes for both special screws No. (19). Drill holes
and mount screws.
2.
Install the 87° bend, keeping the distance of 100 mm
from the wall tot he middle of the pipe. The pipe
connection is now established.
3.
Adjust fitting No. (15), mark holes, drill holes and mount
fitting No. (15).
4.
Hold the urinal against the wall und push firmly onto the
fitting No. (4). Thus, the pipe connection is made.
Please note
: Between urinal and wall should be a gap of
approx. 2 to 5 mm, so that tension cracks can be
prevented.
5.
Fill the waste trap Pos. (B) full with water.
6.
Insert the stainless steel cover Pos. (A).
7.
Pour 1 bottle uriLOCK ( 0,3 liter) over the cover.
8.
Seal the gap between the wall and the urinal with
silicone.
The uridan urinal is now ready for use!
Please leave customer care booklet, cleaning and
maintenance instructions and suction device with customer.
DE
1.
Höhe von Fußboden nehmen und Bohrungen für beide
Spezialschrauben Nr. (19) anreißen. Löcher bohren und
Schrauben montieren.
2.
87° Bogen montieren, dabei den Abstand von 100 mm von
der Wand bis Mitte des Rohrs einhalten.
3.
Beschlag Nr. (15) anpassen, Bohrungen anreißen, Löcher
bohren und Beschlag Nr. (15) montieren.
4.
Urinal an die Wand halten und fest auf Beschlag Nr. (19)
aufschieben. Damit ist auch die Rohrverbindung
hergestellt.
Achtung!
Zwischen Urinal und Wand muss ein Abstand
von ca. 2 bis 5 mm bleiben, damit Spannungsrisse
verhindert werden können.
5.
Geruchsverschluss Pos. (B) mit Wasser auffüllen
6.
Deckel Pos. (A) einsetzen.
7.
Eine 0,3 l Flasche uriLOCK einfüllen.
8.
Fuge zwischen Wand und Urinal mit Silikon abdichten.
Ihr uridan-Urinal ist nun funktionsbereit!
Übergeben Sie bitte dem Kunden die im Verpackungskarton
beiliegende Reinigungs- und Wartungsvorschrift sowie den
beiligenden Saugnapf, und weisen Sie das Reinigungspersonal
anhand dieser Unterlagen ein.