background image

62 

6.6.13 Target Tolerance (Tolerancia objetivo)


Esta función establece el rango de tolerancia de capacidades entre el dispositivo de origen y 
el de destino. Si la capacidad está fuera del rango de tolerancia, la copia fallará..


6.6.14 Clean SSD Before Copy (Limpiar SSD antes de copiar)


Configura para borrar SSD antes de la función de copia. La configuración predeterminada es 
“No”. 


6.7 Restore Defaults (Restaurar los valores predeterminados)


Restaura toda la configuración a los valores predeterminados de fabricación.


Desplácese para seleccionar “6.5 Restore Defaults”, luego presione “OK” para restaurar la 
configuración a los valores predeterminados de fábrica.


7. Log Manager (Administrador de registros)


Este menú permite a los usuarios acceder a varios submenús. Desplácese para seleccionar 
"7. Log Manager”, luego presione "OK" acceder a los submenús.


III.


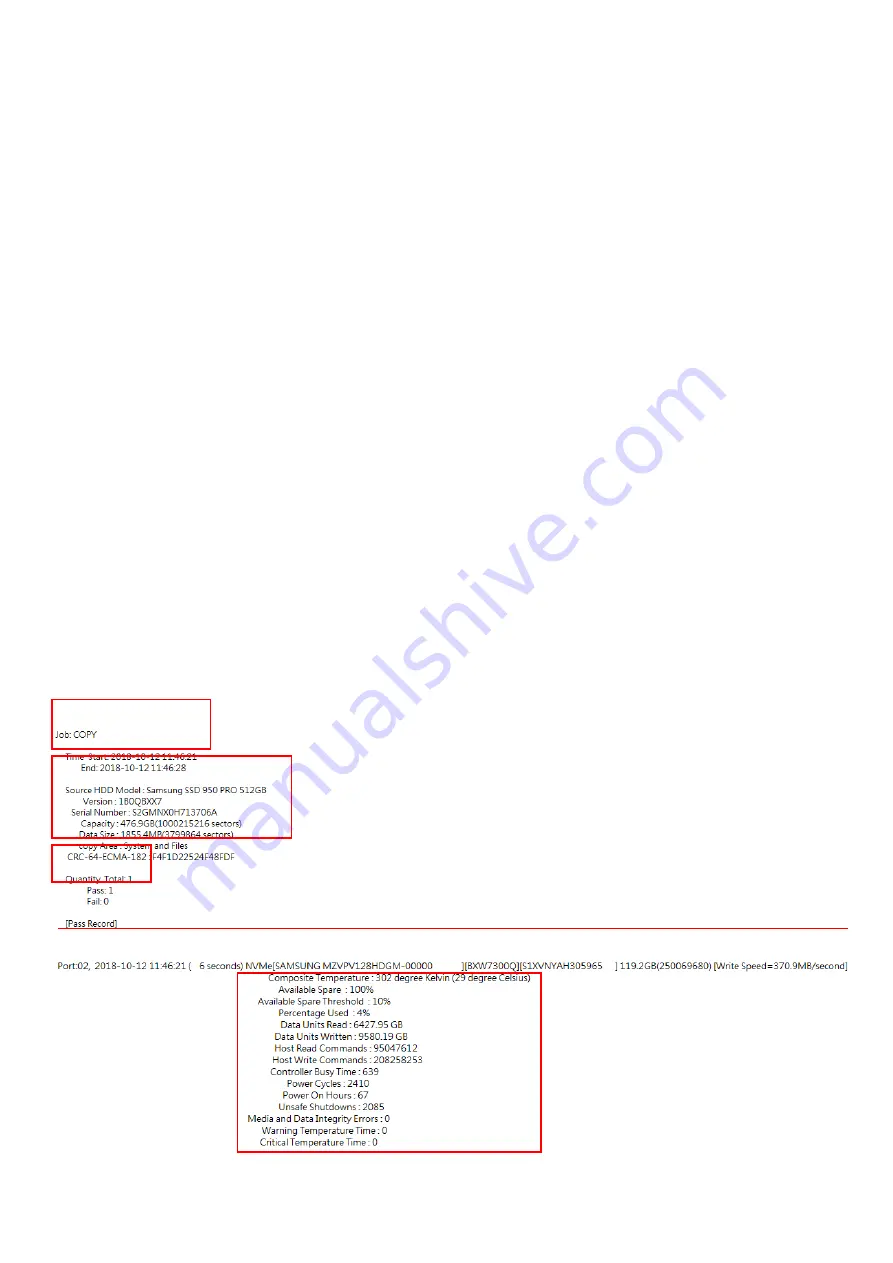
Log Report Diagram (Diagrama de informe de registro)


Source device Info.


Background information of this log report


Result


Port/Date/Time(Lapsed Time) [ Model No. ]                    [Revision][S/N]        Capacity(Sectors)[Write Speed] 


  S.M.A.R.T Info.


Содержание NV-BM Series

Страница 1: ...NV BM Series PCIE Duplicator and Sanitizer User Manual v A 04 ...

Страница 2: ... Piracy Statement 3 Before You Start 4 Notice Symbols 4 Functions Table 5 Product Overview 10 Functions 12 1 Copy 12 2 Compare 13 3 Copy Compare 13 4 Erase 14 5 Utility 15 6 Setup 17 7 Log Manager 25 8 Image Manager 27 Image Management 28 v A 04 4 ...

Страница 3: ...ucts software program and or hardware issues can cause loss of data defective formatting or unreliable data loading U Reach will make efforts to resolve or repair any issues recognized by customer either within the warranty period or on a time and materials basis Specifications and features are subject to change without notice or obligation Warranty U Reach provides a basic one year parts and labo...

Страница 4: ...wer cord for 2 minutes for discharging Use product only in a clean dry dust free and ventilated area Liquids or foreign debris can severely damage your duplicator It is typical for the machine to heat up during operation While in use do not move the duplicator or remove HDDs Static electricity may cause duplication error Please pay attention to the duplicator s environment while operating equipmen...

Страница 5: ...a bit by bit from the device connected to the Source Port or Port 1 3 2 Internal Storage Available when internal SSD is installed Copies and verifies saved data images bit by bit from the duplicator s internal storage device 4 Erase 4 1 Quick Erase Erases device s index table 4 2 Full Erase Erases entire device s complying with NIST 800 88 Standards 4 3 DoD Erase Erases device s complying with DoD...

Страница 6: ...Sets default function to display after equipment initialization 6 2 Copy Area System and Files Copies data and skips empty space Only supports standard formats ALL Partitions Copies all partitions and data unallocated partitions not included Whole HDD Copies all source data bit by bit Percentage Sets percentage of source capacity to copy Deep Analysis Analyze the data location and then copy It doe...

Страница 7: ...rs Skips bad sectors during Erase 6 6 5 HPA Copy Mode No Keep HPA No Clear HPA No Setting HPA Copy and Setting 6 6 6 Clear HPA at ERASE Clear HPA Setting Clears HPA setting during erase Keep HPA Setting Keeps original HPA setting during erase 6 6 7 Wait Device Time Sets device power up buffer time prior to copy erase etc 6 6 8 Lock Key Disabled Enabled Only down up buttons are disabled Reboot syst...

Страница 8: ...ort Outputs today s log data 7 2 Out Recent Report Outputs recent log data 7 3 Out Period Date Outputs a set period of log data 7 4 Advanced Function Default password 123456 7 4 1 Clear All Logs Clear all log records 7 4 2 Password Setup Allows password change 7 4 3 Adjust Time Date Change time and date 7 4 4 Add Watermark at text File Creates watermark on the log report 8 Image Manager 8 1 Copy S...

Страница 9: ... Show One Image Display image information 8 5 Rename One Image Rename an image file 8 6 Delete One Image Delete an image file of the internal SSD 8 7 Format Image Tank Formats the internal SSD for duplicator ...

Страница 10: ...verview Front View Back View USB port for Log Report Outputs and Firmware Updates Control Buttons OK Button LCD Display USB Port for PC LINK Power Switch Power Input SSD slot for saving Master Image Grounding Port ...

Страница 11: ...tus LCD Configuration Yellow Powered Green Pass Red Fail Number of Target Device Function Total Size Forward Confirm OK The slowest Device Time elapsed and copy progress Copied processed size Backward Cancel Back ...

Страница 12: ...Completed The quantity of passed or failed target device s and the copied duration will be displayed on the LCD after duplication completes 1 1 Source Port Scroll to select 1 1 Source Port then press OK to copy to targets from the source port Note Recommendation Target device s capacity must be equal to or larger than the source device capacity Note The number of working connected targets will be ...

Страница 13: ...ess OK to select which GOB Image to verify from the duplicator s built in storage device The GOB Image is created through U Reach s proprietary software that is included with the duplicator 3 Copy Compare Sequentially automates from Function 1 Copy to Function 2 then Compare Scroll to select 3 Copy Compare then press OK to select which source to copy and verify from Scroll to select 3 1 Source Por...

Страница 14: ...ill erase the index table from the connected device s Scroll to select 4 1 Quick Erase then press OK to start the erasing process 4 2 Full Erase This function will erase all data per NIST 800 88 Standards to the connected device s Scroll to select 4 2 Full Erase then press OK to start the erasing process Caution 1 When 1 2 Internal Storage is selected the 1st port becomes a target port automatical...

Страница 15: ...related to device information system information and updates Scroll to select 5 Utility then press OK to view the submenus 5 1 Show Device Info This function will display basic information such as device model name capacity etc Scroll to select 5 1 Show Device Info then press OK to view the connected device s Then through to view connected device s by port number order 5 2 Update System Step 1 Pre...

Страница 16: ...rocess 5 5 Calc CRC64 This function will count the CRC64 value for the source port The CRC64 value is an easy way to double check the source data is correct Caution The firmware update process may take longer than 5 minutes Please do not disrupt power or process during BIOS update If interrupted the system will become useless U Reach will not be held responsible for any damages Note Contact a U Re...

Страница 17: ...tions Please consider the following settings before proceeding with copy 6 2 Copy Area 6 4 Skip Bad Sectors Using appropriate copy modes can greatly reduce operation time and increase efficiency There are four copy area with different copy methods System and Files Copies data and skips empty space Only supports standard formats Scroll to select 6 2 Copy Area System and Files then press OK to save ...

Страница 18: ... to save the copy method The target device s capacity must be equal to or larger than the source device s capacity Whole HDD Copies all source data bit by bit Scroll to select 6 2 Copy Area Whole HDD then press OK to save the copy method Copies the whole source device irrespective of content format partition or empty space This mode does not analyze the data ...

Страница 19: ...ial format devices It analyzes the whole device and then copies the data area The target device is required to be wholly cleaned prior to copy Scroll to select 6 2 Copy Area Deep Analysis then press OK to save the copy method Note 1 Deep Analysis copy mode needs to take time to analyze the whole device capacity prior to copying 2 Deep Analysis is recommended for use with 8 1 Copy SSD to Image ...

Страница 20: ...s recommended to leave the GPT backup area intact Caution GPT backup areas will be rebuilt automatically the next time Windows reboots For Linux tools such as gdisk can rebuild these backups 6 4 Skip Bad Sectors Skip source bad sectors during Copy Compare Scroll to select 6 4 Skip Bad Sectors then press OK to scroll through the available values for skipping bad sectors If the device data is critic...

Страница 21: ... of modified and proprietary data and partitions Copy Unknown Copy unknown format s Scroll to select 6 6 1 Unknown Format Copy Unknown then press OK to save this setting Skip Unknown Skip unknown format s Scroll to select 6 6 1 Unknown Format Skip Unknown then press OK to save this setting 6 6 2 Erase Master This function allows user to enable or disable the source port for sanitization Scroll to ...

Страница 22: ...press OK to view the submenus The default setting is Copy and Setting Do Not Copy HPA This menu contains submenu settings from which users can select Scroll to select HPA Copy Mode Do Not Copy HPA then press OK view submenu settings Keep Target HPA Does not copy HPA data but keeps target device s original HPA setting Scroll to select Keep Target HPA then press OK to save this setting Clear Target ...

Страница 23: ...buffer time 6 6 8 Lock Key This function allows user to enable or disable the 4 control panel buttons Scroll to select 6 6 7 Lock Key then press OK to access available settings Disabled Scroll to select Disabled then press OK to save this setting Enabled Only down up buttons are disabled Reboot system for setting to be in effect Scroll to select Enabled then press OK to save this setting 6 6 9 Sto...

Страница 24: ... Target Tolerance This function sets the capacities tolerance range between the source and target device If the capacity is outside the tolerance range the copy will fail 6 6 14 Clean SSD Before Copy Sets to clear SSD before copy function The default setting is No 6 7 Restore Defaults Restores all setting to manufacture defaults Scroll to select 6 5 Restore Defaults then press OK to restore settin...

Страница 25: ...helps to identify the slowest writing device that in turn keeps the operation running efficiently Export Today s Log Report Export today s log report via USB port to a USB drive Export Recent Log Report Exports a recent log report 1 28 days via USB port to a USB drive Note 1 The USB must be FAT16 FAT32 format 2 The LCD will display the number of recorded logs E g 1 6 means there are 6 logs Source ...

Страница 26: ...ced Function This menu allows user to access several submenus Scroll to select 7 4 Advanced Function then press OK access submenus Default password 123456 7 4 1 Clear All Logs Clear all log records Scroll to select 7 4 1 Clear All logs then press OK to clear all log records 7 4 2 Setup Password Allows password change Scroll to select 7 4 2 Password Setup then press OK to change to desired password...

Страница 27: ...Compare the source data with an image file in the internal SSD 8 3 Show Image Tank Display the information for internal SSD 8 4 Show One Image Select and display the information for an image file 8 5 Rename One Image Select and rename an image file 8 6 Delete One Image Select and delete an image file 8 7 Format Image Tank Format the internal SSD Caution This function will delete the data in the in...

Страница 28: ... user guide is stored in this folder 1 2 Double click PCIe Software it will show three folders Driver The PC needs to install the driver first in order to install other software GOB Compiler Used for creating GOB Image PCIE Upload Image Used for uploading the GOB Image to PCIE duplicator 1 3 Double click to install the driver 2 Creating a GOB Image 2 1 Connect a source drive to PC 2 2 Double click...

Страница 29: ...image and click Save The GOB file will be created b During compiling process the percentage of production is shown in the Progress Note If the device has not been detected in the list please click renew button in the right Caution Please note the GOB Image file will not copy to smaller target capacities than the original source drive capacity test01 D Scan D Scan ...

Страница 30: ...30 c After completion the detail of image information will display at the bottom Whole Device a Click Whole HDD named the image and click Save The GOB file will be created D Scan Test01 D Scan ...

Страница 31: ...31 b During compiling process the percentage of production is shown in the Progress c After completion the detail of image information will display at the bottom D Scan CRC32 D68BA4C D Scan ...

Страница 32: ...ile will be created b After completion the progress will show Deep Analyze 100 Caution If your source device has a lot of garbage data the image file size made through Depth Profiling Analysis will be big It is recommended to use a clean device to make a source Executing 4 5 Secure Erase is one way to clean the device Depth Profiling Analysis copy only supports new target device clean target devic...

Страница 33: ...3 2 Connect your computer via USB cable to the PCIE duplicator with both systems powered on 3 3 Double click and execute GOB Uploader application 3 4 After successful detection a popup menu will display shown in the figure below Click OK to Format HDD FOR FIRST USE This formats the internal SSD installed in the PCIE duplicator 3 5 Once formatted click Upload and choose an image file For example se...

Страница 34: ...d then power on the machine Scroll through to select 1 2 Internal Storage then press OK to verify the file name and size are correct A maximum of two duplicators can be connected If more than two duplicators are connected a popup menu will display an error message Machine ID Not Match To resolve the error all files must be deleted except GOB Uploader application within folder Select Image Test01 g...

Страница 35: ...icator s built in storage device 5 How to delete the GOB Image 5 1 Connect your computer via USB cable to the PCIE duplicator Then execute GOB Uploader application 5 2 Select the GOB file in the list and press Delete 5 3 Confirm the file name and then press OK 6 Advanced Functions 6 1 Connect your computer via USB cable to the PCIE duplicator Then execute the GOB Uploader application 6 2 Press Adv...

Страница 36: ...atically copy after the image is uploaded More Information For additional details on the U Reach NV BM Series please visit http www ureach usa com PCIe 1 to 20 html Specifications are subject to change without notice Caution Please backup all important data before using this function ...

Страница 37: ...Series NV BM Duplicador y Desinfectante PCIE Manual de Usuario v A 04 ...

Страница 38: ...e Notificaciones 40 Functions Table 41 Descripción del producto 46 Funciones 48 1 Copy Copiar 48 2 Compare 49 3 Copy Compare 49 4 Erase Borrar 50 5 Utility Utilidad 51 6 Setup Configuración 53 7 Log Manager Administrador de registros 62 8 Image Manager Administrador de imágenes 64 Image Management Gestión de imágenes 66 v A 04 4 ...

Страница 39: ... hardware pueden causar pérdida de datos formato defectuoso o carga de datos U Reach se esforzará por resolver o reparar cualquier problema reconocido por el cliente ya sea dentro del período de garantía o en función del tiempo y los materiales Especificaciones y características sujetas a cambios sin previo aviso u obligación Garantía U Reach ofrece una garantía básica de un año para piezas y mano...

Страница 40: ...rgue Use el producto solo en un área limpia seca sin polvo y ventilada Los líquidos o los residuos extraños pueden dañar gravemente su duplicador Es típico que la máquina se caliente durante el funcionamiento Mientras esté en uso no mueva el duplicador ni extraiga SSD La electricidad estática puede provocar un error de duplicación Preste atención al entorno de la duplicadora mientras opera el equi...

Страница 41: ...ca datos bit a bit del dispositivo conectado al puerto de origen o al puerto n 1 3 2 Internal Storage Almacenamiento interno disponible cuando se instala SSD interno Copies and verifies saved data images bit by bit from the duplicator s internal storage device 4 Erase Borrar 4 1 Quick Erase Borrado rápido Borra la tabla de índice de los dispositivos 4 2 Full Erase Borrado completo Borra todo el di...

Страница 42: ...me 5 4 7 Hora de apagado 5 5 Calc CRC64 Calcular CRC64 Calcula el valor CRC64 del dispositivo fuente 6 Setup Configuración 6 1 Menú de inicio Configura la función predeterminada para que se muestre después de la inicialización del equipo 6 2 Copy Area 6 2 Área de copia System and Files Sistema y archivos Copia datos y omite el espacio vacío Solo admite formatos estándar All Partitions Todas las pa...

Страница 43: ...ar patron One Byte Un byte Carácter aleatorio escrito por byte Grandes datos aleatorios Carácter aleatorio escrito en un conjunto de áreas 6 6 4 Skip Erase Errors Omitir errores de borrado Omite los sectores defectuosos durante el borrado 6 6 5 HPA Copy Mode Modo de copia HPA No mantener HPA No claro HPA No configurando HPA Copiar y configurar 6 6 6 Clear HPA at ERASE Borrar HPA en BORRAR Clear HP...

Страница 44: ...tino 6 6 12 Velocidad PCIe Establece la velocidad de transmisión de datos 6 6 13 Tolerancia objetivo Establece el rango de tolerancia de capacidad entre el origen y el destino La configuración predeterminada es Sin límite 6 6 14 SSD Clean SSD Before Copy SSD Limpiar SSD antes de copiar No La configuración predeterminada es No SI 6 7 Restore Defaults Restaurar los valores predeterminados Restablece...

Страница 45: ...istrador de imágenes 8 1 Copy SSD to Image Copiar SSD a imagen Carga los datos de origen en SSD interno 8 2 Compare SSD with Image Comparar SSD con imagen Compara los datos de origen con un archivo de imagen almacenado en el SSD interno 8 3 Show Image Tank Mostrar tanque de imagen Muestra la información del disco del SSD interno 8 4 Show One Image Mostrar una imagen Muestra información de la image...

Страница 46: ...Puerto USB para salidas de informes de registro y actualizaciones de firmware Botones de control Botón OK Pantalla LCD Puerto USB para PC LINK Interruptor de alimentación Entrada de alimentación Ranura SSD para guardar Imagen maestra Puerto de puesta a tierra ...

Страница 47: ...talla LCD Amarillo Encendido Verde Pase Rojo falló Número de Dispositivo de destino Función Tamaño total Adelante Confirmar Aceptar El dispositivo más lento Tiempo transcurrido y progreso de la copia Tamaño procesado copiado Hacia atrás Cancelar Atrás ...

Страница 48: ...o aprobados o fallidos y la duración de la copia se mostrarán en la pantalla LCD después de que se complete la duplicación 1 1 Source Port Puerto de origen Desplácese para seleccionar 1 1 Source Port luego presione OK para copiar a los destinos desde el puerto de origen Nota Recomendación la capacidad de los dispositivos de destino debe ser igual o mayor que la capacidad del dispositivo de origen ...

Страница 49: ...r 2 2 Internal Storage then press OK to select which GOB Image to verify from the duplicator s built in storage device The GOB Image is created through U Reach s proprietary software that is included with the duplicator 3 Copy Compare Sequentially automates from Function 1 Copy to Function 2 then Compare Scroll to select 3 Copy Compare then press OK to select which source to copy and verify from D...

Страница 50: ...os 5 submenús 4 1 Quick Erase Borrado rápido Esta función borrará la tabla de índice de los dispositivos conectados Desplácese para seleccionar 4 1 Quick Erase luego presione OK para iniciar el proceso de borrado Precaución 1 Cuando 1 2 Internal Storage está seleccionado el primer puerto se convierte en un puerto de destino automáticamente por ejemplo NV BM60 se convertirá en un duplicador de 1 a ...

Страница 51: ...rra las áreas no cargables que cumplen con los estándares NIST 800 88 Desplácese para seleccionar 4 5 Secure Erase luego presione OK para iniciar el proceso de borrado 5 Utility Utilidad Este menú revelará submenús relacionados con la información del dispositivo la información del sistema y las actualizaciones Desplácese para seleccionar 5 Utility luego presione OK para ver los submenús 5 1 Show D...

Страница 52: ...es Paso 1 prepare una unidad USB para la actualización Conecte una unidad USB a la PC Busque el archivo de BIOS deseado y guárdelo en el directorio raíz de la unidad USB Paso 2 proceda a actualizar el firmware Conecte la unidad USB al puerto USB en la parte frontal del duplicador Desplácese para seleccionar 5 4 2 Burn FW SSD Slot1 o 5 4 3 Burn FW ALL Slot luego presione OK para iniciar el proceso ...

Страница 53: ...ese para seleccionar 6 2 Copy Area luego presione OK Luego desplácese para seleccionar uno de los cinco métodos de copia Copy and Compare Preparations Copiar y comparar preparaciones Tenga en cuenta las siguientes configuraciones antes de continuar con la copia 6 2 Área de copia 6 4 Omitir sectores defectuosos El uso de los modos de copia adecuados puede reducir en gran medida el tiempo de funcion...

Страница 54: ...copiar Si los datos del dispositivo de origen están dentro de la capacidad del dispositivo de destino se procesará la copia FAT16 32 64 NTFS EXT2 EXT3 EXT4 lvm y HFS HFS HFSX son compatibles con este modo de copia All Partitions Todas las particiones Copie u omita HPA DCO particiones desconocidas formatos modificados etc definidos por la configuración Desplácese para seleccionar 6 2 Copy Area All ...

Страница 55: ...ia todo el dispositivo de origen independientemente del contenido formato partición o espacio vacío Este modo no analiza los datos Percentage Porcentaje Seleccione el porcentaje de capacidad de origen para copiar Desplácese para seleccionar 6 2 Copy Area Percentage luego presione OK para guardar el método de copia Se copiarán 350GB de todas las particiones junto con su contenido ...

Страница 56: ...apacidad del dispositivo antes de copiar 2 Deep Analysis se recomienda su uso con 8 1 Copy SSD to Image Precaución 1 Utilice un dispositivo de origen limpio para reducir la capacidad de datos analizados Dispositivo de origen limpio significa que no hay datos basura en el dispositivo de origen 2 El dispositivo de destino debe ser nuevo o completamente limpio antes de la copia De lo contrario existe...

Страница 57: ...s luego presione OK para desplazarse por los valores disponibles para omitir sectores defectuosos Si los datos del dispositivo son críticos y deben ser un clon completo se recomienda configurar Skip Error a 0 Los sectores defectuosos se pueden establecer como ilimitados o en un valor de 0 a 65 535 6 5 Language Idioma Seleccione inglés o japonés Desplácese para seleccionar 6 5 Language luego presio...

Страница 58: ...ardar esta configuración Skip Unknown Saltar desconocido Omitir formatos desconocidos Desplácese para seleccionar 6 6 1 Unknown Format Skip Unknown t Luego presione OK para guardar esta configuración 6 6 2 Erase Master Borrado maestro Esta función permite al usuario habilitar o deshabilitar el puerto de origen para la desinfección Desplácese para seleccionar 6 6 2 Erase Master luego presione OK Lu...

Страница 59: ...lazarse por los valores disponibles para omitir los sectores defectuosos 6 6 5 HPA Copy Mode Modo de copia HPA Desplácese para seleccionar 6 6 5 HPA Copy Mode luego presione OK para ver los submenús La configuración predeterminada es Copy and Setting Do Not Copy HPA Este menú contiene configuraciones de submenú entre las que los usuarios pueden seleccionar Desplácese para seleccionar HPA Copy Mode...

Страница 60: ... Borrar configuración de HPA Borra la configuración y los datos de HPA durante el borrado Desplácese para seleccionar 6 6 5 Clear HPA at Erase Clear HPA Setting luego presione OK para guardar esta configuración Keep HPA Setting Mantiene la configuración y los datos originales de HPA durante el borrado Desplácese para seleccionar 6 6 5 Clear HPA at Erase Keep HPA Setting luego presione OK para guar...

Страница 61: ...p Motor Time luego presione OK para configurar el tiempo de búfer 6 6 10 Boot Password Contraseña de arranque Configura la contraseña de inicio de sesión para el sistema Disabled Desactivado Los usuarios no necesitan una contraseña para acceder al sistema Enabled Activado Requiere la contraseña para acceder al sistema 6 6 11 Delete Device Signature After Copy Eliminar la firma del dispositivo desp...

Страница 62: ...erminados Restaura toda la configuración a los valores predeterminados de fabricación Desplácese para seleccionar 6 5 Restore Defaults luego presione OK para restaurar la configuración a los valores predeterminados de fábrica 7 Log Manager Administrador de registros Este menú permite a los usuarios acceder a varios submenús Desplácese para seleccionar 7 Log Manager luego presione OK acceder a los ...

Страница 63: ... través del puerto USB a una unidad USB 7 1 Out Today Report Informe de hoy Emite el informe de registro del día actual Desplácese para seleccionar 7 1 Out Today Report luego presione OK para enviar el informe de registro a una unidad USB 7 2 Out Recent Report Informe reciente Genera un informe de registro reciente Desplácese para seleccionar 7 2 Out Recent Report luego presione OK para enviar el ...

Страница 64: ...ificar mediante software iSecuLog exe para evitar modificaciones 8 Image Manager Administrador de imágenes Esta función permite al usuario administrar los archivos de imagen almacenados en el SSD interno 8 1 Copy SSD to Image Copiar SSD a imagen Cargue los datos de origen en el SSD interno como un archivo de imagen 8 2 Compare SSD with Image Comparar SSD con imagen Compare los datos de origen con ...

Страница 65: ...65 Seleccionar y eliminar un archivo de imagen 8 7 Format Image Tank Formato de tanque de imagen Formatee el SSD interno Precaución Esta función eliminará los datos en el SSD interno ...

Страница 66: ...está almacenada en esta carpeta 1 2 Doble click PCIe Software mostrará tres carpetas Controlador la PC necesita instalar el controlador primero para instalar otro software Compilador GOB se utiliza para crear una imagen GOB Imagen de carga PCIE se utiliza para cargar la imagen GOB en el duplicador PCIE 1 3 Doble click para instalar el controlador 2 Creating a GOB Image Creación de una imagen de GO...

Страница 67: ...c en Save Se creará el archivo GOB b Durante el proceso de compilación el porcentaje de producción se muestra en el Progress Nota Si el dispositivo no se ha detectado en la lista haga clic en botón de renovación a la derecha Precaución Tenga en cuenta que el archivo de imagen GOB no se copiará a capacidades de destino más pequeñas que la capacidad de la unidad de origen original test01 D Scan D Sc...

Страница 68: ...magen se mostrará en la parte inferior Whole Device Dispositivo complete a Clic Whole HDD nombró la imagen y haga clic en Save Se creará el archivo GOB b Durante el proceso de compilación el porcentaje de producción se muestra en el Progress D Scan Test01 D Scan ...

Страница 69: ...de la información de la imagen se mostrará en la parte inferior Depth Profiling Analysis Análisis de perfiles de profundidad Esta función está especialmente diseñada para formatos de datos que System and Files CRC32 D68BA4C D Scan D Scan ...

Страница 70: ...Si su dispositivo de origen tiene muchos datos basura el tamaño del archivo de imagen creado a través del Análisis de perfiles de profundidad será grande Se recomienda utilizar un dispositivo limpio para hacer una fuente Ejecutando 4 5 Secure Erase es una forma de limpiar el dispositivo La copia del análisis de perfiles de profundidad solo admite el dispositivo de destino nuevo dispositivo de dest...

Страница 71: ...su computadora mediante un cable USB al duplicador PCIE con ambos sistemas encendidos 3 3 Doble click y ejecute GOB Uploader application 3 4 Después de una detección exitosa aparecerá un menú emergente que se muestra en la figura siguiente Haga clic en OK para Format HDD FOR FIRST USE Esto formatea el SSD interno instalado en el duplicador PCIE 3 5 Una vez formateado haga clic en Upload y elija un...

Страница 72: ...Desplácese para seleccionar 1 2 Internal Storage luego presione OK para verificar que el nombre y el tamaño del archivo sean correctos Se pueden conectar un máximo de dos duplicadores Si hay más de dos duplicadores conectados un menú emergente mostrará un mensaje de error Machine ID Not Match Para resolver el error se deben eliminar todos los archivos excepto GOB Uploader application within folder...

Страница 73: ... almacenamiento integrado del duplicador 5 How to delete the GOB Image Cómo eliminar la imagen GOB 5 1 Conecte su computadora mediante un cable USB al duplicador PCIE Entonces ejecuta GOB Uploader application 5 2 Seleccione el archivo GOB en la lista y presione Delete 5 3 Confirme el nombre del archivo y luego presione OK 6 Advanced Functions Funciones avanzadas 6 1 Conecte su computadora mediante...

Страница 74: ...pués de que se cargue la imagen More Information Más información Para obtener detalles adicionales sobre la serie U Reach NV BM visite http www ureach usa com PCIe 1 to 20 html Specifications are subject to change without notice Precaución Haga una copia de seguridad de todos los datos importantes antes de usar esta función ...

Отзывы: