background image

13

INSTALLATION, EXCHANGE AND CYLINDERS RESET

UR Fog generators do not require special care, however, it is recommended the support of qualified and authorized 
personnel for periodic annual monitoring, taking into account the following:
1- Verify the good working condition of the power supply and battery
2- It is advisable to replace the cylinders after 2 years from the installation
3- Verify the lock of the nozzle ferrule
4- Verify the entirety of the nozzle sphere
5- Check the air tightness of the circuit and the switch functioning
6- Intervention report redaction and release of conformity declaration according to 37/08 order in case of provision 

Check the efficiency of the power supply and of the battery

Verify that the tension of the no-load voltage power supply (disconnected battery) is 13,8 V. If tension is different, regulate 
it using the trimmer placed on the power supply. Verify the efficiency of the battery (it should not be hot and bloated); 
it is suggested to change it every two years due to the heavy and prolonged charge during the shot without mains power.

Entirety of the nozzle sphere

Verify that the nozzle hole is cylindric. The average duration of the nozzle sphere depends on the number and duration 
of the shooting, around 8L of glycol.

14

MAINTENANCE

N.B. When you close the door, the buzzer will make a sound to confirm the tamper is closed.
Attention: Before opening the side doors, make sure that the alarm control panel is in “service” mode, 
so that the opening of the “anti-sabotage or tamper” circuit does not cause any alarm.

The cylinders for FAST PRO PLUS are guaranteed to work until the expiry date that is 
printed on the top of them.
After that date, cylinders should be changed even if they have not been used.
It is recommend to return them to you dealer, who will take care of disposal.
After removing the screws of the door, is sufficient to remove the cylinder and reset the 
LED of empty cylinder. After that, insert a new cylinder until you hear the “click” of the 
plastic support entering in its housing, then close the door.

If the cylinder seems to be “stuck” in the upper part DO NOT pull with force, 
make a pressure with two fingers on top of the cylinder, as to lower it. Then, try 
to remove it again. If the cylinder does not enter, check if the cylinder plate of 
the motor remains lifted.

In case of an empty cylinder to be replaced, it is recommended to replace it with the 
second cylinder still full present in the machine, and a new cylinder will replace this last 
one.
This in order to ensure a proper rotation of the cylinders and to avoid that a cylinder can 
remain unused for a long time within the device.

17

Содержание FAST 02 2C PRO PLUS

Страница 1: ...ST PRO PLUS FAST 03 1C PRO PLUS FAST 03 2C PRO PLUS FAST 02 2C PRO PLUS INSTALLATION AND USE MANUAL Installation and use manual models FAST PRO PLUS 120 v 230 v rev 22 08 2021 page 1 of 23 ENGLISH MANUAL ...

Страница 2: ...tions tips for fogging systems page 4 05 Technical specifications page 5 06 How to activate the system page 6 07 Mains power and power supply connections page 7 08 Description of input and output connections page 8 09 Connection examples page 10 10 Front LEDS Meaning page 14 11 Shooting time settings and fog flow direction page 14 12 Nozzle tamper page 16 13 Installation exchange and cylinders res...

Страница 3: ...t guaranteed by the manufacturer the use of UR Fog system in the presence of objects that may be damaged anyway by the contact with substances based on glycol water and alcohol Any employee or worker that may be exposed to fog must be warned in advance and must be checked for any allergy to the substances listed above At the date of printing of this manual it has never been pointed out any problem...

Страница 4: ...me table avoid overshooting even if the produced fog is dry and generally doesn t leave residue A shot that goes far beyond the recommended seconds can create a residue problems in the room 13 UR Fog continues to be effective for up to 2 hours without 220V and 110V main power thanks to the insulation system which maintains the temperature in the heating system 14 Install at an height of about 2 5 ...

Страница 5: ...g heating Heating time Maximum consume at 12 V Maximum power consumption at 12 V Average batteries lifetime Door tamper Anti tear off and anti shift 11 8 Kg 200 m3 1200 m3 1C 2400 m3 2C 2 x 600 ml 1 x 600 ml in 1C version about 2 hours 300 W 270 W about 50 minutes 42 W 500 mA Pb 2 Ah 12V Tamper screw Accelerometer 15 0 Kg 400 m3 2400 m3 2 x 600 ml about 2 hours 300 W 270 W about 90 minutes 45 W 50...

Страница 6: ...nly for a vertical standard installation In case of horizontal installation please refer to your authorized reseller distributor to get the appropriate cylinders I s necessary to insert the cylinders with the black plastic plug To open the additional compartment in the lower part it is necessary to remove cylinders compartment s door and take off the frontal shell unscrew and remove the screws bel...

Страница 7: ...that they generate a true sine wave not a rebuilt one Ask please to the UPS manifacturer the correspondance of such features before proceeding with the connection he max current to be considered for the system is 4A The connection to the 230V and 110V electricity grid must be performed by a qualified technician Connect the equipment to the electricity grid only after you have completed the install...

Страница 8: ...screw on the metal sheet INPUTS 12V power input GND power input ARM Arming input SHOOT Shooting input GND OUTPUTS EMPTY Empty cylinder output FAULT Fault output TAMPER Tamper output CONFIRM Shot confirmation output PIR SENSOR VALIDATION INPUT P 12V for PIR power supply P GND for PIR power supply COM PIR PV N C PIR V J6 Serial bus RS232 12V power input INPUTS OUTPUTS Shooting seconds setting Cylind...

Страница 9: ...ol receiver max 300 mA PV Validation input It s possible to connect to this input a validation sensor with a contact normally closed conncted to the terminal P The PV input can be connected to external devices such as PIR or door sensors and behaves as an additional firing validation input When the PV function is active by closing the W4 jumper the emission of fog will be possible ONLY if the SHOO...

Страница 10: ... FAST PRO PLUS inputs with outputs of a standard alarm system 09 CONNECTION EXAMPLES The diagrams and examples below are intended only for a better understanding of the operation of the inputs outputs None of the diagrams below represents the single scheme to perform as in respect of the reference standard EN50131 8 there are precise indications and only using all inputs and outputs on the PCB it ...

Страница 11: ...utputs Compared to B diagram this alarm central has only open collector outputs The simplest action to take is to use 2 relays to create a connection similar to the one shown in the previous diagram 12V INPUT GND INPUT ARM INPUT SHOOT INPUT GND EMPTY OUT FAULT OUT TAMPER OUT CONFIRM OUT 12V OUT GND OUT VALIDATION IN CENTRAL ALARM NC C NO NC C NO RELÈ ON OFF RELÈ ALARM FAST PRO PLUS CENTRAL ALARM O...

Страница 12: ... control panel normally opened In this diagram by putting a resistance with a value required by the alarm control panel used in UR Fog terminal with not used outputs the central will see the correct resistance After the activation of an output a pull down will occur causing the alarm in the corresponding zone DL EMPTY DL FAULT DL TAMPER 12V INPUT GND INPUT ARM INPUT SHOOT INPUT GND EMPTY OUT FAULT...

Страница 13: ...if the fogging system is not armed N B Is recommend to use this function after a careful evaluation of the risks from a security consultant With p2 p3 p4 p5 jumpers is possible to select if the contact should be normally opened or normally closed 1 2 empty contact 3 4 fault contact 1 2 tamper contact 3 4 shot confirmation contact p6 jumper should remain in fast plus position Normally closed Normal...

Страница 14: ...ning side door ensure that the control panel is set to service so that the opening of anti sabotage or tamper circuit does not cause any shooting ARM FAULT EMPTY RESERVE HEATING In this step the machine is heating but is not ready to shoot RECOMMENDED SHOOTING SECONDS ACCORDING TO THE VOLUME SPACE TO PROTECT m3 Fogging systems FAST 03 PRO PLUS and FAST 02 PRO PLUS are able to produce fog for a max...

Страница 15: ...25 6 7 8 9 10 160 192 576 175 210 630 189 227 681 204 244 732 218 262 786 11 12 13 14 15 m to protect Seconds of emission m to protect m to protect Seconds of emission Seconds of emission SHOOTING TABLE FAST 03 PRO PLUS 2C and 1C 19 23 69 38 46 138 57 68 204 77 92 276 96 115 345 115 138 414 135 162 486 160 192 576 175 210 630 1 2 3 4 5 6 7 8 9 190 228 684 205 246 738 220 264 792 235 282 846 250 30...

Страница 16: ...s disarmed probably was easier to go near the machine and obstruct the nozzle After 15 minutes the compressor will stop automatically If the system is disarmed and armed again the cycle will start again for 15 minutes After the emission of the fog as normally the zone where the machine is installed is the last where the visibility is reduced the generator remains vulnerable giving the possibility ...

Страница 17: ...tion of the shooting around 8L of glycol 14 MAINTENANCE N B When you close the door the buzzer will make a sound to confirm the tamper is closed Attention Before opening the side doors make sure that the alarm control panel is in service mode so that the opening of the anti sabotage or tamper circuit does not cause any alarm The cylinders for FAST PRO PLUS are guaranteed to work until the expiry d...

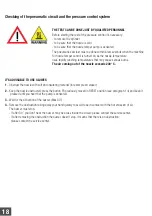
Страница 18: ... of the nozzle exceeds 200 C IT S ADVISABLE TO USE GLOWES 1 Obstruct the nozzle with soft and insulating material for example an eraser 2 Keep the nozzle obstructed press the button P3 previously moved in RESET position see paragraph 14 and keep it pressed until you hear that the pump is activated 3 Wait for the activation of the buzzer Max 30 4 Remove the obstruction taking away your hand quickly...

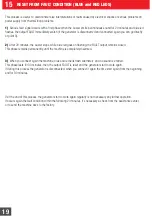
Страница 19: ...hing the FAULT output remains closed This phase remains permanently until the machine is completely disarmed 3 When you connect again the machine blue and red leds flash alternately and no sound is emitted This phase lasts for 30 minutes then the output FAULT is reset and the generator start to work again If during this process the generator is disconnected when you connect it again the time start...

Страница 20: ...sor will go on with it reaches 15 minutes If the machine is disarmed and then armed again the count will start again from zero Insert batteries Batteries not present When you connect the generator you don t hear the clicking relay When you arm the machine you hear an internal buzz like a motor The 3 frontal LED are flashing and the buzzer emits 1 beep for minute The buzzer emits 2 beep for minute ...

Страница 21: ...nected with the same central in rare situations it may occur that there are potential differences between the equipments and it could be necessary to uncouple Pressure down and then pull Wiring error The Jumper P3 is in the SET position The cylinder does not enter Disturbance interference or potential differences between devices In the case of strong interference lightning can occur a thermocouple...

Страница 22: ... THE OPENING OF THE MACHINE YOU WILL ACCEPT WHAT IS WRITTEN ON THIS MANUAL AND ON THE WEB SITE www urfog com We recommend to throw away the batteries in the appropriate waste containers for recycling Heavy metals contained in them are recyclable UR Fog srl Via Toscana n 38 10099 San Mauro Torinese Italy Phone 011 01 33 037 Fax 011 01 33 005 support urfog com Legal office Via Giacinto Collegno 11 1...

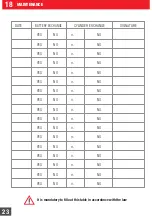
Страница 23: ... NO n NO YES NO n NO YES NO n NO YES NO n NO YES NO n NO YES NO n NO YES NO n NO YES NO n NO YES NO n NO YES NO n NO YES NO n NO YES NO n NO YES NO n NO YES NO n NO YES NO n NO YES NO n NO YES NO n NO It is mandatory to fill out this table in accordance with the law 23 ...

Страница 24: ...N B Ask for the PDF module writing to support urfog com UR Fog S r l Via Toscana 38 10099 San Mauro Torinese Italy ...

Отзывы: