27
1. Remove all packaging materials. Keep packaging materials away from chil-
dren - danger of suffocation!
2. Clean all parts with a damp cloth, as described in the section „Cleaning
and care“.
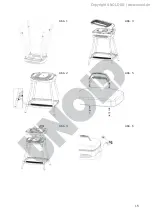
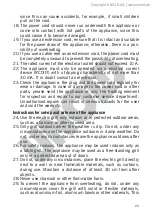
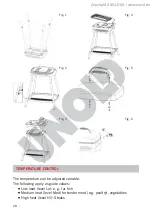
3. Fasten the four stand tubes on the grill base (Fig. 1). There is a pin on the
end stand tube, which is inserted in the appropriate opening on the grill
base and must audibly engage.
4. Insert the tray. There are appropriate holders on the stand tubes, in which
the tray must engage (Fig. 2).
5. Now place the grill housing on the grill base (Fig. 3).
6. Check whether the grease drip pan is correctly inserted. The grease drip
pan must be pushed into the grill housing and must firmly lock in place.
To take out the grease drip pan, you must carefully press it downwards and
then pull it out.
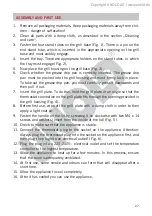
7. Insert the grill plate. To do this, hold the grill plate at an angle so that the
thermostat connection on the grill plate fits through the opening provided in
the grill housing (Fig. 4).
8. Before first use, wipe off the grill plate with a damp cloth in order to then
apply a light coat oil.
9. Fasten the handle on the lid by screwing it on clockwise with two M4 x 14
screws and washers (insert from the inside of the lid) (Fig. 5).
10. Check to make sure that the appliance is stable.
11. Connect the thermostat plug to the socket on the appliance. Attention:
Always plug the thermostat plug into the socket on the appliance first, and
then plug the plug into an electrical outlet! (Fig. 6).
12. Plug the plug into a 220-240V~ electrical outlet and set the temperature
controller to the highest temperature.
13. Allow the appliance to heat up for a few minutes. In this process, ensure
that the room is adequately ventilated.
14. At first use, some smoke and odours can form that will disappear after a
short time.
15. Allow the appliance to cool completely.
16. After it has cooled you can use the appliance.
ASSEMBLY AND FIRST USE
Copyright UNOLD AG | www.unold.de
Содержание 58580
Страница 6: ...6 EINZELTEILE 6 9 10 1 7 2 11 3 5 4 8 Copyright UNOLD AG www unold de ...
Страница 8: ...8 EINZELTEILE 6 9 10 1 7 2 11 3 5 4 8 Copyright UNOLD AG www unold de ...
Страница 15: ...15 Abb 1 Abb 2 Abb 3 Abb 4 Abb 5 Abb 6 Copyright UNOLD AG www unold de ...
Страница 95: ...95 Copyright UNOLD AG www unold de ...
Страница 96: ...Aus dem Hause Aus dem Hause Copyright UNOLD AG www unold de ...


