2
2.1
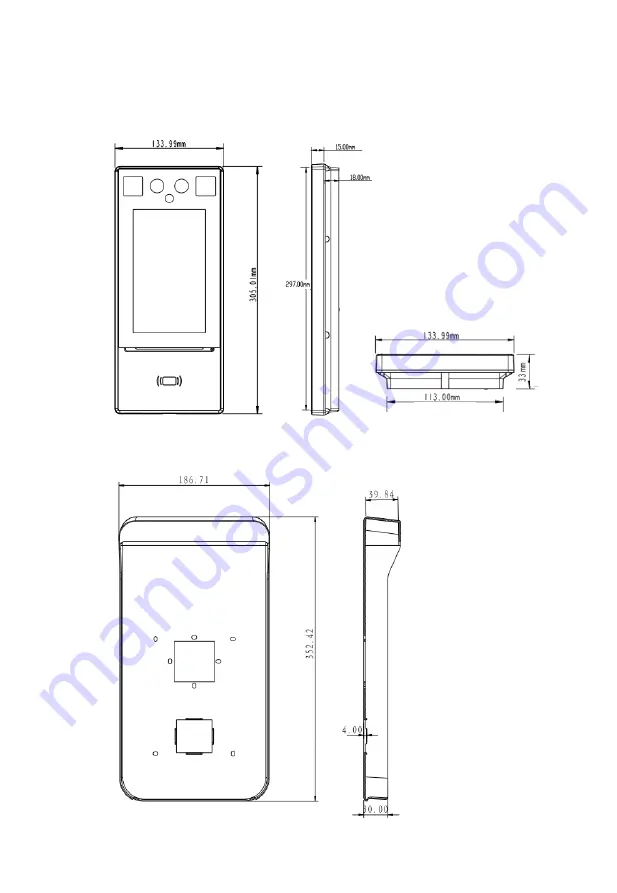
Appearance
and Dimension
The actual device appearance shall prevail. The figure below shows the dimension
of the device.
A waterproof hood is required in waterproof installation. The figure below shows
the dimensions of the waterproof hood.
Страница 1: ...V1 00 Face Recognition Access Control Terminal Quick Guide ...
Страница 2: ...stallation Environment 4 3 2 Device Wiring 4 3 3 Tools Preparations 6 3 4 Installation Steps 6 4 Device Startup 8 5 Web Login 9 6 Personnel Management 9 7 Appendix 10 7 1 Face Recognition Precautions 10 7 1 1 Face Photo Collection Requirements 10 7 1 2 Face Match Position 11 7 1 3 Face Match Posture 11 Disclaimer and Safety Warnings 13 ...
Страница 3: ...ly integrates UNV face recognition technology and supports face scanning based verification and door opening by relying on the deep learning algorithm thereby implementing accurate control of personnel access Visitors can call the indoor unit of a resident so that the resident opens the door remotely The product is highlighted by high recognition rate large storage capacity and fast recognition Th...
Страница 4: ... Dimension The actual device appearance shall prevail The figure below shows the dimension of the device A waterproof hood is required in waterproof installation The figure below shows the dimensions of the waterproof hood ...
Страница 5: ...ment lamp 1 2 Infrared camera 3 Infrared light supplement lamp 4 Visible light camera 5 Light supplement lamp 2 6 Display screen 7 Pass through indicator 8 Microphone 9 Card reading area 10 Loudspeaker 11 Reset button 12 USB2 0 13 Network interface 14 Power input DC 12V 25 15 20 pin interface 16 Tamper proof button 1 2 3 4 5 6 7 9 13 14 15 16 8 10 11 12 ...
Страница 6: ... see Wiring Description Table 3 1 Diameter Selection Table for Extension Power Cables DC 12V 2A for power supply the lower limit for the operating voltage is DC 9V 12V 25 Wire Diameter mm 0 8mm 1mm 1 25mm 1 63mm 20AWG 18AWG 16AWG 14AWG Transmission Distance m 18 37 58 99 2 Wiring Description The figures below show the wiring between the access control terminal and different devices For the wiring ...
Страница 7: ...OM WHITE LOCK_NO BROWN GND BLACK SEN_ IN WHITE BROWN BUTTON_IN WHITE YELLOW PRESS TO EXIT Face Recognition Access Control Terminal USB2 0 Network interface USB drive Card reader Door opening button Cathode lock Door status switch Power supply Anode lock Magnetic lock Access controller Power supply Wiegand card reader Alarm output device Alarm output device Alarm input device Alarm input device Pow...
Страница 8: ... in the wall in advance or makes a hole on the wall to embed the box NOTE There are two installation holes on the 86 86mm wall mounted junction box They can be parallel to the ground or vertical to the ground They need to map to intermediate holes on the bracket during actual installation 2 Determine the positions of holes on the wall by referring to the positions of four holes A on the installati...
Страница 9: ...ion box and use the Phillips screwdriver to tighten the screws clockwise to fasten the bracket Waterproof Installation The waterproof installation process is basically the same as the normal installation process You need to fasten the bracket and waterproof hood together for detail see figure below After the waterproof installation is completed apply enough silicone rubber along the gap between th...
Страница 10: ... Startup After the device is installed correctly connect one end of the power adapter purchased or prepared to the mains supply and the other end to the power interface of the face recognition access control terminal and then start the device The display screen of the outdoor monitor is energized and lights up and the live view is displayed on the screen indicating that the device is started succe...
Страница 11: ... restart the Internet Explorer to log in to the system The default password of this product is used only for initial login You are required to change the default password after initial login to ensure security Set a strong password of at least nine characters including all three elements digits letters and special characters If the password has been changed use the new password to log in to the We...
Страница 12: ...ple Import Tool Operation Manual Detailed Version and People Import Tool Operation Manual Simplified Version 7 Appendix 7 1 Face Recognition Precautions 7 1 1 Face Photo Collection Requirements General requirement bareheaded full face photo with the front side facing the camera Range requirement The photo should show the outline of a person s both ears and cover the range from the top of the head ...
Страница 13: ... figure If face match fails in area 1 shown in the figure move backward If face match fails in area 2 shown in the figure move forward 7 1 3 Face Match Posture 1 Facial Expression To ensure the accuracy of face match keep natural expression during the match as shown in the figure below 1m 1 5m 2m Matchable range 0 5m 1m 1 5m 2m 0 5m 1 2 Note Range of recognizable distance 0 5m to 2m Wall Ground ...
Страница 14: ...ccuracy of face match keep the face facing the recognition window during the match Avoid the head to one side side face head too high head too low and other incorrect postures Normal Head to one side Side face Head too high Head too low ...
Страница 15: ...or notice Users are fully responsible for the damages and losses that arise due to improper operation Uniview reserves the right to change any information in this manual without any prior notice or indication Due to such reasons as product version upgrade or regulatory requirement of relevant regions this manual will be periodically updated Disclaimer of Liability To the extent allowed by applicab...
Страница 16: ...prevent unauthorized physical access Isolate video surveillance network Isolating your video surveillance network with other service networks helps prevent unauthorized access to devices in your security system from other service networks Learn More You may also obtain security information under Security Response Center at Uniview s official website Safety Warnings The device must be installed ser...
Страница 17: ...ation Statement refer to http en uniview com Support Download_Center Product_Installation Declaration Caution The user is cautioned that changes or modifications not expressly approved by the party responsible for compliance could void the user s authority to operate the equipment NOTE This equipment has been tested and found to comply with the limits for a Class B digital device pursuant to part ...
Страница 18: ...lies with the European Low Voltage Directive 2014 35 EU and EMC Directive 2014 30 EU 2014 53 EU WEEE Directive 2012 19 EU The product this manual refers to is covered by the Waste Electrical Electronic Equipment WEEE Directive and must be disposed of in a responsible manner Battery Directive 2013 56 EC Battery in the product complies with the European Battery Directive 2013 56 EC For proper recycl...
Страница 19: ...www uniview com globalsupport uniview com Better Security Better World ...