background image

19 


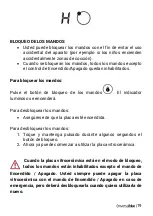
BLOQUEO DE LOS MANDOS 


Usted puede bloquear los mandos con el fin de evitar el uso 

accidental del aparato (por ejemplo si los niños encienden 

accidentalmente zonas de cocción). 


Cuando se bloquean los mandos, todos los mandos excepto 

el control de Encendido/Apagado quedan inhabilitados. 

 
Para bloquear los mandos: 

Pulse el  botón  de bloqueo de los mandos

.  El indicador 

luminoso se encenderá. 
 
Para desbloquear los mandos:


Asegúrese de que la placa esté encendida. 

 
Para desbloquear los mandos: 


Toque y mantenga pulsado durante algunos segundos el 

1.

botón de bloqueo. 


Ahora ya puede comenzar a utilizar la placa vitrocerámica. 

2.


 Cuando la placa vitrocerámica está en el modo de bloqueo, 
todos los mandos están inhabilitados excepto el mando de 

Encendido / Apagado. Usted siempre puede apagar la placa 
vitrocerámica con el mando de Encendido / Apagado en caso de 
emergencia, pero deberá desbloquearla cuando quiera utilizarla de 
nuevo. 


Содержание UBE2404-21

Страница 1: ......

Страница 2: ...5 DIRECTRICES PARA LA COCCIÓN 23 6 AJUSTES DE CALOR 25 7 CUIDADO Y LIMPIEZA 26 8 CONSEJOS Y RECOMENDACIONES 28 9 INSTALACIÓN 29 10 INFORMACION INHERENTE MEDIOAMBIENTE 36 11 GARANTÍA 37 ENGLISH 1 IMPORTANT SAFEGUARDS 39 2 PRODUCT INFORMATION 44 3 USING YOUR CERAMIC HOB 49 4 USING THE TIMER 53 5 COOKING GUIDELINES 55 6 HEAT SETTINGS 57 7 CARE AND CLEANING 58 8 HINTS AND TIPS 59 ...

Страница 3: ...3 9 INSTALLATION 61 10 ENVIRONMENTAL INFORMATION 68 11 WARRANTY 69 ...

Страница 4: ... el futuro Recuerde que el producto es para uso doméstico 1 INSTRUCCIONES DE SEGURIDAD POR FAVOR LEA TODAS LAS INSTRUCCIONES CON CUIDADO ANTES DE UTILIZAR EL PRODUCTO RIESGO DE ELECTROCUCIÓN DURANTE LA INSTALACIÓN Desconecte el aparato de la red eléctrica antes de efectuar cualquier tarea de mantenimiento en él La conexión a un sistema de cableado de puesta a tierra adecuado es un requisito esenci...

Страница 5: ...ite este manual de instrucciones a la persona responsable de la instalación del aparato ya que así podría reducir los costes de la instalación Con el fin de evitar situaciones de riesgo este aparato debe instalarse de acuerdo con las instrucciones para la instalación proporcionadas en este manual La instalación y la puesta a tierra de este aparato solo deben ser efectuadas por una persona debidame...

Страница 6: ...tacto con un técnico cualificado Desenchufe el aparato en la toma eléctrica de la pared antes de proceder a su limpieza o mantenimiento El incumplimiento de estas medidas de precaución conlleva el riesgo de electrocución o muerte RIESGO PARA LA SALUD Este aparato cumple las normas de seguridad electromagnética PELIGRO POR SUPERFICIE A ALTAS TEMPERATURAS Durante el uso partes accesibles de este apa...

Страница 7: ...alcance de los niños El incumplimiento de estas medidas de precaución conlleva el riesgo de quemaduras o escaldamiento RIESGO DE CORTE La hoja extremadamente afilada del rascador de la superficie vitrocerámica queda al descubierto cuando se retrae la cubierta de seguridad Extreme las precauciones y guarde siempre el rascador en un lugar seguro lejos del alcance de los niños La no adopción de las d...

Страница 8: ...sufrir lesiones personales graves No deje a los niños solos o sin vigilancia en la zona en la que se esté utilizando el aparato Tanto los niños como las personas que padezcan una discapacidad que limite su capacidad para utilizar este aparato deben estar supervisados por una persona responsable y competente que les indique cómo debe utilizarse El supervisor debe asegurarse de que el uso del aparat...

Страница 9: ...ificación similar con el fin de evitar situaciones de riesgo Este aparato está diseñado para el uso en viviendas y otras aplicaciones similares ADVERTENCIA El aparato y partes accesibles del mismo alcanzan temperaturas muy elevadas durante el uso Es necesario tener cuidado de no tocar los elementos calefactores Los niños menores de ocho años de edad deben mantenerse alejados del aparato a menos qu...

Страница 10: ...ne artículos sobre las superficies de cocción ADVERTENCIA Si la superficie estuviera agrietada apague el aparato con el fin de evitar el riesgo de electrocución ya que la superficie sirve de protección contra el contacto con elementos del aparato con corriente No deben utilizarse dispositivos de limpieza con vapor El aparato no debe utilizarse con un temporizador externo o un sistema de control re...

Страница 11: ...buena cocina ANTES DE UTILIZAR SU NUEVA PLACA VITROCERÁMICA Lea cuidadosamente este manual especialmente la sección Advertencias de Seguridad Retire la película de protección que pudiera cubrir su placa vitrocerámica Retire también la pegatina azul que lleva un código QR CARACTERÍSTICAS DEL PRODUCTO Modelo UBE2404 21 UBE2405 21 Tipo de placa Integrable Integrable Número de zonas de cocción 3 4 Tec...

Страница 12: ...x 510 x 55mm 580 x 510 x 55mm Dimensiones de encastre 560 x 480mm 560 x 480mm El peso y las dimensiones son aproximados Debido a que nos esforzamos por mejorar nuestros productos continuamente las especificaciones y los diseños podrían ser objeto de cambios sin previo aviso IMAGEN DEL PRODUCTO UBE2404 21 ...

Страница 13: ... 14 21 30cm 1050 1950 2700W 3 Panel de control táctil 4 Botón de encendido y apagado 5 Botón temporizador 6 Botón de función boost zona de cocción derecha 7 Botón de bloqueo 8 Botones para subir y bajar la potencia 9 Botones para seleccionar los quemadores 10 ...

Страница 14: ...14 UBE2405 21 Diámetro 16 5cm 1200W 1 Diámetro 20cm 1800W 2 Diámetro 13 8 23cm 1000 2200W 3 Diámetro 16 5cm 1200W 4 Panel de control táctil 5 Botón de encendido y apagado 6 ...

Страница 15: ...utensilios de cocina con los bordes dentados o irregulares o con una base curva Asegúrese de que la base de sus cazuelas sea lisa se apoye totalmente sobre la superficie vitrocerámica y tenga el mismo tamaño que la zona de cocción Coloque siempre la cazuela centrada encima de la zona de cocción A la hora de retirar las cazuelas de la superficie vitrocerámica levántelas no las deslice ni las arrast...

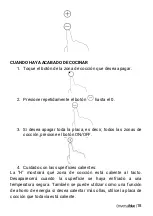
Страница 16: ...segúrese de que los mandos siempre estén limpios secos y que no haya ningún objeto como por ejemplo un utensilio de cocina o un trapo cubriéndolos Incluso una película delgada de agua podría dificultar el funcionamiento de los mandos PARA COMENZAR A COCINAR Pulse el mando de Encendido Apagado Una vez 1 encendido el aparato el zumbador emite un pitido y todas las visualizaciones muestran o indicand...

Страница 17: ...botón de la zona de cocción que desea activar 3 Seleccione la potencia tocando los botones o 4 o Si no elige un ajuste de calor en 5 segundos la placa calefactora se apagará automáticamente y entrará en el estado de espera o Puede modificar el ajuste de calor en cualquier momento durante la cocción o Manteniendo pulsado cualquiera de estos botones el valor se ajustará hacia arriba o hacia abajo ...

Страница 18: ...r todos las zonas de 3 cocción presione el botón ON OFF Cuidado con las superficies calientes 4 La H mostrará qué zona de cocción está caliente al tacto Desaparecerá cuando la superficie se haya enfriado a una temperatura segura También se puede utilizar como una función de ahorro de energía si desea calentar más ollas utilice la placa de cocción que todavía está caliente ...

Страница 19: ...dicador luminoso se encenderá Para desbloquear los mandos Asegúrese de que la placa esté encendida Para desbloquear los mandos Toque y mantenga pulsado durante algunos segundos el 1 botón de bloqueo Ahora ya puede comenzar a utilizar la placa vitrocerámica 2 Cuando la placa vitrocerámica está en el modo de bloqueo todos los mandos están inhabilitados excepto el mando de Encendido Apagado Usted sie...

Страница 20: ...ón trasera derecho posee elementos calefactores adicionales para aumentar la potencia Al pulsa el botón de función Boost los elementos calefactores adicionales se encenderán para proporcionar potencia extra ADVERTENCIA DE CALOR RESIDUAL Cuando la placa vitrocerámica ha estado en funcionamiento durante algún tiempo quedará un cierto calor residual En ese caso se mostrará la letra H con el fin de av...

Страница 21: ...á ninguna zona de cocción cuando haya transcurrido el intervalo de tiempo fijado También puede utilizarse para apagar una zona de cocción cuando haya transcurrido el intervalo de tiempo fijado El temporizador puede ajustarse en un intervalo de tiempo de hasta 99 minutos Si desea utilizar el temporizador para apagar una zona de cocción Seleccione una zona de cocción 1 Ajuste la configuración del te...

Страница 22: ...nte La pantalla mostrará el tiempo restante La zona de cocción correspondiente mostrará una H 4 cuando el temporizador haya finalizado Nota Si quieres cambiar el tiempo después de haber fijado el temporizador debes comenzar desde el paso 1 Si desea utilizar el temporizador como un avisador de minutos Presione el botón del temporizador cuando la encimera 1 esté funcionando Nota puedes utilizar el m...

Страница 23: ... frían alimentos ya que el aceite y la grasa se calientan muy rápidamente Cuando el aceite y la grasa alcanzan temperaturas extremadamente elevadas pueden arder espontáneamente con el serio riesgo subsiguiente de incendio Consejos para la Cocción Cuando los alimentos alcancen la ebullición reduzca el ajuste de temperatura El uso de una tapa sobre las cazuelas reduce el tiempo de cocción y permite ...

Страница 24: ...o recomendado Braseado de las carnes Para preparar filetes o chuletas jugosos y sabrosos Deje reposar la carne a temperatura ambiente durante unos 20 1 minutos antes de cocinarla Caliente una sartén de base gruesa 2 Unte los dos lados de la carne con aceite Añada una pequeña 3 cantidad de aceite a la sartén caliente y coloque la carne en ella Dé la vuelta a la carne solo una vez durante la cocción...

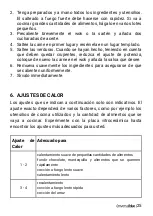
Страница 25: ... que desee Remueva suavemente los ingredientes para asegurarse de que 6 se calienten uniformemente Sírvalo inmediatamente 7 6 AJUSTES DE CALOR Los ajustes que se indican a continuación solo son indicativos El ajuste exacto dependerá de varios factores como por ejemplo los utensilios de cocina utilizados y la cantidad de alimentos que se vaya a cocinar Experimente con la placa vitrocerámica hasta e...

Страница 26: ...ca no habrá ninguna indicación de superficie caliente pero es posible que la zona de cocción siga estando caliente Extreme las precauciones Los estropajos duros algunos estropajos de nylon y los productos de limpieza abrasivos podrían arañar la superficie vitrocerámica Lea siempre la etiqueta con el fin de comprobar si su producto de limpieza o estropajo es adecuado No deje nunca residuos de limpi...

Страница 27: ... se retrae la cubierta de seguridad la hoja del raspador está extremadamente afilada Utilice el raspador con el máximo cuidado y guárdelo siempre en un lugar seguro lejos del alcance de los niños Comida o líquidos derramados sobre los controles táctiles 1 Apague la placa vitrocerámica 2 Absorba el vertido con una bayeta 3 Limpie la zona de los controles táctiles con una esponja o trapo limpio húme...

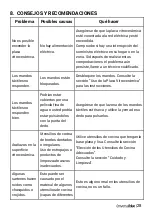
Страница 28: ...mandos táctiles no responden bien Podrían estar cubiertos por una película fina de agua o usted podría estar pulsándolos con la punta del dedo Asegúrese de que la zona de los mandos táctiles esté seca y utilice la yema de su dedo para pulsarlos Arañazos en la superficie vitrocerámica Utensilios de cocina de bordes dentados o irregulares Uso de estropajos o productos de limpieza abrasivos inadecuad...

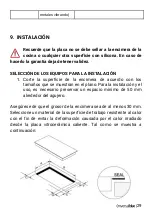
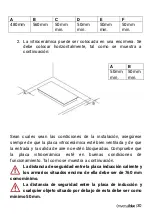
Страница 29: ...rficie de la encimera de acuerdo con los 1 tamaños que se muestran en el plano Para la instalación y el uso es necesario preservar un espacio mínimo de 50 mm alrededor del agujero Asegúrese de que el grosor de la encimera sea de al menos 30 mm Seleccione un material de la superficie de trabajo resistente al calor con el fin de evitar la deformación causada por el calor irradiado desde la placa vit...

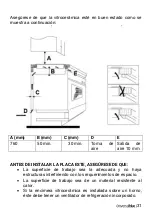
Страница 30: ...mica esté bien ventilada y de que la entrada y la salida de aire no estén bloqueadas Compruebe que la placa vitrocerámica esté en buenas condiciones de funcionamiento Tal como se muestra a continuación La distancia de seguridad entre la placa inducción caliente y los armarios situados encima de ella debe ser de 760 mm como mínimo La distancia de seguridad entre la placa de inducción y cualquier ob...

Страница 31: ...aire 10 mm ANTES DE INSTALAR LA PLACA ESTE ASEGÚRESE DE QUE La superficie de trabajo sea la adecuada y no haya estructuras interfiriendo con los requerimientos de espacio La superficie de trabajo sea de un material resistente al calor Si la encimera vitrocerámica es instalada sobre un horno éste debe tener un ventilador de refrigeración incorporado ...

Страница 32: ...suario Consulte a las autoridades locales si tiene alguna duda sobre la instalación Utilice acabados resistentes al calor y fáciles de limpiar como azulejos de cerámica para las superficies de las paredes que rodeen la encimera CUANDO HAYA INSTALADO LA PLACA ESTE SEGURO DE El cable de alimentación no es accesible a través de puertas o cajones Hay un flujo adecuado de aire desde el exterior hasta l...

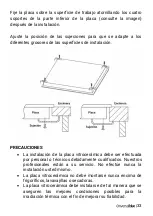
Страница 33: ...ión PRECAUCIONES La instalación de la placa vitrocerámica debe ser efectuada por personal o técnicos debidamente cualificados Nuestros profesionales están a su servicio No efectúe nunca la instalación usted mismo La placa vitrocerámica no debe montarse nunca encima de frigoríficos lavavajillas o secadoras La placa vitrocerámica debe instalarse de tal manera que se aseguren las mejores condiciones ...

Страница 34: ...de conectar la placa de inducción a la red eléctrica compruebe que El sistema de cableado doméstico sea apropiado para la 1 potencia utilizada por la placa La tensión corresponda al valor indicado en la placa de datos 2 de la placa de inducción Las secciones del cable de alimentación eléctrica puedan 3 resistir la carga especificada en la placa de datos Para conectar la placa de inducción a la red...

Страница 35: ...s Si el aparato se conecta directamente a la red eléctrica es necesario instalar un disyuntor omnipolar con una apertura mínima de 3 mm entre los contactos El instalador debe asegurarse de que la instalación eléctrica sea correcta y que cumpla las normativas de seguridad aplicables El cable no debe estar doblado o comprimido El cable debe inspeccionarse con regularidad y solo debe ser reemplazado ...

Страница 36: ...ciada de desperdicios eléctricos y electrónicos o bien entregar al vendedor en el momento de comprar un nuevo aparato La adecuada recogida de este aparato contribuye a evitar posibles repercusiones negativas para el ambiente o la salud de las personas La eliminación debe hacerse respetando los reglamentos medioambientales locales vigentes Para informaciones más detalladas inherentes al tratamiento...

Страница 37: ...mpra del producto No están cubiertos por la garantía los daños causados durante el transporte negligencia o mal uso montaje o instalación incorrecta así como las influencias externas tales como rayos atmosféricos o eléctricos inundaciones humedad etc Tampoco estarán cubiertos por la garantía los daños causados como consecuencia de inadecuada instalación conexión de alimentación eléctrica agua gas ...

Страница 38: ...ien contacte con nosotros de cualquiera de las siguientes formas o A través del email sat universalblue es adjuntando la factura de compra e indicando sus datos de contacto y brevemente qué problema presenta su producto o A través del teléfono 0034 968 893691 o En la siguiente dirección UNIVERSAL FOR ENGINEERING INDUSTRIES SPAIN SL C Decenio N1 P I Media Legua Las Torres de Cotillas Murcia 30565 P...

Страница 39: ...c use only 1 IMPORTANT SAFEGUARDS READ ALL INSTRUCTIONS BEFORE USING When using this appliance the following safety instructions should always be followed INSTALLATION ELECTRICAL SHOCK HAZARD Disconnect the appliance from the mains electricity supply before carrying out any work or maintenance on it Connection to a good earth wiring system is essential and mandatory Alterations to the domestic wir...

Страница 40: ...st be installed according to these instructions for installation This appliance is to be properly installed and earthed only by a suitably qualified person This appliance should be connected to a circuit which incorporates an isolating switch providing full disconnection from the power supply Failure to install the appliance correctly could invalidate any warranty or liability claims Hobs to be in...

Страница 41: ...arts of this appliance will become hot enough to cause burns Do not let your body clothing or any item other than suitable cookware contact the Induction glass until the surface is cool Metallic objects such as knives forks spoons and lids should not be placed on the hob surface since they can get hot Keep children away Handles of saucepans may be hot to touch Check saucepan handles do not overhan...

Страница 42: ... Never use your appliance for warming or heating the room After use always turn off the cooking zones and the hob as described in this manual i e by using the touch controls Do not allow children to play with the appliance or sit stand or climb on it Do not store items of interest to children in cabinets above the appliance Children climbing on the hob could be seriously injured Do not leave child...

Страница 43: ... abrasive cleaning agents to clean your hob as these can scratch the Induction glass If the supply cord is damaged it must be replaced by the manufacturer its service agent or similarly qualified persons in order to avoid a hazard This appliance is intended to be used in household and similar applications WARNING The appliance and its accessible parts become hot during use Care should be taken to ...

Страница 44: ...cked switch off the appliance to avoid the possibility of electric shock for hob surfaces of glass ceramic or similar material which protect live parts A steam cleaner is not to be used The appliance is not intended to be operated by means of an external timer or separate remote control system Remember that the hob must not be sealed to the kitchen countertop or any other surface with silicone If ...

Страница 45: ...ob Remove the QR code blue sticker TECHNICAL SPECIFICATION Model UBE2404 21 UBE2405 21 Type of hob Integrable Integrable No of cooking zones 3 4 Heating technologies Vitrocerámica Vitrocerámica Diameter of each cooking plates Ø 1 16 5cm 2 20cm 3 14 21 30 cm 1 16 5cm 2 20cm 3 13 8 23 cm 4 16 5cm Power of each heating element 1 1200W 2 1800W 3 1050 1950 2700W 1 1200W 2 1800W 3 1000 2200W 4 1200W Tot...

Страница 46: ...46 Weight and Dimensions are approximate Because we continually strive to improve our products we may change specifications and designs without prior notice PRODUCT OVERVIEW UBE2404 21 ...

Страница 47: ... 1 Diameter 20cm 1800W 2 Diameter 14 21 30cm 1050 1950 2700W 3 Control panel 4 On off button 5 Timer button 6 Booster for the right burner 7 Lock button 8 Power regulation control 9 Cooking zone selection button 10 UBE2405 21 ...

Страница 48: ...n 7 Booster for the right burner 8 Lock button 9 Power regulation control 10 Cooking zone selection button 11 CHOSSING THE RIGHT COOKWARE Do not use cookware with jagged edges or a curved base Make sure that the base of your pan is smooth sits flat against the glass and is the same size as the cooking zone Always centre your pan on the cooking zone ...

Страница 49: ...controls respond to touch so you don t need to apply any pressure Use the ball of your finger not its tip You will hear a beep each time a touch is registered Make sure the controls are always clean dry and that there is no object e g a utensil or a cloth covering them Even a thin film of water may make the controls difficult to operate ...

Страница 50: ... sure the bottom of the pan and the surface of the cooking zone are clean and dry Touching the heating zone selection control 3 Select a heat setting by touching the or control 4 If you don t choose a heat setting within 5 seconds the heating plate will automatically switch off and enter the state of standby mode You can modify the heat setting at any time during cooking By holding down either of ...

Страница 51: ...ng the to 2 0 Turn the whole cooktop off by touching the ON OFF control Beware of hot surfaces 3 H will show which cooking zone is hot to touch It will disappear when the surface have cooled down to a safe temperature It can also be used as an energy saving function if you want to heat further pans use the hotplate that is still hot LOCKING THE CONTROLS ...

Страница 52: ... lock mode all the controls are disable except the ON OFF you can always turn the ceramic hob off with the ON OFF control in an emergency but you shall unlock the hob first in the next operation OVER TEMPERATURE PROTECTION A temperature sensor equipped can monitor the temperature inside the ceramic hob When an excessive temperature is monitored the ceramic hob will stop operation automatically BOO...

Страница 53: ...ault shutdown times are shown inthe table below Power level 1 2 3 4 5 6 7 8 9 Default working timer hour 8 8 8 4 4 4 2 2 2 4 USING THE TIMER Your can use the timer in two different ways You can use it as a minute minder In this case the timer will not turn any cooking zone off when the set time is up You can set it to turn one cooking zone off after the set time is up You can set the timer for up ...

Страница 54: ...er setting then touch the or control of the timer once to decrease or increase by 1 minute or touch and hold the or control of the timer to decrease or increase by 10 minutes When the time is set it starts to count down immediately 3 The display shows the remaining time The corresponding cooking zone indicator shows H when 4 the setting time is be finished ...

Страница 55: ... this case the timer will not turn any cooking zone off when the set time is up Besides the timer can be adjusted to 0 to exit the minute 4 minder function 5 COOKING GUIDELINES Take care when frying as the oil and fat heat up very quickly At extremely high temperature oil and fat will ignite spontaneously and this presents a serious fire risk COOKING TIPS When food comes to the boil reduce the tem...

Страница 56: ...oking Heat up a heavy based frying pan 2 Brush both sides of the steak with oil Drizzle a small amount 3 of oil into the hot pan and then lower the meat onto the hot pan Turn the steak only once during cooking The exact cooking 4 time will depend on the thickness of the steak and how cooked you want it Times may vary from about 2 8 minutes per side Press the steak to gauge how cooked it is the fir...

Страница 57: ... 7 6 HEAT SETTINGS The settings below are guidelines only The exact setting will depend on several factors including your cookware and the amount you are cooking Experiment with the hob to find the settings that best suit you Heat setting Suitability 1 2 delicate warming for small amounts of food melting chocolate butter and foods that burn quickly gentle simmering slow warming 3 4 reheating rapid...

Страница 58: ... some nylon scourers and harsh abrasive cleaning agents may scratch the glass Always read the label to check if your cleaner or scourer is suitable Never leave cleaning residue on the hob the glass may become stained Boilover s melts and hot sugary spills on the glass Remove these immediately with a fish slice palette knife or razor blade scraper suitable for ceramic glass hobs but beware of hot c...

Страница 59: ...harp Use with extreme care and always store safely and out of reach of children Spillover s on the touch controls 1 Switch off the power to the hob 2 Soak up the spill 3 Wipe the touch control area with a clean damp sponge or cloth 4 Wipe the area completely dry with a paper towel The hob may beep and turn itself off and the touch controlsmay not function while there is liquid on them Make sure yo...

Страница 60: ...e There may be a slight film of water over the controls or you may be using the tip of your finger when touching the controls Make sure the touch control area is dry and use the ball of your finger when touching the controls The glass is being scratched Rough edged cookware Unsuitable abrasive scourer or cleaning products being used Use cookware with flat and smooth bases See Choosing the right co...

Страница 61: ...work surface according to the sizes shown in the 1 drawing For the purpose of installation and use a minimum of 50mm space shall be preserved around the hole Be sure the thickness of the work surface is at least 30mm Please select heat resistant work surface material to avoid larger deformation caused by the heat radiation from the hotplate As shown below A B C D E F 480 mm 560 mm 50mm mini 50mm m...

Страница 62: ...umstances make sure the ceramic cooker hob is well ventilated and the air inlet and outlet are not blocked Ensure the ceramic cooker hob is in good work state As shown below The safety distance between the hotplate and the cupboard above the hotplate should be at least 760 mm The safety distance between the induction hob and any object below it must be at least 50 mm ...

Страница 63: ...e with space requirements The work surface is made of a heat resistant material If the hob is installed above an oven the oven has a built in cooling fan The installation will comply with all clearance requirements and applicable standards and regulations A suitable isolating switch providing full disconnection from the mains power supply is incorporated in the permanent ...

Страница 64: ...aces surrounding the hob WHEN YOU HAVE INSTALLED THE HOB MAKE SURE THAT The power supply cable is not accessible through cupboard doors or drawers There is adequate flow of fresh air from outside the cabinetry to the base of the hob If the hob is installed above a drawer or cupboard space a thermal protection barrier is installed below the base of the hob The isolating switch is easily accessible ...

Страница 65: ...ramic cooker hob shall be installed such that better heat radiation can be ensured to enhance its reliability The wall and induced heating zone above the work surface shall withstand heat To avoid any damage the sandwich layer and adhesive must be resistant to heat A steam cleaner is not to be used This ceramic hob can be connected only to a supply with system impedance no more than 0 427 ohm If n...

Страница 66: ...rating plate 2 The power supply cable sections can withstand the load 3 specified on the rating plate To connect the hob to the mains power supply do not use adapters reducers or branching devices as they can cause overheating and fire The power supply cable must not touch any hot parts and must be positioned so that its temperature will not exceed 75 C at any point Check with an electrician wheth...

Страница 67: ...n made and that it complies with safety regulations The cable must not be bent or compressed The cable must be checked regularly and only replaced by a properly qualified person If the circuits reach a high temperature due to a deficient ventilation it is a clear sign that the hob has been incorrectly installed The first working sign would be a waste of power and it is recommended to uninstall and...

Страница 68: ...nce requires specialist waste disposal For further information regarding the treatment recover and recycling of this product please contact your local council your household waste disposal service or the shop where you purchased it For more detailed information about treatment recovery and recycling of this product please contact your local city office your household waste disposal service or the ...

Страница 69: ...tc arising from use are not covered by the warranty This warranty ends when it is discovered that repairs alterations or interventions have been made by anyone not authorised by Universal Blue The warranty ends when the product has not been used for domestic use only The warranty does not cover deficiencies resulting from improper use and periodic maintenance of the product as specified in the ins...

Страница 70: ...olígono Industrial Media Legua 30565 Las Torres de Cotillas Murcia Download this manual in our web site www universalblue es Universal for Engineering Industries Spain S L reserves the right to make any change in the specifications and features of the products without prior notice due to the continuous improvement of the products The images shown here are illustrative so there may be slight differ...

Страница 71: ...71 www universalblue es ...

Отзывы: