background image

11

QUICK START

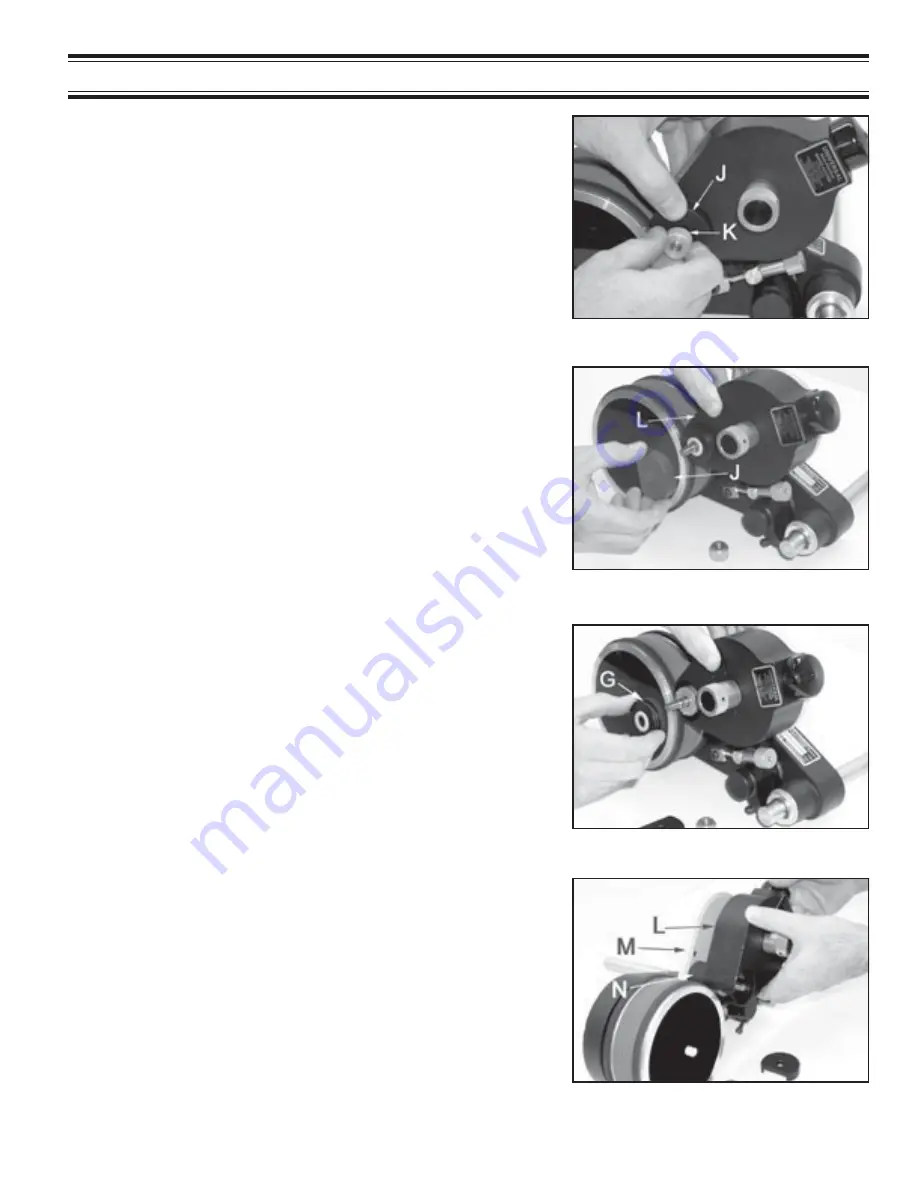
6 -Carefully pull the Inking System Cover “L” directly away

from the Inking System Baseplate “M”.  Do not let the cover
drag across the surface of the Transfer Roller “N”.

3 -While holding the Knurled Drive Wheel Cover “J” in place, re-

move the Knurled Cover Retaining Knob “K” by turning it counter-
clockwise

.

4 -Hold the Inking System Cover “L” in place and remove the

Knurled Drive Wheel Cover “J”.

5 -Continue to hold the Inking System Cover and Remove

the Knurled Drive Wheel “G”.

FIGURE 15

FIGURE 16

FIGURE 17

FIGURE 18

The Cover Retaining Knob holds the entire inking system
together and other parts may fall free from the coder if not
held securely when this knob is removed.

Note:

 The flat on the side of the Drive Wheel Cover is aligned

towards the print drum.  During reassembly, this must be re-
placed in the same position.

The Knurled Drive Wheel rests on top of the Transfer Roller
and is installed over 3 stainless steel drive pins which pro-
trude through 3 mating holes in the Drive Wheel.

The Transfer Roll Surface is a finely engraved Delrin plastic
material which can be easily scratched.  When assembled,
the Transfer Roll resides in a very close fitting cavity in the
Inking System Cover.

The Knurled Drive Wheel Cover is very loose fitting.

Содержание CLP-100NI-NPRT

Страница 1: ...US CONVEYOR LINE PRINTERS ALL MODELS UNIVERSAL STENCILING MARKING SYSTEMS INC P O BOX 871 ST PETERSBURG FLORIDA 33731 USA PH 727 894 3027 FAX 727 821 7944 E Mail sales universal marking com Website www universal marking com STENCILING MARKING SYSTEMS NPCLP 09048 ...

Страница 2: ...ur Customer Service Department PREFACE SPECIFICATIONS CLP 100 Series CLP 200 Series Indexing and Non Indexing Models Mounting Configurations Printing Dies Ink Rolls QUICK START Installing the Inking System Assembly Installing the Pre Inked Roll Installing the Printing Dies Adjusting the Ink Roll Eccentric BASIC PRINCIPLES OF OPERATION Inking System Using the 4 Oz Reservoir Ink Cartridges Selecting...

Страница 3: ...t automatic re inking of the roll without interrupting the printing process After many months of design engineering and field testing the Non porous Conveyor Line Printer is both simplistic in design and extremely effective in operation The relatively low cost of this system makes in plant printing of all types of non porous materials a practical reality The following pages of this manual explain ...

Страница 4: ...ETRIC CODERS ONLY 23 8 MM 7 RIBS X 430 2 MM LENGTH PRINT DRUM CIRCUMFERENCE APPROXIMATELY 18 457 MM MEASURED AT DIE FACE CONVEYOR LINE PRINTER SPECIFICATIONS TOP MOUNT SERIES Model Shown CLP 100NI NPRT 8 25 210 MM 11 60 295 MM 10 51 267 MM 11 51 292 MM 5 70 145 MM M I N M A X 1 2 3 4 91 125 MM 3 90 99 MM 1 56 40 MM 1 13 29 MM ...

Страница 5: ... 5 13 KG MAXIMUM DIE SIZE US STANDARD 1 7 8 14 RIBS X 16 15 16 LENGTH MAXIMUM DIE SIZE METRIC CODERS ONLY 49 2 MM 13 RIBS X 430 2 MM LENGTH PRINT DRUM CIRCUMFERENCE APPROXIMATELY 18 457 MM MEASURED AT DIE FACE 5 70 145 MM 9 19 233 MM 8 25 210 MM 11 25 286 MM 11 51 292 MM M I N M A X 1 2 3 4 82 122 MM 2 48 63 MM 2 05 52 MM ...

Страница 6: ...n the trailing edge of a carton passes the coder the print drum rotation stops at a random position When the next car ton engages the print drum the code will begin printing at a random position relative to the leading edge of the carton and repeat the code every 18 down the length of the carton Note Due to the symmetrical design of the Inking System on the Non Porous Conveyor Line Printer the Rig...

Страница 7: ...o accommodate the differences the print drums for Metric dies are machined to a slightly different diameter from the U S versions The coder model numbers on Metric coders will have a T suffix and the Metric Drum Covers have a distinct pink color Universal Non Porous Coders are designed to use Universal RIBtype printing dies which have a molded rib backing The ribs on the back of the die snap into ...

Страница 8: ... 2 seconds at 75 Degree F 24 Deg C ambient temperature Many other inks both dye and pigment based can be used in these ink rolls to meet the specific application requirements Refer to the Basic Principles of Operation section on Page 16 for more information on se lecting an appropriate ink Universal s Type MT Ink Rolls are disposable pre inked rolls which are available in a variety of fast drying ...

Страница 9: ...two holes in the Inking System with the matching holes in the Pivot Arm Reinstall the two Mount ing Screws B 4 Rotate the Pivot Arm until the Inking System Assembly A con tacts the Print Drum D There is a small amount of clearance in the mounting holes in the PivotArm While holding the Inking Sys tem against the Print Drum align the Inking System so that it points directly at the center of the Pri...

Страница 10: ...ry XF Neoprene ink roll refer to the Maintenance Section page 27 for inking instructions Rollers that have been pre inked at the factory are normally slightly oversaturated with ink to compensate for potential solvent loss during shipping and storage If you received a pre inked ink roll with your coder it is important to examine the roll prior to installation The ink roll should be thoroughly satu...

Страница 11: ...Cover Retaining Knob holds the entire inking system together and other parts may fall free from the coder if not held securely when this knob is removed Note The flat on the side of the Drive Wheel Cover is aligned towards the print drum During reassembly this must be re placed in the same position The Knurled Drive Wheel rests on top of the Transfer Roller and is installed over 3 stainless steel ...

Страница 12: ...ina tion of the external parts of the coder during roll installation Rolls which have been pre inked at the factory are typically over saturated with ink to compensate for potential solvent loss dur ing shipping and storage Installing an over saturated roll on the coder will result in ink leakage from the Inking System and in extreme cases may damage the ball bearings in the Transfer Roll When the...

Страница 13: ...pins on the top of the Transfer Roll N and pressing the Drive Wheel onto the Transfer Roll 12 Replace the Knurled Drive Wheel Cover J and rotate it into position with the flat edge directly facing the Print Drum The tops of the stainless pins will be flush with the top of the Drive Wheel when seated properly Hold the Drive Wheel Cover and Inking System Cover in place The Cover Retaining Knob shoul...

Страница 14: ...ie and then immediately press the die into the drum cover Do not apply too much liquid or the dies will slip during printing Note Do not apply silicone oil or any other lubricating agent to the rib backing or the dies will not hold properly during printing Individual character codes or text messages are installed in a mirror image of normal written text In other words install in a right to left di...

Страница 15: ...he surface of the Transfer Roller which in turn applies the ink to the face of the printing dies Do not rotate the Ink Roll Eccentric Knob further than necessary towards the MAX position or the excess contact pressure will squeeze ink out of the ink roll and may cause dripping inside the cover 1 After the printing dies are installed on the print drum manu ally rotate the print drum continuously in...

Страница 16: ...ss of ink solvent through evaporation these rolls are mounted in separate precision machined cavities in a sealed aluminum housing The integrity of the housing is such that the system can be left idle for days with out risk of the ink roll drying out The ink roll is installed on an eccentric mounted axle which enables the roll to be adjusted into con tact with the transfer roll The surface of the ...

Страница 17: ... AN APPROPRIATE INK Universal s Non Porous Inking System is compatible with a wide range of alcohol base marking inks Although we offer a variety of inks for specific applications you are not restricted to using only Universal brand inks When selecting inks from other manufacturers however it is your responsibility to make sure the inks are compatible with the coder Dye base inks contain liquid co...

Страница 18: ...omers in all applica tions the ink must be suitable for the specific application or it will not perform properly in the coder Universal 100 ink is an extremely fast dry ing formulation and is normally recom mended for continuous motion web print ing applications In these applications the ink must dry very rapidly on the material to prevent downstream transfer to idler rolls When the print drum is ...

Страница 19: ...eration with respect to the attitude of the coder frame is that the 4 oz res ervoir ink cartridge when installed should be kept as near to a vertical position as possible with the plastic ball pointing down This will en sure proper ink feed from the 4 oz cartridge to the ink roll When disposable Type MT Ink Rolls are used on the coder 4 oz Reservoir Ink Car tridges are not used and therefore the c...

Страница 20: ...g time air blowers can be used to direct heated air on the printed marks to accelerate drying Preheating the web material slightly with hot air before printing can also be an effective method to decrease the drying time If either of these techniques are used it is recommended that the hot air blowers be electrically tied into the web feed motor energizing circuit This will ensure that the blowers ...

Страница 21: ...ystem The 4 oz Reservoir Ink Cartridge should not be installed until most of the ink is consumed from the ink roll and the print quality shows signs that more ink is needed SPECIAL WEB PRINTING APPLICATIONS In applications where the web material is too narrow for both friction drive bearers to contact the surface of the web contact with one friction bearer is acceptable When the web is too narrow ...

Страница 22: ...num bridge is ordered in an appropriate length to span across the web line and custom mounting plates are designed to support the bridge The coders are installed using the Saddle Mounts which provide quick lateral positioning adjustment capabilities for the coder To position the coder a ratchet handle is loosened and the Saddle Mount can be moved laterally to the desired position and retightened F...

Страница 23: ...s can be accomplished easily with Univer sal Non Porous Conveyor Line Printers The selection of an appropriate place for installation on your conveyor line or other packaging equipment is a very important consideration in the performance of your coder The most important factor to consider is carton alignment CARTON ALIGNMENT To ensure print reliability and prevent damage to your coders the cartons...

Страница 24: ...aximum of 2 It is recommended that cartons be aligned between guide rails with no more than 1 4 clearance on each side as shown in Figure 40 This should allow ample clearance for cartons and protect your printer from damage In most applications installation of the printer can be accomplished by attaching the mounting bracket to the side rails of the powered conveyor using two 3 8 machine bolts The...

Страница 25: ...the cartons as they emerge from between the guide rails Check the print drum contact with the cartons while the conveyor is under power and adjust the print drum position to obtain approximately 1 4 3 8 deflection Figure 44 DIE POSITIONING FOR INDEXING APPLICATIONS Non Indexing models of the coder do not offer print registration capabilities there fore mounting the printing dies at a spe cific loc...

Страница 26: ...rinting dies in this position restricts how close to the leading edge of the carton you can register the print it is one of the only ways to ensure a good imprint on every carton Since the fastest drying non porous inks will dry in approximately 2 seconds at 75 Degree F ambient temperature the ink will also dry on the die face within 2 seconds after it is applied by the transfer roll If the dies h...

Страница 27: ...nces of ink in 1 rolls and 6 7 fluid ounces of ink in 2 rolls Please follow the guidelines below to properly pre ink your roll 1 Remove the dry roll from the storage container Pour 3 to 4 oz of ink into the container Note The ink level should be just below the textured line R on the side of the con tainer 2 Carefully place the roll into the container of ink Using your finger tips firmly press down...

Страница 28: ...with anything abrasive 1 To clean dust and ink residue from the surface of the transfer roll first remove it from the coder Lightly saturate a soft cotton cloth with the appropriate ink solvent and gently rub the surface of the roll until it is clean CLEANING THE CODER Warning Most of the ink solvents used for cleaning are flammable liquids Follow all safety precau tions recommended by the manufac...

Страница 29: ... the surface of the material being printed As the ink begins to dry this binder becomes tacky or sticky While in this stage of the drying process the tack on the dies will tend to pick up both airborne dust and any dust or dirt on the surface of the material being printed When this happens the dies should be cleaned or replaced The easiest method of cleaning the dies requires the appropriate solve...

Страница 30: ...crew and lift the tension adjustment assembly off of the coder 4 Remove the Pivot Arm Cap and lift the Pivot Arm assembly off it s axle 5 Reinstall the Pivot Arm on the axle in the opposite or mirrored orientation and replace the Pivot Arm Cap 6 Remove the Position Adjusting Screw and reinstall in the reverse position 7 Replace the tension adjusting assembly and the Pivot Screw LEFTHAND RIGHTHAND ...

Страница 31: ... end over the Locating Button 6 Readjust the position of the Adjusting Bolt to center the Tension Arm between the sides of the coder base plate Snug the Lock Nut against the Tension Arm to prevent movement from conveyor vibration TENSION ARM ASSEMBLY CONVERSION FIGURE 56 10 Reinstall the Inking System Assembly and adjust as explained on Page 9 Installing the Inking SystemAssembly SPRING CUP LOCATI...

Страница 32: ...ex mechanism ro tate the Print Drum approximately 3 4 turn The Index Com pression Springs will now be in the fully extended relaxed position 4 Using a 5 32 hex wrench remove the two Index Ramp Mount ing Screws which are located on the under side of the Coder Baseplate The Index Ramp will be reinstalled in the oppo site orientation to allow the Print Drum to turn in the reverse direction FIGURE 57 ...

Страница 33: ...x wrench loosen the Brass Tipped Set Screw located in the side of the Index Ring until the Index Ring rotates freely MAINTENANCE Important Note The Print Drum Axle is machined with thread relief as shown in Figure 40 so the tip of the set screw will not damage the threads To completely remove the Index Ring from the Axle the Brass Tip Set Screw must be loosened at least 2 full turns to prevent dam...

Страница 34: ...Print Drum approximately 3 4 turn to relieve spring tension as shown in Figure 59 Page 32 REPLACING PRINT DRUM INDEX SPRINGS 2 Using a small screwdriver remove the two Snap Rings on the Index Spring Assembly 3 Remove the Index Spring Assembly by lifting it straight up off the pivot pins RIGHT HAND CONFIGURATION LEFT HAND CONFIGURATION FIGURE 66 FIGURE 67 FIGURE 64 FIGURE 65 ...

Страница 35: ...ly Block A pull the Index Assembly Block C off the guide shafts Figure 68 Remove the Drum Index Springs Figure 69 5 Install new Index Springs over the stainless steel guide shafts and replace Index Block C 6 Reinstall the Index Spring Assembly in the Print Drum with the flanges of the white bushings facing the open end of the Print Drum 7 Reinstall the two Snap Rings Ensure that Block C is install...

Страница 36: ...Index Ring is properly adjusted as explained in Steps 5 7 on Page 33 The easiest way to accomplish this is to hold a flat block of metal or wood across the top of the Index Ring While holding the block in place raise Index Block B up to contact the bottom of the align ment block Ensure that Block B is level and vertically aligned with the Index Ring FIGURE 72 2 Lift Index Block B straight up to re...

Страница 37: ...approximately 1 2 from the flange ALIGN DIMPLES 3 Insert the Eccentric into the Inking System Cover Rotate and pull the Eccentric from the opposite side until the o ring slips into the bore When fully seated the flange of the eccentric will be approximately 0 010 above the sur face of the cover Rotate the Eccentric and align the dimple on the Eccentric flange with the dimple in the cover 4 Install...

Страница 38: ...rled Knob and align the engraved line on the knob with the MAX line on the Inking System Cover Set the ink roller axle on a small block of wood or metal The block used should be tall enough so the entire assembly is supported by the ink roller axle the Inking Sys tem Cover should not touch the table top FIGURE 78 FIGURE 79 6 Press down firmly on the Eccentric Knurled Knob While holding pressure on...

Страница 39: ...NE PRINTER CE GUARD ASSEMBLY PARTS LIST 1 2 3 4 5 6 CF 32 1 SCREW 5 16 18 X 1 2 SHC 1 4 1 1 1 NP 23 MS 36 NP 70 NP 72 NP 73 NP 71 SCREW 1 4 20 X 1 2 SHC SCREW 8 32 X 1 2 SHC MOUNTINGARM CLPCE GUARD TOP PLATE 100 CLP CE GUARD TOP PLATE 200 CLP CE GUARD END PLATE CLPCE GUARD KEY NO DESCRIPTION QTY REQD PARTNUMBER ...

Страница 40: ...40 NON POROUS CONVEYOR LINE PRINTER CLP 100 CLP 200 SERIES 1 2 29 28 27 3 4 7 8 9 6 5 26 25 23 24 23 14 15 13 16 10 11 12 18 17 22 21 20 19 ...

Страница 41: ... 20 X 1 1 4 SHC SPRING TENSIONARMCOMPRESSION TENSIONARMADJUSTINGCUP HEXNUT HEX BOLT SCREW 3 8 16 X 1 1 2 SHC 3 8 STEEL FLAT WASHER MOUNTINGBRACKET MOUNTING COLUMNASSEMBLY 3 4 NYLON FLAT WASHER BASE PLATE ASSEMBLY 3 4 STEEL FLAT WASHER SNAP RING FOR 3 4 SHAFT 1 NON INDEXING PRINTDRUMASSEMBLY COMPLETE 1 INDEXING PRINTDRUMASSEMBLY COMPLETE 2 NON INDEXING PRINTDRUMASSEMBLY COMPLETE 2 INDEXING PRINTDRU...

Страница 42: ...42 NON POROUS CONVEYOR LINE PRINTER INKING SYSTEMS CLP 100 CLP 200 SERIES 1 2 3 4 5 20 19 18 17 6 7 8 9 10 11 12 13 14 15 16 ...

Страница 43: ...ES INKING SYSTEM COVERASSEMBLY SIDE MOUNT CLP 200 SERIES INKING SYSTEM COVERASSEMBLY TOP MOUNT CLP 200 SERIES 1 TRANSFER ROLLASSEMBLY 2 TRANSFER ROLLASSEMBLY 1 CLP TRANSFER ROLL AXLE 2 CLP TRANSFER ROLL AXLE BRASS WASHER PRINT DRUM CLPNON POROUS INKING SYSTEM BASEPLATE SET SCREW 1 4 20 X 3 8 FPS SCREW 1 4 20 X 1 2 SHC SET SCREW 5 16 18 X 3 8 FPS 1 CLP XF NEOPRENE INK ROLL DRY 2 CLP XF NEOPRENE INK...

Страница 44: ...LP PD2I NP CLP PD1 NPT CLP PD1I NPT CLP PD2 NPT CLP PD2I NPT CLP 100 INDEXING PRINT DRUM W CB 04 PRINT DRUM BEARINGS CLP 200 NON INDEXING PRINT DRUM W CB 04 PRINT DRUM BEARINGS CLP 200 INDEXING PRINT DRUM W CB 04 PRINT DRUM BEARINGS CLP 100 NON INDEXING PRINT DRUM W CB 04 PRINT DRUM BEARINGS METRIC CLP 100 INDEXING PRINT DRUM W CB 04 PRINT DRUM BEARINGS METRIC CLP 200 NON INDEXING PRINT DRUM W CB ...

Страница 45: ...POROUS CONVEYOR LINE PRINTER INDEX ASSEMBLY PARTS LIST 2 3 4 5 6 7 8 9 10 11 CLP IA CLP IB CF 27 CS 07 CLP IC CM 34 CF 29 CLP IP CLP IR2 CF 04 1 1 1 2 1 1 2 1 1 1 INDEX ASSEMBLY BLOCK A INDEXASSEMBLY BLOCK B INDEXASSEMBLYMOUNTINGSCREW DRUMINDEXSPRING INDEX ASSEMBLY BLOCK C INDEXRAMP SCREW 10 32 X 1 2 SHC INDEXPLUNGERASSEMBLY INDEXRING SET SCREW 1 4 20 X 3 8 BTS ...

Отзывы: