Page No 2
Troubleshooting
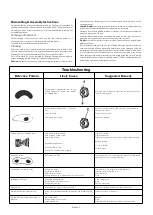
Defective Pattern
Likely Cause
Suggested Remedy
Dried material is clogging side-port “A” and
causing side-port “B” to blow spray towards
the clogged side.
Soak side-ports in thinner to clean clog. Do not poke any open-
ing with metal objects.
Dired material at fluid nozzle “C” restricts air
flow.
Loose air nozzle
Air Pressure set too high.
Remove air nozzle. Wipe off fluid tip using a cloth soaked in
thinner or soft brush.
Fasten nozzle securely.
Reduce air pressure.
Spitting, irregular or fluttering spray
Fluid nozzle cracked or worn.
Leak at thread of fluid nozzle.
Leak at fluid needle.
Needle Packing worn out.
Insufficient fluid in cup.
Vent hole in container cover clogged.
Tighten or replace.
Tighten fluid nozzle.
Tighten compression nut assembly or replace needle packing.
Replace packing.
Fill cup with fluid.
Clean out vent.
Split spray pattern.
Air Pressure too high.
Turn pattern knob c/w to decrease fan width. Turn fluid needle
adjusting nut c/w to increase fluid flow.
Unatomised or splattered spray.
Material too heavy.
Insufficient air pressure.
Fluid pressure too high.
Dried material on tip of fluid nozzle or air jets of air cap.
Thin material or use larger orifice fluid nozzle set.
Increase pressure to within limit.
Reduce pressure.
Clean.
Inadequate air delivery
Air needle partially closed.
Dried material in air jets of air cap.
Obstruction in air line.
Open control knob.
Clean.
Remove obstruction.
Excessive fog
Air pressure too high for viscosity of fluid.
Reduce air pressure and/or open fluid control knob.
Material leaking from fluid inlet cup
Loose cup or foreign substances on/between cup thread and fluid
inlet.
Tighten and clean or replace it.
Material leak from nozzle when trigger is
released.
Worn fluid needle.
Dried material in tip of nozzle.
Loose packing nut.
Replace.
Clean.
Tighten Needle packing nut by turning counterclockwise.
Dismantling & Assembly Instructions
It is important that the spray gun is cleaned after daily use. Cleaning is accomplished by
spraying an appropriate solvent or thinners through the system. Wipe the exterior of
the spray gun with a solvent soaked cloth or use the provided brush to remove any
accumulated material.
Exchange of nozzle set
When changing to another nozzle, make sure that the complete nozzle set is
changed. A set comprises of air cap, paint nozzle, and fluid needle.
Assemble fluid nozzle before putting in fluid needle.
Cleaning
Empty any material from the gravity feed cup and replace with a suitable solvent.
Operate trigger until material traces have disappeared and gun is thoroughly clean.
Wipe gun exterior with a solvent dampened cloth or use provided brush.
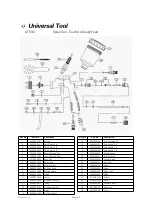
Note: If fluid nozzle (2) is to be removed for thorough cleaning squeeze trigger to
prevent damaging the fluid needle tip (7) when unscrewing nozzle.
Caution:
Always exercise extreme care when using any solvent or thinners. Never
clean gun near fire, flames or any source of heat or sparks. Properly dispose of used
cleaning material.
Caution: Do Not
soak entire spray gun in solvent or thinners for a long period of time
as this will destroy lubricants and possibly makes motion unsmooth.
Never use lye or caustic alkaline solutions for cleaning; such solutions will attack the
aluminium alloy parts of the gun.
Important: Make certain that the air cap and fluid nozzle are kept clean at all times. If
necessary, remove these two components and soak them in solvent.
Do Not
use metal instruments to clean air cap or fluid nozzles as an irregular spray
pattern may result.
After a thorough cleaning of the gun, the following lubrication procedures must be
observed to ensure affective high quality performance of the spray gun. Lubricate
working points (13) with straight mineral oil or caster oil. Periodically place a few drops
of oil on tapered sections of fluid nozzle (2) to ensure easy operation of the air cap.
When spraying water bases materials coat fluid nozzle inside and out with straight
mineral oil after use. Outer diameter of needle sleeve (7) of fluid needle assembly must
be lubricated occasionally with straight mineral oil.


