


58
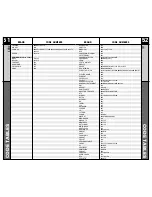
COMMAND
57
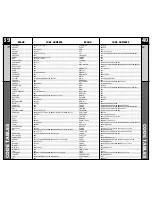
BRAND
CODE NUMBERS
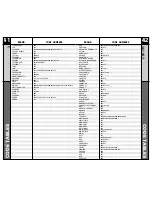
AU
X
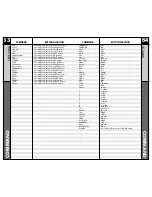
CODE T
ABLES
MARANTZ
014 027 056 065 087
MCINTOSH
238
MITSUBISHI
242 243
NAD
029 048
NAKAMICHI
244 245 025
ONKYO
002 012 016 017 018 019 115
OPTIMUS
026 054 055
PANASONIC
007 010 032 088 195
PHILIPS
027 087
PIONEER
003 039 047 050 066 098 222
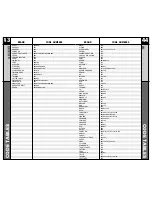
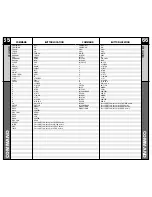
QUASAR
007 088
SANSUI
027 113 119 224
SHARP
026 057 131 175 181
SHERWOOD
038 004 028 030 033 034
SONY
020 022 052 084 089
TEAC
009 059 212
TECHNICS
007 010 076 088 109 122 193
TOSHIBA
112
VICTOR
106
YAMAHA
021 026 031 067 040
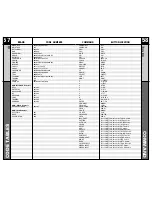
AUX-Media PC Controls
DELL
261 262
GATEWAY
261 262
HAUPPAUGE
294 295
HP
261 262
KEYSPAN
297
SONY
261 262
TOSHIBA
261 262
WINBOOK
261 262
AUX - XBox Controls
MICROSOFT/XBOX
408 107
AUX-iPod Controls
APPLE/iPod
401
BOSE
409
KENSINGTON
406
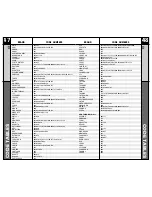
POWER/OFF
OFF
POWER/ON
ON
VOL+
VOL+
VOL-
VOL-
MUTE
MUTE
CH+
CH+
CH-
CH-
PREV CH
PREV CH
TV/VCR
TV/VCR
MENU
MENU
CH GUIDE
GUIDE
DISPLAY
INFO
CANCEL
EXIT
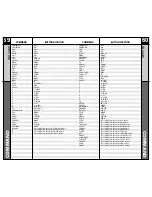
UP
UP
DOWN
DOWN
SELECT
SELECT
LEFT
LEFT
RIGHT
RIGHT
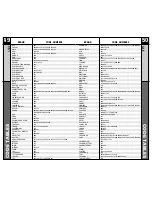
1
1 / SLEEP
2
2 / 6.7 CH
3
3 / TEST
4
4/ THX
5
5 / DD
6
6 / DTS
7
7 / LOGIC
8
8 / ST
9
9 / SURR
0
0 / TAPE 2
10
+10 / VCR 4
ENTER
ENT / PH
PIP ON/OFF
MODE+
PIP SWAP
SUB+
PIP POSITION
PIP CH+
REAR+
PIP OFF
MODE-
PIP SIZE
SUB-
PIP FREEZE
CENTER-
PIP CH-
REAR-
INPUT/ANT
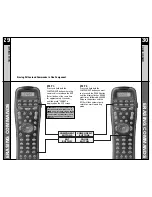
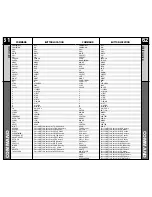
Press SHIFT first, then press TV/VCR button.
CAPTION
Press SHIFT first, then press MENU button.
AUTO CH
Press SHIFT first, then press GUIDE button.
SOUND
Press SHIFT first, then press INFO button.
RESET
Press SHIFT first, then press EXIT button.
ADD
Press SHIFT first, then press UP button.
DELETE
Press SHIFT first, then press DOWN button.
SLEEP
Press SHIFT first, then press 1/SLEEP button.
RATIO
Press SHIFT first, then press 2/6.7CH button.
RGB INPUT
Press SHIFT first, then press 3/TEST button.
COMPONENT
Press SHIFT first, then press 4/THX button.
MODE
Press SHIFT first, then press 5/DD button.
WIDE
Press SHIFT first, then press 6/DTS button.
S-VIDEO INPUT
Press SHIFT first, then press 7/LOGIC button.
VIDEO1 INPUT
Press SHIFT first, then press 8/ST button.
VIDEO2 INPUT
Press SHIFT first, then press 9/SURR button.
TV Locations
BUTTON LOCATION
COMMAND
Содержание RF10 MASTERCONTROL
Страница 1: ......


