background image

V 2 0 0 - 1 8 - E 4 X B      

S n a p - i n   I / O     M o d u l e

  6 / 0 5


Unitronics 


Changing Jumper Settings 


To access the jumpers, you must remove the snap-in I/O module from the controller, and then remove the 
module’s PCB board.  Before you begin, turn off the power supply, disconnect and dismount the controller. 


„


Before performing these actions, touch a grounded object to discharge any 
electrostatic charge. 

„


Avoid touching the PCB board directly by holding the PCB board by its connectors. 

Accessing the Jumpers 

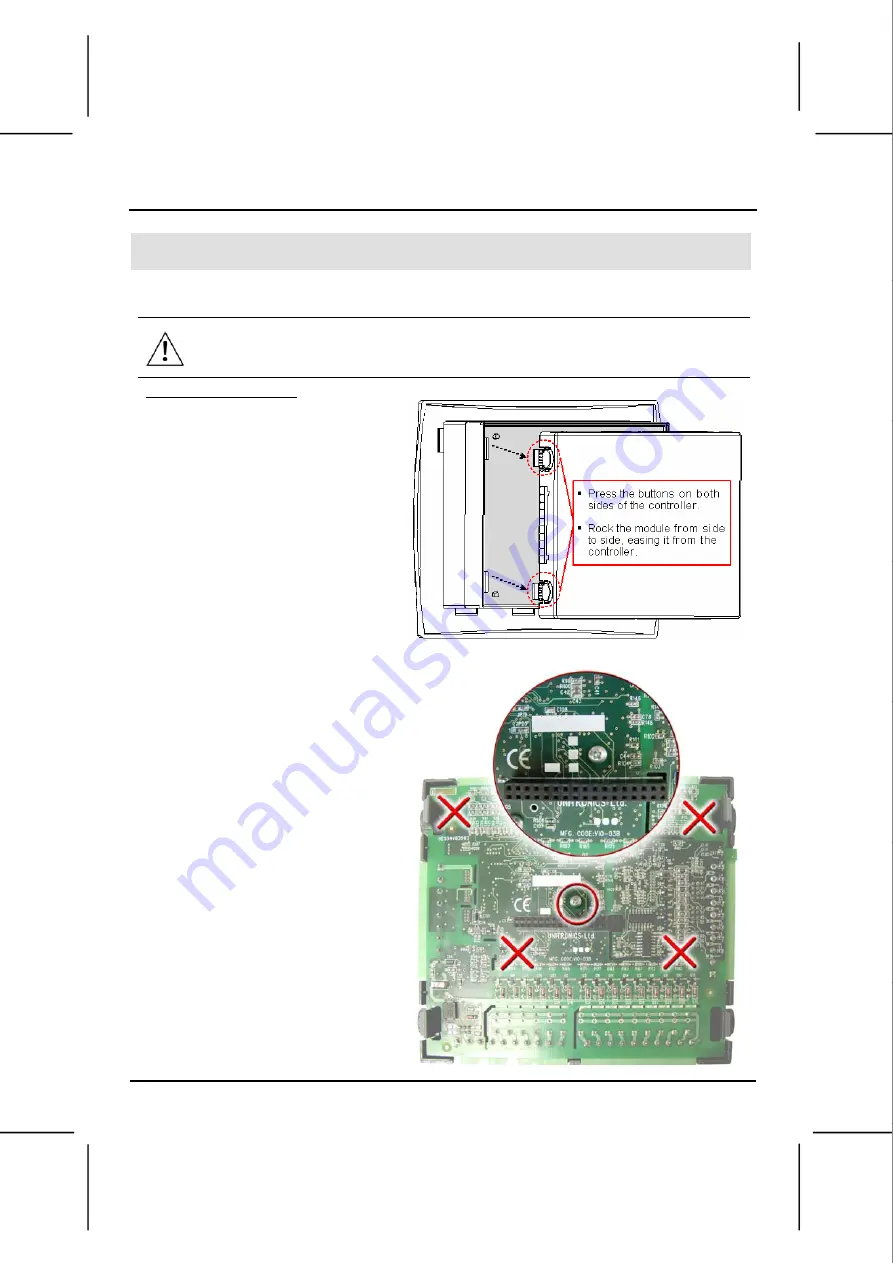
First, remove the snap-in module. 

1.  Locate the 4 buttons on the sides 

of the module, two on either side. 
Press the 2 buttons on either side 
of the module as shown, and hold 
them down to open the locking 
mechanism.  
 

2.  Gently rock the module from side 

to side, easing the module from the 
controller. 


3.  Using a Philips 

screwdriver, remove the 
center screw, shown in 
the figure below, from 
the module’s upper PCB 
board.

 Do not remove 

any other screws

.  


4.  Holding the PCB board by its 

edges, gently lift it out of the 
module. 


i4 Automation Ltd - 01480 395256

Содержание V200-18-E4XB

Страница 1: ... with the device s electrical wiring Symbol Meaning Description Danger The identified danger causes physical and property damage Warning The identified danger can cause physical and property damage Symbols are used to highlight information relating to the user s personal safety and equipment protection throughout this document When these symbols appear the associated information must be read caref...

Страница 2: ...e wire do not exceed a maximum torque of 0 5 N m 5 kgf cm Do not use tin solder or any other substance on stripped wire that might cause the wire strand to break Install at maximum distance from high voltage cables and power equipment I O Wiring General Input or output cables should not be run through the same multi core cable or share the same wire Allow for voltage drop and noise interference wi...

Страница 3: ...al input wiring pnp source digital input wiring npn sink high speed counter pnp source high speed counter Inputs I0 I1 and I2 I3 can be used as shaft encoders as shown below npn sink shaft encoder wiring pnp source shaft encoder wiring i4 Automation Ltd 01480 395256 ...

Страница 4: ...s 9 10 11 12 13 14 15 and 16 In the event of voltage fluctuations or non conformity to voltage power supply specifications connect the device to a regulated power supply Transistor Outputs Outputs 0 and 1 can function as either npn or pnp in accordance with jumper settings and wiring Open the device and set the jumpers according to the instructions beginning on page 8 Outputs 2 to 16 function as p...

Страница 5: ...e to the 0V terminal In the event of voltage fluctuations or non conformity to voltage power supply specifications connect the device to a regulated power supply Since the analog I O power supply is isolated the controller s 24VDC power supply may also be used to power the analog I Os The 24VDC power supply must be turned on and off simultaneously with the controller s power supply i4 Automation L...

Страница 6: ...e In order to function correctly the analog power supplies must be wired as shown on page 5 To ensure proper performance a warm up period of a half an hour is recommended Analog Inputs Inputs may be wired to work with either current or voltage When set to current voltage all inputs share a common ACM signal current current voltage RTD Inputs 1 Wire one lead of each RTD input to the common signal C...

Страница 7: ...iguration note that in order to set mV inputs thermocouple jumper settings are used Thermocouple Analog Outputs Shields should be earthed connected to the earth of the cabinet An output can be wired to either current or voltage Use the appropriate wiring as shown below Open the device and set the jumpers according to the instructions beginning on page 8 To ensure proper performance a warm up perio...

Страница 8: ...ectly by holding the PCB board by its connectors Accessing the Jumpers First remove the snap in module 1 Locate the 4 buttons on the sides of the module two on either side Press the 2 buttons on either side of the module as shown and hold them down to open the locking mechanism 2 Gently rock the module from side to side easing the module from the controller 3 Using a Philips screwdriver remove the...

Страница 9: ... Voltage Current T C or mV PT100 14 A B B A 13 A B B A Analog input 3 12 A A B B 11 A B B A 10 A B B A Analog input 2 9 A A B B 8 A B B A 7 A B B A Analog input 1 6 A A B B 5 A B B A 4 A B B A Bottom PCB board Analog input 0 3 A A B B Digital Output Jumpers Jumper PNP NPN Digital Output 0 1 A B Note that Jumpers 15 16 are not used Digital Output 1 2 A B i4 Automation Ltd 01480 395256 ...

Страница 10: ...ing Reassembling the controller 1 Return the PCB board to the module and secure the center screw 2 Next reinstall the module Line the circular guidelines on the controller up with the guidelines on the Snap in I O Module as shown below 3 Apply even pressure on all 4 corners until you hear a distinct click The module is now installed Check that all sides and corners are correctly aligned i4 Automat...

Страница 11: ...speed counter or as part of a shaft encoder In each case high speed input specifications apply When used as a normal digital input normal input specifications apply 2 Inputs 1 and 3 can each function as either counter reset or as a normal digital input in either case its specifications are those of a normal digital input These inputs may also be used as part of a shaft encoder In this case high sp...

Страница 12: ... See Note 6 pnp 2kHz npn 50kHz ON voltage drop pnp 0 5VDC maximum npn 0 4VDC maximum Short circuit protection Yes pnp only pnp source power supply See Digital Output s Power Supply above npn sink power supply operating voltage 3 5V to 28 8VDC unrelated to the voltage of either the I O module or the controller Notes 5 Outputs 0 1 2 3 4 5 6 7 and 8 share a common power signal Outputs 8 9 10 11 12 13...

Страница 13: ...imation Resolution at 0 10V 0 20mA 14 bit 16384 units See Note 7 Resolution at 4 20mA 3277 to 16383 13107 units See Note 7 Conversion time Synchronized to cycle time Input impedance 1MΩ voltage 121 5Ω current Absolute maximum rating 20V voltage 40mA current Full scale error 0 4 Linearity error 0 04 Status indication Yes See Note 8 Notes 7 12 or 14 bit resolution may be selected via software 8 The ...

Страница 14: ...uts Input range As shown in the table on page 15 See Note 11 Conversion method Voltage to frequency Resolution 0 1 C 0 1 F maximum Conversion time 100mS minimum per channel depending on software filter type Input impedance 10MΩ Cold junction compensation Local automatic Cold junction compensation error 1 5 C 2 7 F maximum Absolute maximum rating 0 6VDC Full scale error 0 4 Linearity error 0 04 War...

Страница 15: ...e Analog Outputs Number of outputs 4 single ended Output range 0 10V 4 20mA See Note 13 Resolution 12 bit 4096 units Conversion time Synchronized to scan time Load impedance 1kΩ minimum voltage 500Ω maximum current Galvanic isolation Analog outputs to bus Yes Analog outputs to Analog PT TC inputs Yes Analog outputs to analog outputs No Linearity error 0 1 Operational error limits 0 2 Notes 13 Note...

Страница 16: ...merchantability and or fitness for a particular use or purpose Unitronics assumes no responsibility for the results direct and or indirect of any misuse of the information appearing in this document nor for any use of the Unitronics products referred to herein in any manner deviating from the recommendations made in this document Unitronics assumes no responsibility for the use of any parts compon...

Отзывы: