background image

GR - 16

4. Η ΧΡΗΣΗ ΤΟΥ ΠΡΟΪΟΝΤΟΣ

4.1 Κουμπια ελεγχου εστιων

Εστία μαγειρέματος

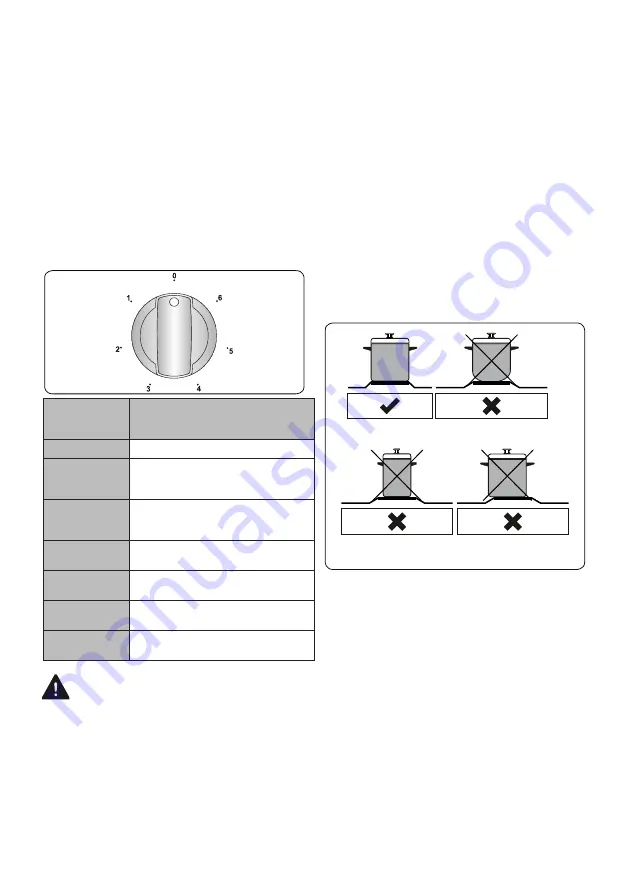
Η εστία μαγειρέματος ελέγχεται από ένα 

κουμπί με 6 θέσεις.

Γυρίζοντας το περιστροφικό κουμπί 

χειρισμού σε μία από αυτές τις θέσεις, η 

εστία μαγειρέματος μπορούν να τεθούν σε 

λειτουργία. Κάτω από κάθε κουμπί, υπάρχει 

ένα μικρό διάγραμμα που δείχνει ποια εστία 

μαγειρέματος ελέγχεται με αυτό το κουμπί. 

Μια ενδεικτική λυχνία που βρίσκεται στον 

πίνακα ελέγχου δείχνει αν χρησιμοποιείται 

κάποια από τις εστίες μαγειρέματος.

Θέσή 

περιστροφικού 

κουμπιού

Λειτουργία

0

Θέση απενεργοποίησης

1

Για να λιώσετε βούτυρο κλπ. και 

για να ζεστάνετε μικρές ποσότητες 

υγρού

2

Για να ζεστάνετε μεγαλύτερες 

ποσότητες υγρού. Για να 

παρασκευάσετε κρέμες και σάλτσες

3

Για να ξεπαγώσετε φαγητό για 

μαγείρεμα

4

Για να μαγειρέψετε τρυφερό κρέας 

και ψάρι

5

Για να μαγειρέψετε ψητό κατσαρόλας 

και μπριζόλες

6

Για να βράσετε μεγάλες ποσότητες 

υγρού και για τηγάνισμα

ΠΡΟΕΙΔΟΠΟΙΗΣΗ:

• Κατά την πρώτη χρήση ή όταν η

εστία δεν έχει χρησιμοποιηθεί για

παρατεταμένο χρονικό διάστημα, πρέπει

να απομακρύνετε τυχόν υγρασία που

μπορεί να έχει συσσωρευτεί γύρω

από τις ηλεκτρικές αντιστάσεις της

εστίας μαγειρέματος. Για να το κάνετε

αυτό, χρησιμοποιήστε την εστία στη

χαμηλότερη ρύθμιση για περίπου 20

λεπτά.

• Ποτέ μην χειρίζεστε μια εστία χωρίς

τηγάνια. Διαφορετικά, ενδέχεται να

παρουσιαστούν ελαττώματα στη μορφή

της εστίας.

• Χρησιμοποιείτε μόνο σκεύη με επίπεδη

και παχιά βάση.

• Να βεβαιώνεστε ότι η βάση του σκεύους

είναι στεγνή πριν το τοποθετήσετε πάνω

στις εστίες.

• Όταν είναι σε λειτουργία η ηλεκτρική

εστία, είναι σημαντικό να διασφαλίζετε

ότι το σκεύος είναι κεντραρισμένο

σωστά πάνω της.

• Ποτέ μην χρησιμοποιείτε τηγάνι με

μικρότερη ή μεγαλύτερη διάμετρο

από αυτή της εστίας, καθώς αυτό θα

σπαταλάει ενέργεια.

Σκεύος με καμπύλή 

βάσή

Σκεύος μικρής 

διαμέτρου

Βάσή σκεύους όχι 

κεντραρισμένή

• Εάν είναι δυνατόν, τοποθετήστε πάντα

τα καπάκια στα ταψιά για την αποφυγή

απώλειας θερμότητας.

• Η θερμοκρασία προσπελάσιμων μερών

της συσκευής μπορεί να είναι υψηλή

όταν λειτουργεί η συσκευή. Κρατήστε τα

παιδιά και τα ζώα μακριά από την εστία

κατά τη λειτουργία και μέχρι να κρυώσει

πλήρως μετά τη λειτουργία.

• Αν παρατηρήσετε κάποια ρωγμή

στην επιφάνεια μαγειρέματος, πρέπει

να την απενεργοποιήσετε άμεσα

και να φροντίσετε να αντικατασταθεί

από εξουσιοδοτημένο προσωπικό

συντήρησης.

4.2 Ελεγχος λειτουργιας φουρνου

Κουμπί ελέγχου λειτουργίας φούρνου

Содержание UFC-60251

Страница 1: ...GR UFC 60251 Free Standing Cooker User Manual EN...

Страница 2: ...GR 2 Icon Type Meaning...

Страница 3: ...GR 3 1 4 1 1 4 1 2 7 1 3 8 1 4 10 2 12 2 1 12 2 2 13 2 3 14 2 4 14 3 15 4 16 4 1 16 4 2 16 4 3 17 4 4 18 5 18 5 1 18 5 2 20 6 21 6 1 21 6 2 21 7 22 7 1 22 7 2 23...

Страница 4: ...GR 4 1 1 1 8 8...

Страница 5: ...GR 5...

Страница 6: ...GR 6...

Страница 7: ...GR 7 1 2...

Страница 8: ...GR 8 100 C 1 3 45...

Страница 9: ...GR 9 0...

Страница 10: ...GR 10 1 4...

Страница 11: ...GR 11 CE EMC Directive 14 30 EU Low Voltage Directive 14 35 EU ErP Directive 09 125 EC RoHS2 Directive 11 65 EU E marking Directive 93 68 EEC www united electronics gr...

Страница 12: ...GR 12 2 2 1 100 C 10 cm 2 cm A mm 420 mm 650 700 C mm 20 D mm E mm 50...

Страница 13: ...GR 13 A B C C D E 2 2 3 mm 220 240 V H05VV F...

Страница 14: ...5 3 3 2 2 1 1 2 3 x1 x1 x1 1 2 3 1 2 3 A B x x A mm B mm 60x60x90 297 5 52 50x60x90 247 5 52 90x60x85 430 107 60x60x90 309 5 112 60x60x85 309 5 64 50x60x90 247 5 112 50x60x85 247 5 64 50x50x90 247 5 1...

Страница 15: ...GR 15 3 1 2 3 4 5 1 2 3 4 5 6 7 8 6 7 8 8 8 8...

Страница 16: ...GR 16 4 4 1 6 0 1 2 3 4 5 6 20 4 2...

Страница 17: ...GR 17 10 10 190 C 4 3 Puff Pastry 1 2 170 190 35 45 1 2 170 190 30 40 1 2 170 190 30 40 2 175 200 40 50 1 2 200 45 60 4 200 10 15 190 50 60 3 4 200 15 25 4 200 15 25...

Страница 18: ...GR 18 4 4 5 5 1...

Страница 19: ...GR 19 1 2 a a 3...

Страница 20: ...GR 20 5 2 300 C 230 V 15 25 Watt E14...

Страница 21: ...GR 21 6 6 1 30 6 2...

Страница 22: ...GR 22 7 7 1 UFC 60251 kg 42 0 93 5 A kWh 0 73 kWh 1 l 55 EN 60350 1...

Страница 23: ...GR 23 7 2 UFC 60251 4 1 1 cm 8 0 1 Wh kg 2 2 cm 18 0 2 Wh kg 193 0 3 3 cm 18 0 3 Wh kg 194 0 4 4 cm 14 5 4 Wh kg 193 0 Wh kg 193 3 EN 60350 2...

Страница 24: ...TION Injury or property damage risk IMPORTANT NOTE Operating the system correctly Thank you for choosing this product This User Manual contains important safety information and instructions on the ope...

Страница 25: ...10 2 1 Instructions for the Installer 10 2 2 Electrical Connection and Safety 11 2 3 Anti tilting kit 12 2 4 Adjusting the feet 12 3 PRODUCT FEATURES 13 4 USE OF PRODUCT 14 4 1 Hob Controls 14 4 2 Ove...

Страница 26: ...f they have been given supervision or instruction concerning use of the appliance in a safe way and understand the hazards involved Children should not play with the appliance Cleaning and user mainte...

Страница 27: ...anti tilting kit set guide During use the appliance will get hot Care should be taken to avoid touching heating elements inside the oven Handles may become hot after a short period of time during use...

Страница 28: ...liance is designed only for cooking food and is intended for indoor domestic household use only It should not be used for any other purpose or in any other application such as for non domestic use in...

Страница 29: ...ay be harmful to children and they should be collected and removed immediately Protect your appliance from the atmosphere Do not expose it to sun rain snow dust or excessive humidity Materials around...

Страница 30: ...one and turn the handles to a safe position so they cannot be knocked If the product will not be used for a long period of time turn the main control switch off Turn the gas valve off when gas applian...

Страница 31: ...ur products meet the applicable European Directives Decisions and Regulations and the requirements listed in the standards referenced This appliance has been designed to be used only for home cooking...

Страница 32: ...ch could otherwise be caused by inappropriate waste handling of this product For more detailed information about recycling of this product please contact your local city office your household waste di...

Страница 33: ...s not damaged If you suspect any damage do not use it and contact an authorised service person or qualified technician immediately Make sure that there are no flammable or combustible materials in the...

Страница 34: ...is damaged and needs to be replaced this should be done by a qualified personnel Do not use adaptors multiple sockets and or extension leads The supply cord should be kept away from hot parts of the a...

Страница 35: ...bracket Wall Product Dimensions Width X Depth X Height Cm A mm B mm 60x60x90 Double Oven 297 5 52 50x60x90 Double Oven 247 5 52 90x60x85 430 107 60x60x90 309 5 112 60x60x85 309 5 64 50x60x90 247 5 11...

Страница 36: ...appearance of your appliance may differ from that shown in the figures below List of Components 1 2 3 4 5 1 Cooktop 2 Control Panel 3 Oven Door Handle 4 Oven Door 5 Adjustable Feet Control Panel 6 Ov...

Страница 37: ...ay occur on the cooktop Only use flat bottomed pans with thick bases Make sure the bottom of the pan is dry before placing it on a hotplate When a hotplate is in operation make sure that the pan is ce...

Страница 38: ...ood and heating food Grilling Function The oven s thermostat and warning lights will switch on and the grill heating element will start operating This function is used for grilling and toasting foods...

Страница 39: ...aners or liquid cleaners which do not contain particles Do not use caustic corrosive creams abrasive cleaning powders rough wire wool or hard tools as they may damage the cooker surfaces Do not use cl...

Страница 40: ...ainless Steel Parts if available Clean the stainless steel parts of your appliance on a regular basis Wipe the stainless steel parts with a soft cloth soaked in only water Then dry them thoroughly wit...

Страница 41: ...the appliance and allow it to cool before cleaning your appliance Remove the glass lens then remove the bulb Insert the new bulb resistant to 300 C to replace the bulb that you removed 230 V 15 25 Wat...

Страница 42: ...rectly positioned Check that the recommended temperatures and shelf positions are being used Do not frequently open the door unless you are cooking things that need to be turned If you open the door o...

Страница 43: ...52281728...

Отзывы: