2
TVR 12 Quick Start Guide
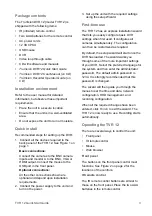
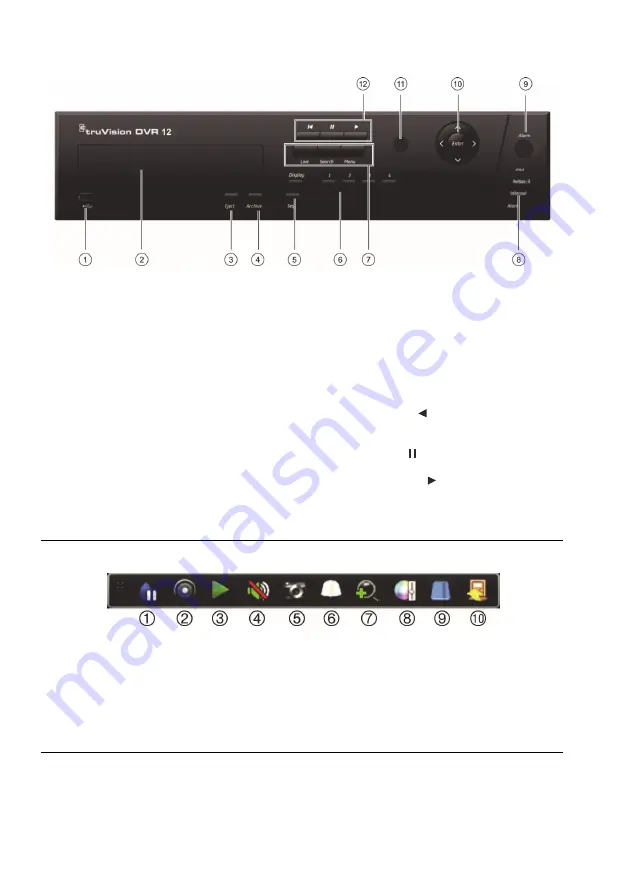
Figure 2: Front panel controls
1 USB
port.
2. CD/DVD burner (optional).
3.
Eject button
: Press to eject CD/DVD disc.
4.
Archive button
: Press once to enter quick
archive mode. Press twice to start archiving.
5.
Display and Seq buttons
: In
live view mode
,
press
Display
to toggle through the single and
multiviews. Press
Seq
to start/stop sequencing
in live view mode.
In
menu mode
, press
Enter
to select a menu
window.
6.
Channel buttons
. Switch between different
cameras in live view, PTZ control or playback
modes.
7.
Live, Menu and Search buttons
: Press
Live
to
switch to live view mode. Press
Menu
to enter
or exit the main menu. In live mode, press
Search
to enter the advanced search menu.
8. Status LEDs. Indicates the status of the HDD,
network, and Watchdog, as well as whether there
is an external alarm.
9.
Alarm button
: Press to manually acknowledge
an alarm.
10.
Enter and arrow buttons
: Use the Direction
buttons to navigate in the menus and to control
playback. Press
Enter
to confirm menu selection.
11. IR receiver.
12.
Playback buttons
:
Reverse
: In live view
mode, use to play back earliest video. In
playback mode, play back a camera in the
reverse direction.
Pause
: In live view; freeze
the last image for all active cameras. In playback
mode, stop playback.
Play
: In live view mode,
play all-day playback of the selected camera. In
playback mode, play back the camera in the
forward direction.
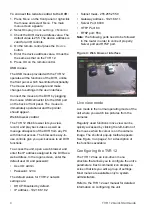
Figure 3:
Quick access toolbar
1.
Freeze
: Freeze live image of the selected
camera.
2.
Manual recording
: Start/stop manual
recording.
3.
Instant playback
: Play back the recorded video
from the last five minutes.
4.
Audio
: Enable/disable audio output.
5.
Quick snapshot
: Capture a snapshot of a video
image.
6.
PTZ control
: Enter PTZ control mode.
7.
Digital zoom
: Enter digital zoom.
8.
Image settings
: Modify the image lighting levels.
9.
Text show
: Display inserted text on screen.
10.
Close
: Close the toolbar.


