background image

7

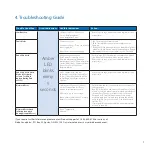
4. Troubleshooting Guide

Trouble Condition

Visual Indications Audible Indications

Action:

Low Battery

Amber 

LED 

blinks 

every  

seconds

Chirp every 60 sec, voice every 

30 sec:  “Replace alarm.”

 Voice stops after 5 mins.

*  Remove, discharge, dispose unit, and replace as soon 

as possible.

Fault Mode

Chirp every 30 sec.

Voice every 30 sec: “Error, see trouble 

shooting guide”

After 5 mins: no voice message

* See Cleaning Your Alarm section.

* Push Test/Hush button once to attempt to reset 

the unit .

*  Red LED will blink out an error code (number of blinks) 

when Test/Hush button is push/released once. Report 

the number of blinks to customer service if needed.

End of Unit Life

Double chirp every 30 sec.

First 5 mins: Voice every 30 sec: 

“Replace alarm, press button to 

temporarily silence.” Voice stops after 

5 mins. After 7 days: Chirps continue. 

Voice every 30 sec for 5 mins: 

“Replace alarm.”

*  Push/release Test/Hush button to temporarily silence 

(see End of Unit Life Hush Mode section below)

*  Remove, discharge, dispose unit, and replace as soon 

as possible. 

End of Unit Life Hush 

Mode (after push/

release Test/Hush  

button during End 

of Life)

Voice “Temporarily Silenced.”

End of Unit Life chirps silenced for 

24 hrs. (7 days after End of Unit Life 

chirps begin, the chirps cannot be 

silenced.)

*  Remove, discharge, dispose unit, and replace as soon 

as possible. 

Network Error

Chime every 30 secs. Voice every 

30 sec: “Connection lost. Press 

button to temporarily silence.” 

After 5 min: no voice messages

(Note: network must have 3 or more 

alarms for voice messages.)

*  Push/release the Test/Hush button once to silence for 

24 hrs at a time.

*   Red LED will blink out an error code (number of blinks) 

when Test/Hush button is push/released once. Report 

the number of blinks to customer service if needed.

*  Push and hold Test/Hush button until two beeps 

are heard (approx 4 sec) and then release the button 

to try to rejoin. Or reset (section 9.3) and then rejoin 

(section 9.2).

*   If error persists, remove, discharge, and replace alarm 

as soon as possible.

Network Error Hush 

(after button push 

during Network Error)

Voice “Temporarily

Silenced.”

If you require further information please contact Product Support at 1-800-880-6788 or write us at:   

Kidde Canada Inc., P.O. Box 40, Apsley, ON K0L 1A0. Our internet address is www.kiddecanada.com.

Содержание Kidde P4010ACSCO-WCA

Страница 1: ...connect User Guide Model P4010ACSCO WCA WIRELESS INTERCONNECT You do NOT need a home wi fi system to use these units Multiple wireless units create their own independent wireless alarm network 120 V H...

Страница 2: ...h the unit This alarm is a multi criteria device designed to detect both smoke and carbon monoxide from any source of combustion in a residential environment It is not designed for use in a recreation...

Страница 3: ...moke Alarms 11 8 Locations To Avoid 13 9 Activation And Wireless Alarm Network 13 9 1 Setting Up A Wireless Alarm Network 14 9 2 Adding Another Device to an Existing Wireless Alarm Network 15 9 3 Rese...

Страница 4: ...that door Instead use your alternate exit If the inside of the door is cool place your shoulder against it open it slightly and be ready to slam it shut if heat and smoke rush in If the escape route r...

Страница 5: ...to fresh air outdoors or by an open door window Do a head count to check that all persons are accounted for Do not re enter the premises nor move away from the open door window until the emergency se...

Страница 6: ...unit Push test button to clear Alarm Memory NOTE standard test sequence will follow Push release button again to cancel test Smoke Alarm Hush Mode Hush Control Red LED blinks every 2 sec After button...

Страница 7: ...of Unit Life Hush Mode after push release Test Hush button during End of Life Voice Temporarily Silenced End of Unit Life chirps silenced for 24 hrs 7 days after End of Unit Life chirps begin the chi...

Страница 8: ...the Replace by date 10 years from initial power up in permanent marker on the label prior to installing the unit NOTE AC power must be connected to obtain the full 10 year battery and unit life PRODUC...

Страница 9: ...ization sensing alarms may detect invisible fire particles associated with fast flaming fires sooner than photoelectric alarms Photoelectric sensing alarms may detect visible fire particles associated...

Страница 10: ...ZARDOUS LOCATIONS AS DEFINED IN THE LOCAL BUILDING CODE IT IS NOT DESIGNED FOR USE IN A RECREATIONAL VEHICLE RV OR BOAT The installation of this device should not be used as a substitute for proper in...

Страница 11: ...smoke alarms and smoke detectors on tray shaped ceilings 4 10cm 4 10cm 12 30 5cm 12 30 5cm ANYWHERE ALONG THIS BOLD SURFACE Locations permitted for smoke alarms and smoke detectors on tray shaped cei...

Страница 12: ...MA 02269 MOBILE HOME INSTALLATION Modern mobile homes have been designed and built to be energy efficient Install smoke alarms as recommended on the previous page In older mobile homes that are not w...

Страница 13: ...condensing Moisture or steam can cause nuisance alarms In insect infested areas Smokealarmsshouldnotbeinstalledwithin0 9m 3ft ofthedoortoabathroomcontainingatuborshower forced air supply ducts used fo...

Страница 14: ...position on ALL devices using the white tool included with the Quick Start Guide Once powered the light rings will glow red and voice message will announce Ready to connect Follow Quick Start instruct...

Страница 15: ...beeps Release button Sonar ping will stop Device will announce that setup is complete and the number of connected devices G SETUP COMPLETE If all devices flash green and Sonar ping has stopped the de...

Страница 16: ...ress and hold the button on ONE INSTALLED device on your network until you hear two beeps Release button You will hear Searching for other devices Light will pulse green and device will sound a contin...

Страница 17: ...ettings B CONCLUDE RESET Light ring will flash green once and then it will pulse red You will hear the words Ready to connect follow quick start instructions Device has been reset See Section 9 1 to b...

Страница 18: ...combination alarm and detector guard have been evaluated and found suitable for that purpose WARNING THE ALARM CANNOT BE OPERATED FROM POWER DERIVED FROM A SQUARE WAVE MODIFIED SQUARE WAVE OR MODIFIED...

Страница 19: ...o operate or a shock hazard Makecertainalarmsarewiredtoacontinuous non switched powerline NOTE Use standard CSA Listed household wire as required by local codes available at all electrical supply stor...

Страница 20: ...the connector snap into place Then push the excess wire back into the electrical box through the hole in the center of the mounting bracket Install the alarm fully on the mounting bracket by rotating...

Страница 21: ...mpatible hardwire or wireless interconnected units will also alarm This model is not designed to be interconnected with other manufacturer s products unless otherwise specified AC HARDWIRE INTERCONNEC...

Страница 22: ...If the alarm or voice does not sound or gives erratic or low volume sound the unit must be replaced See Permanently Disable Alarm Discharge Battery section to determine how to prepare the unit for shi...

Страница 23: ...UNIT AS SOON AS POSSIBLE WHEN IN END OF UNIT LIFE OR LOW BATTERY MODE 12 Recognizing Nuisance Alarms SMOKE NUISANCE HUSH If you know why the alarm is sounding and you can verify that it is not a life...

Страница 24: ...n alarm is called the initiating alarm unit Initiating alarm units will be flashing the Green LED every second during alarm Depending on unit locations and the location of the source of smoke or CO it...

Страница 25: ...idity or temperatures may reduce battery life WARNING NO SERVICEABLE PARTS INCLUDED DO NOT ATTEMPT TO OPEN THE ALARM FOR ANY REASON DO NOT TRY TO REPAIR THE ALARM YOURSELF LOW BATTERY This alarm is eq...

Страница 26: ...o longer function Oncethealarmbatteryhasbeendischarged thealarmcannotbemountedontothemountingplate orreactivated TO PERMANENTLY DISABLE ALARM DISCHARGE BATTERY Rotate the alarm counterclockwise to rem...

Страница 27: ...gas oil and wood It can be produced by any fuel burning appliance that is malfunctioning improperly installed or not ventilated correctly such as Furnaces boilers gas ranges stoves gas clothes dryers...

Страница 28: ...ar a home CO SAFETY TIPS Every year have the heating system vents chimney and flue inspected and cleaned by a qualified technician Always install appliances according to manufacturer s instructions an...

Страница 29: ...OUSEHOLD 1 MILD EXPOSURE Slight headache nausea vomiting fatigue often described as Flu like symptoms 2 MEDIUM EXPOSURE Severe throbbing headache drowsiness confusion fast heart rate 3 EXTREME EXPOSUR...

Страница 30: ...he alarm needs to be replaced Never use detergent or other solvents to clean the unit Avoid spraying air freshener hair spray or other aerosols near the alarm Do not paint the unit Paint will seal the...

Страница 31: ...ave to call 911 while the second person stays to account for additional family members Establish a rule that once you re out you never re enter under any circumstance Make a floor plan indicating all...

Страница 32: ...crawl low under smoke Install and maintain fire extinguishers on every level of the home and in the kitchen basement and garage SMOKE DETECTION ARE MORE ALARMS DESIRABLE The required number of smoke a...

Страница 33: ...each separate dwelling unit sleeping area within 6 4 m 21 of any door to a sleeping room with the distance measured along a path of travel 3 On every level of a dwelling unit including basements 4 On...

Страница 34: ...t or for any indirect special incidental or consequential damages or costs or expenses incurred by the consumer or any other user of this product whether due to a breach of contract negligence strict...

Отзывы: