130
SERVICE
Service Access —
All unit components can be reached
through clearly labelled hinged access doors. These doors are
not equipped with tiebacks, so if heavy duty servicing is need-
ed, either remove them or prop them open to prevent accidental
closure.
Each door is held closed with 3 latches. The latches are se-
cured to the unit with a single
1
/
4
-in. - 20 x
1
/
2
-in. long bolt. See
To open, loosen the latch bolt using a
7
/
16
-in. wrench. Pivot
the latch so it is not in contact with the door. Open the door. To
shut, reverse the above procedure.
NOTE: Disassembly of the top cover may be required under
special service circumstances. It is very important that the ori-
entation and position of the top cover be marked on the unit
prior to disassembly. This will allow proper replacement of the
top cover onto the unit and prevent rainwater from leaking into
the unit.
Cleaning —
Inspect unit interior at beginning of each heat-
ing and cooling season and as operating conditions require.
Remove unit side panels and/or open doors for access to unit
interior.
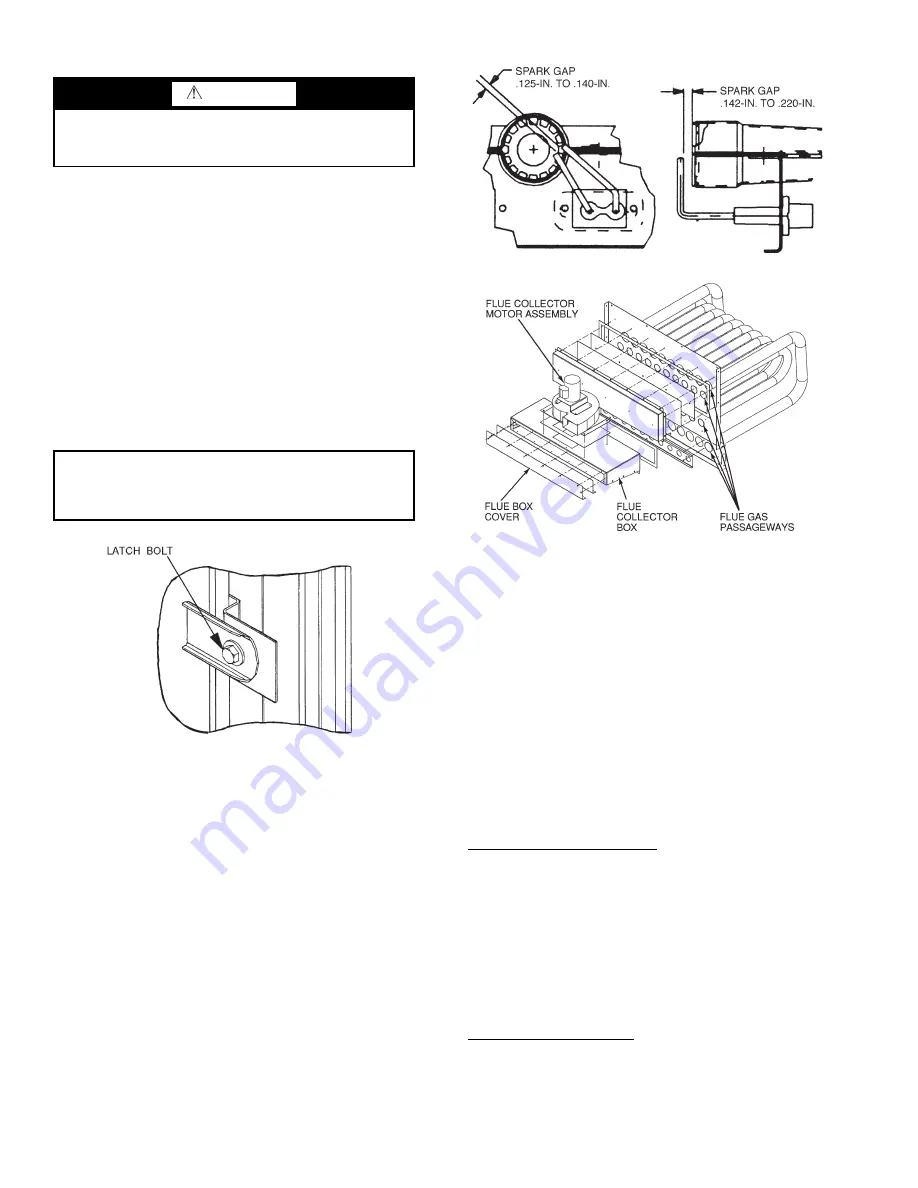
MAIN BURNERS — At the beginning of each heating sea-
son, inspect for deterioration or blockage due to corrosion or
other causes. Observe the main burner flames and adjust if nec-
essary. Check spark gap. See Fig. 41. Refer to Main Burners
section on page 141.
FLUE GAS PASSAGEWAYS — The flue collector box and
heat exchanger cells may be inspected by removing gas section
access panel, flue box cover, collector box, and main burner as-
sembly (Fig. 42 and 43). Refer to Main Burners section on
page 141 for burner removal sequence. If cleaning is required,
clean all parts with a wire brush. Reassemble using new high-
temperature insulation for sealing.
COMBUSTION-AIR BLOWER — Clean periodically to as-
sure proper airflow and heating efficiency. Inspect blower
wheel every fall and periodically during heating season. For the
first heating season, inspect blower wheel bi-monthly to deter-
mine proper cleaning frequency.
To inspect blower wheel, remove heat exchanger access
panel. Shine a flashlight into opening to inspect wheel. If
cleaning is required, remove motor and wheel assembly by
removing screws holding motor mounting plate to top of
combustion fan housing (Fig. 42 and 43). The motor, scroll,
and wheel assembly can be removed from the unit. Remove
scroll from plate. Remove the blower wheel from the motor
shaft and clean with a detergent or solvent. Replace motor and
wheel assembly.
ROUND TUBE PLATE FIN COIL MAINTENANCE AND
CLEANING RECOMMENDATIONS — Routine cleaning
of coil surfaces is essential to maintain proper operation of the
unit. Elimination of contamination and removal of harmful res-
idues will greatly increase the life of the coil and extend the life
of the unit. The following maintenance and cleaning proce-
dures are recommended as part of the routine maintenance ac-
tivities to extend the life of the coil.
Remove Surface Loaded Fibers — Surface loaded fibers or
dirt should be removed with a vacuum cleaner. If a vacuum
cleaner is not available, a soft non-metallic bristle brush may
be used. In either case, the tool should be applied in the direc-
tion of the fins. Coil surfaces can be easily damaged (fin edges
can be easily bent over and damage to the coating of a protect-
ed coil) if the tool is applied across the fins.
NOTE: Use of a water stream, such as a garden hose, against a
surface loaded coil will drive the fibers and dirt into the coil.
This will make cleaning efforts more difficult. Surface loaded
fibers must be completely removed prior to using low velocity
clean water rinse.
Periodic Clean Water Rinse — A periodic clean water rinse is
very beneficial for coils that are applied in coastal or industrial
environments. However, it is very important that the water
rinse is made with very low velocity water stream to avoid
damaging the fin edges. Monthly cleaning as described below
is recommended.
WARNING
Before performing service or maintenance operations on
unit, turn off main power switch to unit. Electrical shock
could cause personal injury.
IMPORTANT: After servicing is completed, make sure
door is closed and relatched properly, and that the latches
are tight. Failure to do so can result in water leakage into
the evaporator section of the unit.
Fig. 40 — Door Latch
A48-3821
Fig. 41 — Spark Gap Adjustment
A48-4022
Fig. 42 — Gas Heat Section Details
A48-3727
Содержание Carrier Weathermaker 48A2
Страница 105: ...105 Fig 20 Typical Main Control Box Wiring Schematic 48 50A2 A3 A4 A5 Units...
Страница 106: ...106 Fig 21 Typical Auxiliary Control Box Wiring Schematic...
Страница 107: ...107 Fig 22 Typical 2 Stage Gas Heat Wiring Schematic Size 060 Units Shown a48 8357...
Страница 108: ...108 TO NEXT PAGE Fig 23 Typical Staged Gas Heat Wiring Schematic Size 060 Units Shown A48 7296...
Страница 109: ...109 Fig 23 Typical Staged Gas Heat Wiring Schematic Size 060 Units Shown cont A48 8358...
Страница 110: ...110 Fig 24 Typical Electric Heat Control Schematic 50 Series Size 060 Units Shown a50 8228...
Страница 111: ...111 Fig 25 Typical Power Schematic 48 50A2 A3 A4 A5 060 Unit Shown...
Страница 112: ...112 Fig 26 Typical Low Ambient Controls Option Wiring...
Страница 113: ...113 Fig 27 Typical Small Chassis Component Location Size 020 035 Units...
Страница 114: ...114 Fig 28 Typical Large Chassis Component Locations Size 040 060 Units...
Страница 118: ...118 Fig 30 Economizer Control Board ECB1 and VAV Control Board ECB2 A48 7706...
Страница 142: ...142 A48 3733 Fig 56 Main Burner Removal...
Страница 176: ...176 APPENDIX C VFD INFORMATION cont Fig F Internal Enclosure Fan Replacement A48 7716...


