background image


Chapter 3 


Operation 


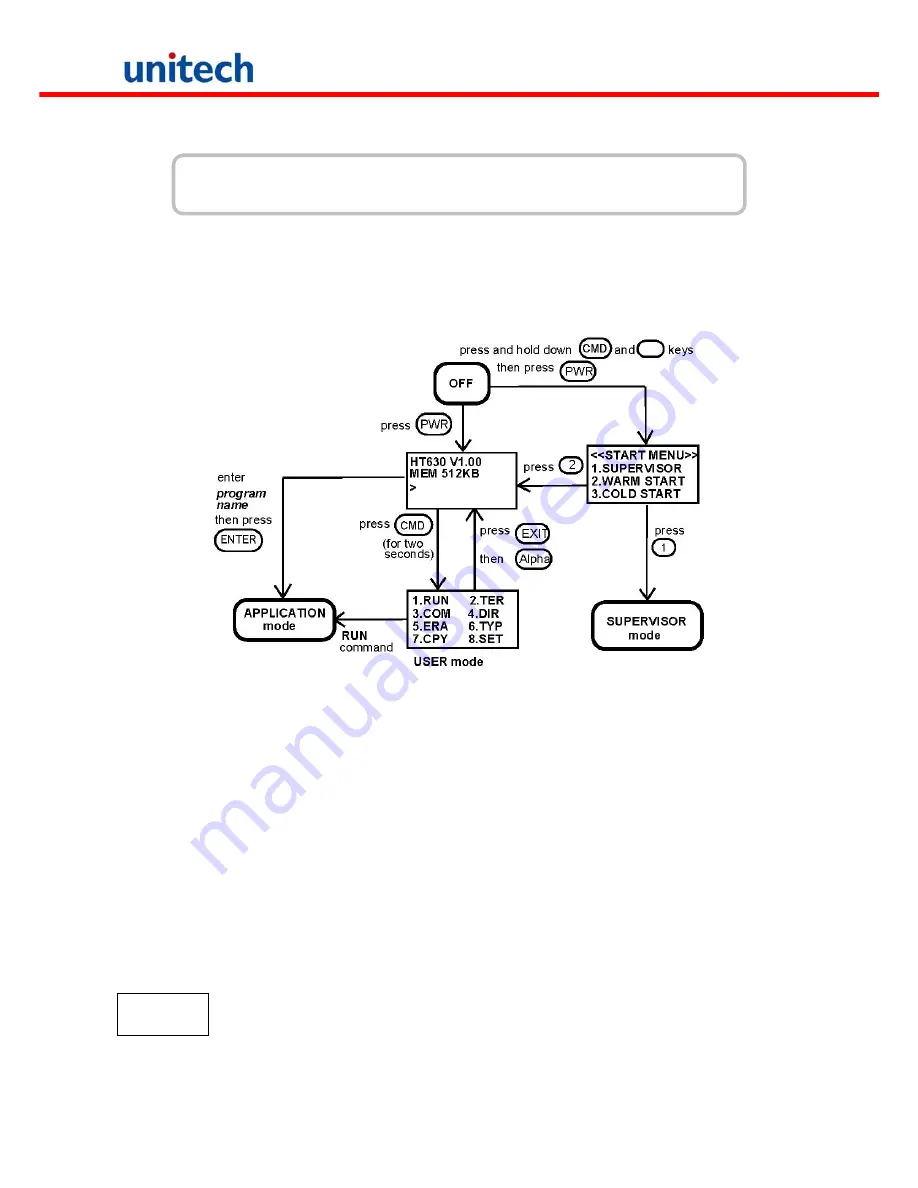
The HT630 is set up several operating modes.    The system of terminal may operate in various modes for 

different purposes.    The figure below shows the operating flow of the terminal.    The following diagram 

summarized these operating modes to switch between different modes. 


System configurations are categorized in two groups, users can select “8.SET” command in User mode to set 

general system configurations or enter Supervisor mode to set advanced system configurations. The 

Supervisor mode

 is also protected with password checking to prevent unauthorized personnel from 

changing the system configuration.   

(For HT630 detail setup procedures please refer to HT630 Technical Binder).  

It is likely that your unit 

came pre-configure by your software vender or system developer.    In this case, please be caution when 

changing these settings. 


3.1 Ready Mode   

The terminal performs a Power-On-Test and Warm-Start when it is switched on.    After the Warm Start, the 

system enters Ready mode and shows the Ready mode prompt.   

Ready mode 

prompt 

HT630 Vx.xx 


MEM 4608 KB 
>


The first line indicates the model code and version number (e.g. V1.00).    The second line 

shows the size of the total installed RAM (i.e. 4608 KB). The third line prompts a ">" which 

indicates that the terminal passed the Power-on-test and is ready to be used. 

Copyright 2008 Unitech Electronics Co., Ltd. All rights reserved. Unitech is a registered trademark of Unitech Electronics Co., Ltd. 

11


Содержание HT630

Страница 1: ...Unitech HT630 User s Manual User Manual Version 3 Copyright 2008 Unitech Electronics Co Ltd All rights reserved Unitech is a registered trademark of Unitech Electronics Co Ltd ...

Страница 2: ...quired For procedures on how to charge the battery please refer to Chapter 1 5 Quick Start Please switch on the backup battery and to ensure fully charge the backup battery when you first time to use it Copyright 2008 Unitech Electronics Co Ltd All rights reserved Unitech is a registered trademark of Unitech Electronics Co Ltd ...

Страница 3: ... 8 2 3 Battery Replacement 9 2 4 Recharging the Battery Pack 9 2 5 Storage and Safety Precautions 10 Chapter 3 Operation 11 3 1 Ready Mode 11 3 2 User Mode and System Commands 12 3 3 Configure the Terminal in SET command 13 Chapter 4 Built in Application FormCaching 16 4 1 Specification of FormCaching 16 4 2 How to Create a FormCaching 17 4 3 How to Run FormCaching 17 4 4 Default Setting of FormCa...

Страница 4: ...Chapter 5 Bluetooth Application 18 Chapter 6 WiFi settings 22 Copyright 2008 Unitech Electronics Co Ltd All rights reserved Unitech is a registered trademark of Unitech Electronics Co Ltd ...

Страница 5: ... you had purchased your terminal might be equipped with 3 different memory RAM configuration range from 512K 2 5MB 4 5MB and 8 5MB HT630 also has offer 3 different optional communication charging cradles These are RS232 Ethernet and Modem cradles 1 2 Support Over here at unitech making you satisfy is our first priority If you find any problems regarding to this terminal or any our other product pl...

Страница 6: ...Display Yes Keypads 26 alphanumeric keys one scan trigger phosphorescent material Performance Characteristics CPU X86 Compatible 16 bit Operating System DOS compatible Memory 512KB 2 5MB 4 5MB 8 5MB option Flash ROM 256KB Application Development C language Turbo C Visual C JobGen plus a window based program generator FormCaching a built in program generator Communication RS232 Modem Ethernet seria...

Страница 7: ...30 front view Figure 0 2 HT630 head view Figure 0 3 HT630 tail view Figure 0 4 HT630 side view Figure 0 5 HT630 back view Figure 0 6 HT630 charging communication cradle features 3 types RS232 modem and Ethernet communication Figure 0 7 Modem or Ethernet cradle back view Figure 0 8 RS232 Cradle Back view Copyright 2008 Unitech Electronics Co Ltd All rights reserved Unitech is a registered trademark...

Страница 8: ...er icon will be displayed red Once it is fully charged LED will be turned to green 2 Or use the standard charging cable which is packed with one of unitech HT630 packages or you can order them separately together with the power adaptor Connect the power plug of the adaptor to the charging cable then connect the charging cable to the main unit Plug the power adaptor to power outlet the unit should ...

Страница 9: ...tself When the light is on it is indicated the cradle is powered on Power On After charging completely LED is turned to green and then you are now ready to turn on the unit Press the power button l on the keypad to turn on HT630 1 6 Interface Ports The HT630 does its communication via RS232 communication port located in the back of the unit You can connect the unit via the communication cable to P...

Страница 10: ...powered on In normal mode the cursor is a block and the keyboard is mainly used to input numeric data and use F1 F4 four function keys COMMAND mode Press CMD key to set the keyboard to command mode In command mode the cursor sign is still same and the keyboard is mainly used to input special characters make hot key function and use F5 F8 four function keys ALPHA mode Press ALPHA key to toggle betw...

Страница 11: ...d power management control The HT630 can be programmed by the high level Windows based JobGen Plus program generation software or programmed by commonly used C compilers including Microsoft C Borland C and Turbo C An executable program generated by JobGen Plus or created by a compiler is downloaded to the unit and run on the unit JobGen Plus The JobGen Plus is a Windows based program generator tha...

Страница 12: ...is important to know that once the power in the backup battery used up all data within the terminal will be lost So it is very important to backup all data when replacing backup battery 2 2 Power Low Indication Main Battery When the main power source reaches the battery low condition a warning message as right icon will be shown on the LCD when the HT630 is powered on or a battery low icon sign wi...

Страница 13: ...der Put the backup battery cap back on Re installed the main battery cold star the new unit Make sure to back up your data in terminal before making the replacement the lithium back up battery 2 4 Recharging the Battery Pack When the terminal shows Main battery low message the battery needs to be recharged Plug in the power adaptor into a power outlet and connect the other end to the power outlet ...

Страница 14: ...emedied by temporarily depleting the battery of its power and recharging it to rejuvenate it This condition can be prevented by avoiding overcharging for a long period of time or always using the cradle to charge the batteries of terminal The cradle starts the charge process in the quick charge rate and switches to trickle charging rate when it detects the battery is fully charged 2 5 Storage and ...

Страница 15: ...n For HT630 detail setup procedures please refer to HT630 Technical Binder It is likely that your unit came pre configure by your software vender or system developer In this case please be caution when changing these settings 3 1 Ready Mode The terminal performs a Power On Test and Warm Start when it is switched on After the Warm Start the system enters Ready mode and shows the Ready mode prompt R...

Страница 16: ...ed on screen and output to RS 232 port Data received from the serial port is displayed on the LCD screen Communication parameters such as baud rate data bits parity stop bits and flow control must be set to be compatible with the destination in order to send data properly COM This command puts the terminal in Kermit server mode The following indicates the available Kermit commands at the Host PC s...

Страница 17: ...EYPAD 5 BLU TOOTH E 6 EXIT 3 3 Configure the Terminal in SET command There are three categories of general system configuration available in SET command Select the corresponded number 1 3 to set system date time assign scanning feature and enable power on Logo display Hit CMD then ALPHA keys to return to User mode prompt SYSTEM SETUP 1 DATE TIME 2 SCANNER 3 DISPLAY 4 KEYPAD 5 BLU TOOTH E 6 EXIT 3 ...

Страница 18: ...wer on logo displays when power on 3 3 4 KEYPAD Allow user to set UPPER LOWER case of character 3 3 5 BLUETOOTH Allow user to transmit and receive data via Bluetooth enabled devices BLUETOOTH Enable disable Bluetooth function Config BT MODE Determine the mode of operation to be SLAVE or MASTER If MASTER mode is selected you can enable disable auto connection to available BT devices Addr Display th...

Страница 19: ... RS232 interface a communication program running on host first sends a few of dummy bytes to the terminal and delays for about 500 mini second to remotely wake up the unit Then the program can be sent out a data pack of a remote ESC command that matches the MULTI protocol to the terminal and instruct the terminal for certain process For instance the terminal will automatically be executed the syst...

Страница 20: ...r alphanumeric data 20H FCH 4 DEVICE TYPE 1 KEY ONLY 2 SCAN ONLY 3 BOTH input by keyboard only bar code scanning only or both DATA RECORD DEFINITION Category Range Description 5 BETWEEN FIELD 1 Append screen 2 Clear screen specify to clear or append screen between two fields 6 FIELD DELIMITER 1 2 3 Space 4 Tab assign field delimiter 7 RECORD DELIMITER 1 CR 2 LF 3 CRLF assign record delimiter 8 DAT...

Страница 21: ...ing When FormCaching is enabled the built in application can be run by selecting 2 TER command in User mode and then select 2 FORMCACHING The FormCaching application will follow the setting as defined to display prompting get input and store data in the file named FORM DAT Hit CMD then ALPHA keys to end FormCaching and return to system Ready mode User may use key to browse a previous data record k...

Страница 22: ...apter 3 3 5 BLUETOOTH 1 If your host has a built in Bluetooth function enable the Bluetooth function If your host does not have the built in Bluetooth function please attach an external Bluetooth dongle at your host and install the driver 2 Double click the Bluetooth icon on the taskbar As different user might use different brand of Bluetooth dongle please find this according to your dongle s manu...

Страница 23: ...lect Pair Device 5 A window pops up asking for PIN Code Enter the default PIN Code 1234 and click OK button Copyright 2008 Unitech Electronics Co Ltd All rights reserved Unitech is a registered trademark of Unitech Electronics Co Ltd 19 ...

Страница 24: ...t Discover Available Services 7 Right click the Dev B on HT630 icon and select Connect to Bluetooth Serial Port Copyright 2008 Unitech Electronics Co Ltd All rights reserved Unitech is a registered trademark of Unitech Electronics Co Ltd 20 ...

Страница 25: ...Click OK button 9 The icon turns to double arrows indicating the connected is ready Now you can run applications or Windows Hyper Terminal on the host for testing Copyright 2008 Unitech Electronics Co Ltd All rights reserved Unitech is a registered trademark of Unitech Electronics Co Ltd 21 ...

Страница 26: ...subnet Note One may click re scan button to find all the HT630 in the subnet Figure 3 Figure 3 re scan function Step 3 Configure HT630 by monitor 1 Change HT630 s IP address 1 Click Configuration 2 Select Network it will pop up Network setting page Figure 4 3 One may change the IP address subnet mask Gateway to meet one s subnet Copyright 2008 Unitech Electronics Co Ltd All rights reserved Unitech...

Страница 27: ...ize page one m and then click Authorize button to make the setting effective Figure 5 Authorize page etup settings by web browser ote Make sure ones PC is located on the same subnet as HT630 Change HT630 s network Basic Setup Radio Security and RS232 S N Copyright 2008 Unitech Electronics Co Ltd All rights reserved Unitech is a registered trademark of Unitech Electronics Co Ltd 23 ...

Страница 28: ...168 1 2 destination port 4660 Virtual COM enable Configure by web server Step 1 Make sure ones PC is located on the same subnet as HT630 Step 2 Open a web browser then enter in the IP address of HT630 to be configured Note Default user name is admin and default password is password Step 3 HT630 s network Basic Setup Radio Security and RS232 Setup settings should be configured in different web page...

Страница 29: ...e cookies Attention To use the Web Console you will need to enable your browser for cookies Your browser s cookie options should be located on your browser s Internet Properties window Since different browsers and different versions of the same browser are configured differently refer to your browser s help section for details 1 Type 192 168 the IP address which get from DHCP or you set through Hy...

Страница 30: ...d IP configurations are Manual and dynamic DHCP Choose from two possible IP configuration modes Manual and DHCP Copyright 2008 Unitech Electronics Co Ltd All rights reserved Unitech is a registered trademark of Unitech Electronics Co Ltd 26 ...

Страница 31: ...etwork the HT630 will use the netmask to check whether the desired TCP IP host specified in the packet is on the same subnet as the HT630 If the address is on the same subnet a connection is established directly between the HT630 and the host If the host is not on the same subnet the packet is sent to the Gateway address Gateway Setting Factory Default Necessity E g 192 168 1 1 None Optional A gat...

Страница 32: ...ial data to be transmitted back and forth between the serial devices and host computer Ad hoc Mode In the following example two HT630 devices establish an Ad hoc peer to peer relationship which means that they communicate with each other directly without going through an AP Access Point Channel Select a radio channel for the wireless network from the pull down menu In infrastructure mode the AP wi...

Страница 33: ...n the textbox WEP Key Index Selects the Primary WEP Key for your wireless network WEP Key 1 2 3 4 For each of the four WEP Keys enter the appropriate WEP Key The WEP Keys are used to help prevent data from being stolen as it is transmitted over public networks The WEP Key setting s for the HT630 must be the same as the WEP Key settings for the AP Note Please reboot HT630 after completed setting Co...

Страница 34: ...new password in the New Password field 4 Re enter the new password to confirm it in the Repeat New Password field 5 Finally click Apply to save the change Also if you desire to restore to the factory set password please click Yes The default setting is disabled SNMP Setup Copyright 2008 Unitech Electronics Co Ltd All rights reserved Unitech is a registered trademark of Unitech Electronics Co Ltd 3...

Страница 35: ...NMP tool change some setting you can read some message from the address Upgrade Firmware 1 Open Upgrade Firmware 2 Click Browse to select your wanted file for upgrade 3 Click Upload to enable the file to be loaded to your HT630 4 Reboot your HT630 and check whether the firmware has been upgraded in the Basic Information Backup Restore Settings HT630 provides backup and restore for file management ...

Страница 36: ...ur backup files Restore This button can be used to clear ALL data and restore ALL settings to the factory default values Reboot AP In some cases if you want to reboot HT630 click Yes and then apply HT630 will reboot Copyright 2008 Unitech Electronics Co Ltd All rights reserved Unitech is a registered trademark of Unitech Electronics Co Ltd 32 ...

Отзывы: