background image

INSTALLATION 
INSTRUCTION

CAUTION:

READ ALL SAFETY GUIDES BEFORE YOU 
BEGIN TO INSTALL YOUR UNIT.

SAVE THIS MANUAL

MODEL:  EF-07

208/230/460
VOLT ONLY

SPLIT-SYSTEM HEAT PUMPS 

OUTDOOR UNITS

035-18547-001-A-0902

CONTENTS

GENERAL 4

SAFETY CONSIDERATIONS  . . . . . . . . . . . . . . . . . . . . .4

AGENCY APPROVALS . . . . . . . . . . . . . . . . . . . . . . . . . .4

INSPECTION . . . . . . . . . . . . . . . . . . . . . . . . . . . . . . . . . .4

INSTALLATION . . . . . . . . . . . . . . . . . . . . . . . . . . . . . . . .5

START-UP . . . . . . . . . . . . . . . . . . . . . . . . . . . . . . . . . . .17

OPERATION  . . . . . . . . . . . . . . . . . . . . . . . . . . . . . . . . .18

MAINTENANCE . . . . . . . . . . . . . . . . . . . . . . . . . . . . . . .21

See the following page for a complete Table of Contents.

NOTES, CAUTIONS AND WARNINGS

Installer should pay particular attention to the words:

NOTE

CAUTION

, and 

WARNING

. Notes are intended to

clarify or make the installation easier. Cautions are given
to prevent equipment damage. Warnings are given to
alert installer that personal injury and/or equipment dam-
age may result if installation procedure is not handled
properly.

Содержание EF-07

Страница 1: ...4 INSTALLATION 5 START UP 17 OPERATION 18 MAINTENANCE 21 See the following page for a complete Table of Contents NOTES CAUTIONS AND WARNINGS Installer should pay particular attention to the words NOT...

Страница 2: ...5 START UP 17 CRANKCASE HEATER 17 PRE START CHECK 17 INITIAL START UP 18 OPERATION 18 GENERAL 18 SYSTEM SEQUENCE OF OPERATION 18 COOLING OPERATION 18 HEATING OPERATION 19 DEFROST CYCLE 20 OPERATION BE...

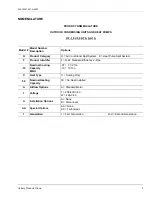
Страница 3: ...System E Heat Pump Split System F Product Identifier F R 22 Standard Efficiency 2 Pipe 10 Nominal Cooling Capacity MBH 07 7 1 2 Ton 10 10 Ton C Heat Type C Cooling Only 00 Nominal Heating Capacity 00...

Страница 4: ...o alert the installer that personal injury and or equipment damage may result if the installation proce dure is not handled properly REFERENCE This instruction covers the installation of the outdoor u...

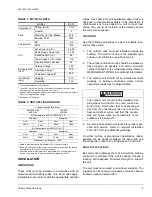
Страница 5: ...solid level supports The supports can be channel iron beams or wooden beams treated to reduce deterioration TABLE 1 PHYSICAL DATA MODEL EF 07 Compressor1 1 These compressors are fully hermetic Rating...

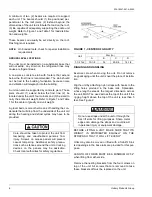
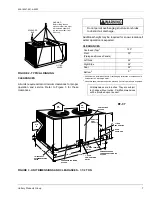
Страница 6: ...st cycles may have to be provided RIGGING AND HANDLING Exercise care when moving the unit Do not remove any packaging until the unit is near the place of installa tion Rig the unit by attaching nylon...

Страница 7: ...discharge Overhead Top 1 1 Units must be installed outdoors Overhanging structures or shrubs should not obstruct air discharge outlet 120 Front Piping and Access Panels 30 Left Side 24 Right Side 24 R...

Страница 8: ...cure it to the unit cabinet Refer to Figure 4 for typical field wiring CONTROL WIRING Refer to Figure 3 for the location of the control wire access opening through the front of the unit Route the nece...

Страница 9: ...DATA Model EF Compressor Outdoor Fan Motor Min Circuit Amps Max Fuse Size Min Wire Size 1 AWG Power Supply RLA LRA Power Factor Power Supply Qty FLA Each 07 25 200 230 3 60 25 6 190 0 0 94 208V 208 2...

Страница 10: ...or a field installed liquid line should never exceed 40 psi because the liquid refriger ant could flash before it reaches the expansion valve This flashing will not only cause erratic valve operation...

Страница 11: ...VES These outdoor units have both vapor and liquid line service valves Both valves are shipped from the factory front seated and closed with the valve stem in the maximum clock wise position These ser...

Страница 12: ...on nection while it is being unbrazed 3 Remove the cap from the 1 4 access port on the liquid line stop valve 4 Connect a supply of dry nitrogen to this access port 5 Unbraze the copper disc from the...

Страница 13: ...bove 5 Move the dry nitrogen supply back to the access port on the liquid line service valve 6 Braze the liquid line to the liquid connection on the indoor unit while maintaining a minimum flow of dry...

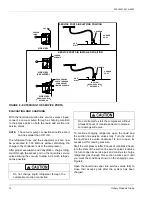
Страница 14: ...rn to open its access port for reading pressure Start the compressor after 8 hours of crankcase heat turn the stem of the suction line service valve clockwise 1 4 turn to open its service port and con...

Страница 15: ...indicating sight glass is clear Add approximately 1 extra pound of refrigerant to assure a liquid refrigerant seal at the expansion valve under all operating condi tions Block the flow of the condense...

Страница 16: ...035 18547 001 A 0902 16 Unitary Products Group FIGURE 7 REFRIGERANT FLOW DIAGRAM...

Страница 17: ...shipping materials etc 3 Have the outdoor fans been rotated manually to check for free rotation 4 Are all wiring connections tight 5 Does the available power supply agree with the nameplate data on th...

Страница 18: ...ERAL During the cooling cycle when the reversing valve solenoid becomes energized operation will be the same as any conventional air conditioning system During the heating cycle when the reversing val...

Страница 19: ...osition the blower will operate only when thermostat calls for heating operation 3 When TH1 of the thermostat closes for first stage heat a circuit is made from terminal Y through the defrost control...

Страница 20: ...ng operation OPERATION BELOW 0 F OUTDOOR TEMPERATURE 1 At 0 F outdoor temperature the low temperature compressor cutoff thermostat 1TH contacts 1 and 3 will open de energizing contactor 1M which shuts...

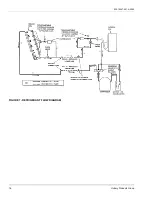
Страница 21: ...tations of the system how the defrost cycle is controlled and how the anti cycle timer operates MAINTENANCE CLEANING Do not allow dirt to accumulate on the outdoor coil Clean the coil with a brush or...

Страница 22: ...035 18547 001 A 0902 22 Unitary Products Group...

Страница 23: ...035 18547 001 A 0902 Unitary Products Group 23...

Страница 24: ...o change without notice Printed in U S A 035 18474 001 A 0602 Copyright by Unitary Products Group 2002 All rights reserved Supersedes 035 18547 000 A 0302 Unitary 5005 Norman Products York OK Group Dr...

Отзывы: