
Micro USB Charging Instructions
i
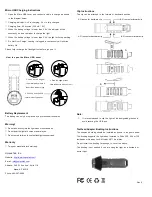
Open the Micro USB cover and connect a cable to charge as shown
in the diagram below
i
Charging indicator:
Red
is charging,
Blue
is fully charged
i
Charging time: 45 minutes (350 mA / 5V)
i
When the battery voltage is lower than 2.6V, the indicator will be
constantly on as a reminder to charge the light
i
When the battery voltage is lower than 2.4V the light will stop working
i
Do Not Over Charge. Leaving it plugged in continuously will shorten
battery life.
Please fully recharge the flashlight first before you use it.
How to open the Micro USB cover
Battery Replacement
The battery can only be replaced by a professional technician.
.
Warning!
i
Do not look directly into the light when it is switched on.
i
Do not point the light at human or animal eyes.
i
Do not permit children to use the flashlight unsupervised.
Warranty
i
Two-year manufacturer’s warranty.
UniqueTek, Inc.
Website:
http://www.uniquetek.com/
E-mail:
Address: 540 W. Iron Ave., Suite 118
Mesa, AZ 85210
Phone: 480-507-0866
Clip Instructions
The clip can be attached in the forward or backward position.
Note:
1.
It is recommended to clip the light at the designated grooves to
avoid covering the USB port.
Toolhead Adapter Bushing Instructions
The neoprene bushing should be installed as shown in the photo below.
The bushing supports the light when installed in Dillon 550, 650 or 750
toolheads or Hornady Lock-N-Load
®
AP™ die plates.
Do not install the bushing far enough to cover the switch.
The bushing is not needed if you are using the light as a keychain or
pocket light.
Rev 0
A. Grooves for backward clip
A. Grooves for backward clip
B. Grooves for forward clip
B. Grooves for forward clip
A
B
1. Look on the edge of
the metal body where it
looks like a rubber hinge.
2. Grab the edge of that
little rubber tip with your nail.
3. Pull it up and the USB
cover will easily pop out.