


04
Important
•
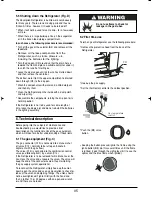
During normal operating conditions, the thermostat
(B2) should be set within the bands 1 and 3.
At room temperatures under 60°F (16°C), there is a risk
that the temperature in the main compartment will drop
below freezing point, even with the thermostat at the
warmest setting.
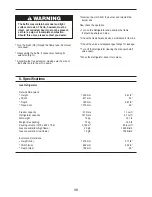
5.3 How to make ice
The Refrigerator is supplied with three plastic ice trays.
Fill these with water to no more than the brim of the
internal separators. Arrange the trays one beside the
other at the bottom of the frozen food compartment.
5.4 Frozen food compartment
In addition to making ice, you can also store frozen
food in the upper compartment. How long food can be
kept without loss of quality depends on its nature and
on the storage temperature.
This temperature is not influenced by the thermostat
setting, nor by the use made of the main compartment.
Even with the thermostat set to defrost, the temperature
will be suitable for the preservation of frozen food.
The temperature does vary, however, with room
temperature: At up to 90°F (32°C) the compartment will
maintain 0°F (–18°C) or better and at 110°F (43°C) it
will still maintain 15°F (–9°C).
The temperature does not vary to any great extent from
one point to another within the compartment, but it is
somewhat lower at the bottom left. Obviously, this will
be the best place to store the more sensitive food.
When frozen food is being stored in the compartment it
is advisable to make ice in only one tray at a time,
placing it at the bottom right.
The compartment is basically designed to store frozen
food, though it can also be used to freeze limited
amounts of unfrozen food. In this case, it can handle up
to 3 lbs (about 1.5 kilos) per 24 hour period, at ambient
temperatures up to 90°F (32°C).
Frost build-up can occur in the freezer compartment.
After proper packaging:
•
Allow any hot food to cool down to room temperature
outside the Refrigerator.
•
When at room temperature, the food should be
placed in the main compartment of the Refrigerator,
to precool for a few hours.
•
Later on, preferably in the evening, place the food in
contact with the bottom of the upper compartment.
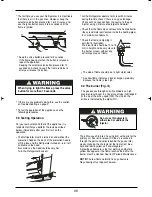
5.5. Defrosting
During operation ice will begin to collect on the fins of
the evaporator (D1), to a point where it will reduce the
efficiency of the Refrigertator. This is why the
Refrigerator needs to be defrosted periodically. The
interval between two defrosting operations can vary
considerably:
from one week to more than a month, depending on the
climate and the extent to which the Refrigerator is
used.
We recommend defrosting whenever 50 per cent of the
space between the fins is taken up by ice. Check the
upper portion of the left hand fins, where the ice is
inclined to collect more quickly.
To defrost you do not have to remove food from the
main compartment or from the Freezer.
Simply set the thermostat knob (B2) to the “defrost”
position(B6), and leave it for a couple of hours.
The Refrigerator will continue to work on a low flame to
provide refrigeration for the Freezer.
The ice on the fins will melt and run through a drain to
the rear of the Refrigerator and into a number of small
container (C5) where it will evaporate.
Check the fins to make sure that they are free of ice
(some ice remaining on the tube can be disregarded)
and then adjust the thermostat to its usual setting.
The Refrigerator will soon resume its normal operation.
The Freezer needs defrosting less frequently.
To defrost, see under item 5.5.
Never use knives or sharp objects to remove the
ice layer. You may cause leakage in the ammonia
system.
If the evaporator is heavily loaded with ice,
defrosting must not be done as explained before,
since the capacity of the container (C5) is limited
to about one quart (one liter) and they might then
overflow. In this case, follow the instructions given
below.
Do not store flammable substances
such as gasoline and kerosene in
your Refrigerator to avoid the risk of
explosion and fire.
Manual 326061824 11/9/06 3:36 PM Page 11
Содержание UGP 7.8
Страница 2: ......
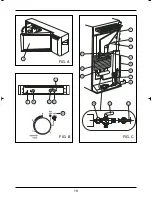
Страница 12: ...19 6 1 5 2 3 4 FIG A FIG B FIG C ...
Страница 13: ...20 FIG D FIG G FIG F ...
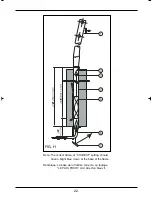
Страница 14: ...21 Cut out in order accommodate the lower hinge A découper pour la charnière inférieure FIG E ...
Страница 16: ...24 ...