background image

UniPOS 

Interactive Fire ControlPanel IFS7002 

Instruction Manual 

Page 

53 

Revision 2.05 

Of 107 

Press the button 

 once again to discontinue the check-up operation; the LEDs and the local 

sounder restore their initial state. 

The operation of buttons 

 and 

 is extended – except for the basic functions they also 

discontinue the check-up if it has been started. 

Note: LED 

 System Error and the local sounder are activated or deactivated a few seconds 

later than the rest of the LEDs. 

12.4. Menu 

Set Up


This is the menu for Set Up condition (see section 13). 
 
Access to Set Up menu is 

allowed at Access Level 3

А

accordingly as soon as you enter the 
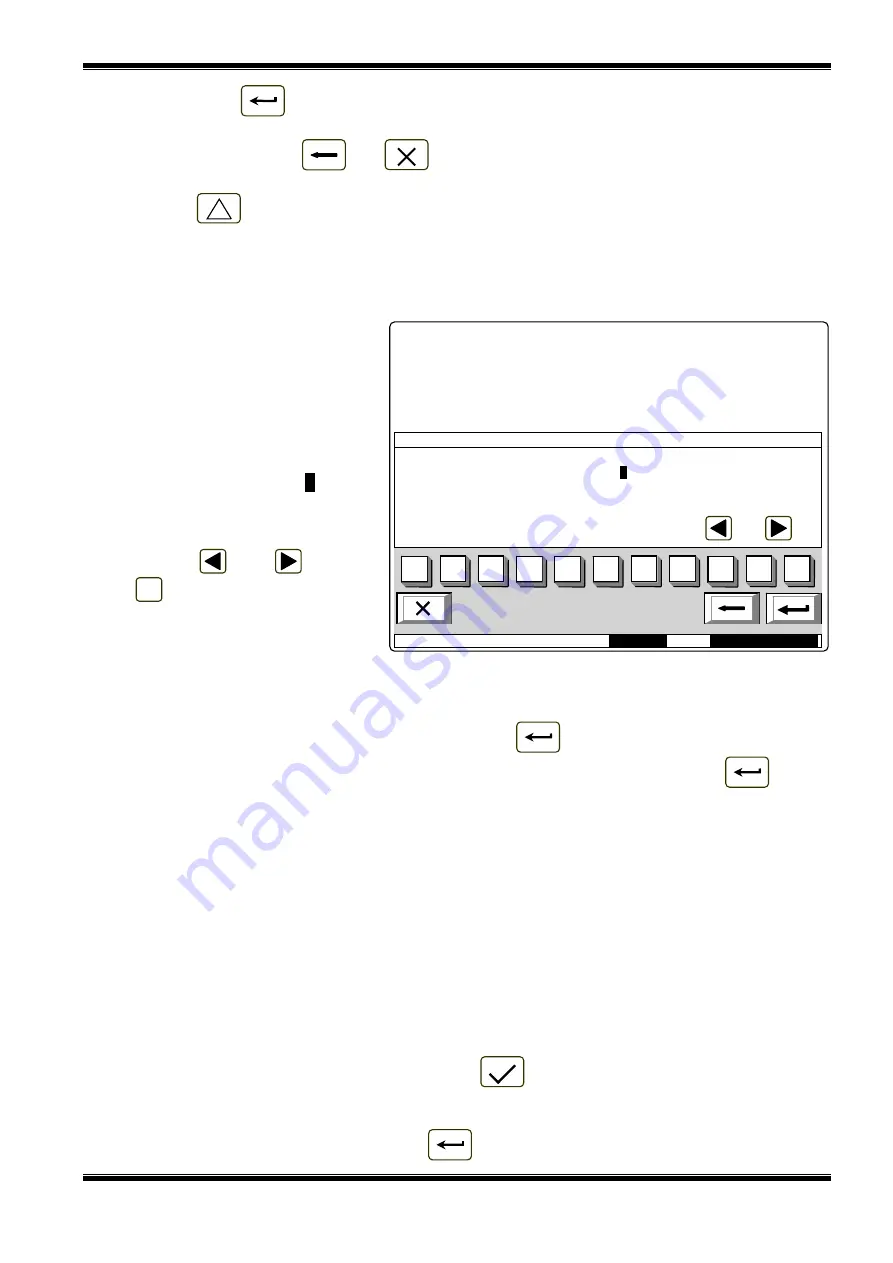
menu, a password screen appears: 

 
To enter the password use the 

digit buttons – press a button and the 
relevant digit will be inserted in the 
place pointed by the cursor „_”, and 
the previous text and the cursor itself 
move one position to the right. Move 
the cursor to the right or to the left 

using buttons 

 and 

. Press 

button 

 to delete: 

  The digit under the cursor, if 

any; 

  The digit to the left of the  

cursor if no digit is under the cursor. 

Password maximum length is 10 symbols. If you press a digit button after a 10-symbol password 

is already entered, the extra digit is not accepted. 

If the password is not correct, when you press button 

 all digits are deleted and the cursor 

moves back to initial position. If a password for Access Level 3 is entered, press button 

 and the 

fire control panel enters Set Up mode: fire detectors are being reset, monitored and addressable 
outputs are being switched off and the faults are being cleared. During this operation the message 

Please wait 

appears on the screen; as soon as the operation is completed, the menu Set Up


is 

activated. 

13. Set Up Mode 

13.1. Description 

Set Up mode is used for setting the configuration parameters of the control panel. 
Access to the Set Up screen is provided through 

Information and Control Mode

 – submenu Set 

Up (see section 12.4). 

When the control panel enters Set Up mode, it exits all other conditions and discontinues the 

service of fire alarm zones, addressable devices, monitored outputs and other periphery devices (all 
outputs are switched off). The panel can be controlled via the keypad provided for the purpose. Upon 
exit of Set Up mode, reset of the control panel is performed.  

In Set Up mode only the green LED indicator 

 (

Power supply

)is illuminated. The local 

sounder is off. 

The displayed screens have a tree structure of subordinate menus (Appendix 2b). Transition to a 

lower hierarchy menu is performed via button 

 (

Enter

); to revert to a previous/ upper hierarchy 

С


Mode: DAY

19:36:15


Mon 21 Mar 2005

FIRE CONTROL PANEL IFS7002 

UniPOS 


PASSWORD  Level 3 

 
  Enter 

Password: 


0

1

2

3

4

5

9

С

Содержание IFS7002

Страница 1: ...UniPOS Interactive Fire Control Panel IFS7002 Instruction Manual Revision 2 05...

Страница 2: ...4 10 3 Consumption on back up batteries supply 9 4 10 4 Power supply to external devices 10 4 11 Dimensions 10 4 12 Weight 10 5 Contents of delivery 10 6 General information 10 6 1 Access levels 10 6...

Страница 3: ...12 Information and Control Mode 24 12 1 Description 24 12 2 Menu Lists 24 12 2 1 Menu Faults 25 12 2 2 Menu Disables 26 12 2 3 Menu Zones in Test 28 12 2 4 Screen Panel configuration 30 12 2 5 Menu Pa...

Страница 4: ...tputs 83 13 8 3 Menu Addressable outputs 84 13 8 4 Function Display 85 13 8 5 Menu Buttons 85 13 9 Menu New passwords 87 13 9 1 Menu Level 2 87 13 9 2 Function Level 3 87 13 10 Function Default parame...

Страница 5: ...002 Instruction Manual Page 5 Revision 2 05 Of 107 20 Conditions of operation storage and transportation 96 20 1 Operation and storage 96 20 1 1 Temperature 96 20 1 2 Relative humidity 96 20 2 Transpo...

Страница 6: ...he available fire control panels resources All these are realizable via fire control panel s keypad and after a detailed examination of the instructions set herewith 2 Terminology ACCESS LEVEL access...

Страница 7: ...upon activation of automatic fire detector the fire control panel enters Fire condition until the specified time expires The common and local light indicators local sound signaling and a text message...

Страница 8: ...splay with a text message for system operations before the user is allowed to proceed with his work with IFS7002 ZONE IN TEST a zone set in Test condition by the user The zone is reset the fire detect...

Страница 9: ...switched off Built in sounder for fault condition one tonal discontinuous can be switched off Built in real time clock Set of test modes and options for adjustment Setting the clock Check ups on ligh...

Страница 10: ...n Disabled components and Zone in test see sections 8 12 2 1 12 2 2 and 12 2 3 Entering inspection time period see section 8 3 1 Forced proceeding from phase Fire condition stage I to phase Fire condi...

Страница 11: ...cations and buttons for control Table 1 gives detail description of the indications for each status Table 2 presents the basic means for control Appendix 1 shows the front panel of IFS7002 Table 1 Con...

Страница 12: ...ed outputs Button Inspection Fire condition phase Fire condition stage I Levels 1 and 2 To add time period for inspection Button Stop Alarm Fire condition and Fault condition with the exception of Fat...

Страница 13: ...1 Previous page from the left window Information and Control Mode Levels 1 and 2 To move the cursor one position to the right Next element if any are available from the left window Button To the right...

Страница 14: ...fication number type and class are being verified against these saved in the energy independent memory of the fire control panel A text message System operations is displayed on the LCD Upon completio...

Страница 15: ...l panel will run the following operations d if the fire control panel detects compliance of parameters with these saved in the energy independent memory the device is placed in service with its previo...

Страница 16: ...he fire control panel enters Fire condition stage II in the same zone The fire control panel enters Fire condition stage I upon activation of an automatic fire detector and Fire condition stage II upo...

Страница 17: ...tion on the first device that has detected fire condition the middle two line field displays information on the second device in fire condition the bottom two line field information on the last device...

Страница 18: ...s for fire condition where outputs for fire condition responded At Access Level 2 and in absence of zones in Fire condition stage I i e the fire control panel is in phase Fire condition stage II only...

Страница 19: ...field is suppressed Press the button to display it When the last suppressed text message for a zone in Fire condition is reached the button disappears Button appears on the display where a message fo...

Страница 20: ...e type Different device class Fault in a monitored output short circuit or break Fault in the mains supply Fault in the backup batteries supply Short circuited ground wire Fault in the positive supply...

Страница 21: ...rs are illuminated too Upon System error indicator System error is flashing in yellow Upon Fault in mains supply indicator Fault in mains supply is flashing in yellow The local sounder produces discon...

Страница 22: ...dition stage I to Fire condition stage II will trigger the local sounder and a signal for fire condition only will be produced New fault condition will trigger the local sounder and a signal for fault...

Страница 23: ...age I or Fire condition stage II is detected in the zone sound and LEDs indications associated addressable controllable or relay outputs are not triggered i e the fire control panel does not enter Fir...

Страница 24: ...Level 2 is active button Reset Fire The screens visualized on the display are organized in a tree structure containing subordinate menus Appendix 2 Transition to a lower hierarchy menu is performed by...

Страница 25: ...yed in a few lines from 1 to 4 It brings out the following information Text for the type of the fault this information is mandatory Information for the device zone if the device is fire detector loop...

Страница 26: ...tputs display information only for disabled outputs monitored outputs and addressable output devices 12 2 2 1 Screen Total If no disables are set the following screen appears Screen Total has the foll...

Страница 27: ...nd address Text message for the device for addressable output devices only Buttons and situated in the right panel section scroll the pages up and down and allow displaying next page or previous page...

Страница 28: ...e available the following screen appears The displayed information is for Zone number Text message for the zone Buttons and in the right panel section scroll the pages up and down and allow displaying...

Страница 29: ...you can enter a random 3 digit number of the zone To correct the number use button the button deletes the last digit you entered As soon as you enter a number in the field Go to press button to displ...

Страница 30: ...twork 12 2 6 Menu Loops The menu displays information for the loops and the devices integrated in the loops It contains two identically organized submenus for Loop 1 and for Loop 2 each submenu contai...

Страница 31: ...he field Go to is activated and a random 3 digit number can be entered in the field showing the device s address in the loop To edit the 3 digit number press button and you can delete the last entered...

Страница 32: ...last entered digit When you press button after the 3 digit number is already entered in the Go to field you can select a zone and its address is displayed in the field If you enter 0 for a number the...

Страница 33: ...enus Fire Phase 1 Outputs and Fire Phase 2 Outputs The menus allow the user to display information for outputs associated to the zone which will respond at Fire Condition phase Fire condition stage I...

Страница 34: ...alized Loop number device address in the loop and the number of the output in the device if more than one is displayed for each device The list is visualized in pages each page containing a maximum of...

Страница 35: ...u to display A screen with the message No integrated devices where no devices are present the only option is to exit the menu A screen for the status of the first device where some devices are present...

Страница 36: ...Fault condition the text message Fault is displayed only when the fire detector responded to a fault condition For automatic fire detectors FD7130 The smoke concentration measured by the fire detecto...

Страница 37: ...d fire detector in the conventional line the text message Removed FD appears only when a conventional line detector is removed The temperature in the module measured by the fire detector in Celsius Te...

Страница 38: ...ressable input if available When you press a digit button the arrow before the selected addressable input disappears and the Go to field is activated then you may enter a random 3 digit number for the...

Страница 39: ...pecific information depending on the event type The code and the specific information for events from the type Fire condition are Event character Event code Specific information Fire alarm zone in Fir...

Страница 40: ...on for events from the type Test are Event character Event code Specific information Fire alarm zone set to Test Mode Zone in Test Reset of Test Mode Zone in Test reset Zone number Text message of the...

Страница 41: ...circuited Loop reset Fault condition Fire alarm loop open Open Loop Fault condition Fire alarm loop open exited Open Loop reset Fault condition Fire alarm loop not initialized Loop not initialized Fa...

Страница 42: ...nd Device exchanged is possible through removing the detector i e fault condition Removed device is registered or through Fire control panel Set Up i e after event Manual Set Up or Remote Set Up 3 Fau...

Страница 43: ...tal is selected where the serial number of the event in the filter coincides with the serial number of the event in the archive Enter the menu to display the record for the last saved event Buttons an...

Страница 44: ...4 12 2 10 3 Menu Fault conditions The menu displays only the records for fault conditions filter Fault conditions is selected Enter the menu to display Where no records for fault conditions are avail...

Страница 45: ...the position for the relevant figure To edit the figures press button the figure before the cursor will be deleted The dates shall comply with the format indicated on the screen the separator appears...

Страница 46: ...em functions The menu contains the following subordinate menus and functions Disables Zones in test Set Clock Set Mode Check LEDs and Buzzer Access to the subordinate menus is allowed at Access Level...

Страница 47: ...f disabled zones are available the first disabled zone is displayed and in the bottom section of the panel appears text message for the zone Buttons and in the right panel section allow the user to sw...

Страница 48: ...he first disabled fire detector and in the bottom section of the panel appears the detector s text message Buttons and seen in the right panel section allow the user to switch between the next and the...

Страница 49: ...ears Buttons and appearing in the right panel section allow the user to switch between the first and the second monitored output When you press button the monitored output status is being changed alte...

Страница 50: ...us of Device 125 will be displayed Simultaneously the number in the Go to field will be deleted i e the field is deactivated When you press button the addressable output module status is being changed...

Страница 51: ...is alternatively changed from IN TEST to NOT IN TEST and reverse and in the bottom left section appears the reminder Data not saved The changes enable disable test operation in fire alarm zone take ef...

Страница 52: ...control panel ignores Fire condition stage I Phase 1 of fire condition i e upon activation of automatic fire detector and manual activation of manual call point the control panel will always enter Fi...

Страница 53: ...t when you press button all digits are deleted and the cursor moves back to initial position If a password for Access Level 3 is entered press button and the fire control panel enters Set Up mode fire...

Страница 54: ...d one position to the left if there is no symbol under the cursor the symbol to the left will be deleted an arrow pointing over the parameter a text in inversive colours To move between the parameters...

Страница 55: ...Menu Loop parameters Menu Device parameters 13 4 1 Menu Loop parameters The menu allows the user to adjust the parameters of the fire alarm loop Loop status On or Off Maximum current value of the loo...

Страница 56: ...e Go to field is activated and a random 3 digit address for each device in the loop can be entered To edit the address use button press it and the last entered digit will be deleted Press button after...

Страница 57: ...or remains for 1 s over the same position if you press it again the symbol will be changed by the next one marked on the button the symbol marked on the second button means that the figure 1 is in com...

Страница 58: ...o move the cursor one position to the right or to the left Use the additional digit keypad to Insert digits when the LED Num is illuminated Move the cursor via buttons 4 and 6 analogically to buttons...

Страница 59: ...hen you press button after you entered a number in the Go to field the zone whose address is in the field will be selected If the number is 0 Zone 1 will be selected If the number is higher than the a...

Страница 60: ...essible 13 5 1 1 Screen List of devices The screen displays a list of fire detectors included in the zone For each devices is displayed the loop where it is included and the device address in the loop...

Страница 61: ...for a device in the zone To edit the number use button press the button to delete the last inserted digit When you press button and a number is already entered in the Go to field the devices whose num...

Страница 62: ...1 When you press button a screen with warning message appears Press button to remove from the zone devices included in the group The screen displays If some devices are still in the zone a screen for...

Страница 63: ...vices get numbers in accordance with the following sequence from the first decive in Loop 1 to the last device in Loop 1 from the first device in Loop 2 to the last device in Loop 2 When you press but...

Страница 64: ...if no value is entered by default will be accepted Address 1 Press button to add the free devices in the group to the zone the limit of 60 devices in a zone is accordingly observed The following info...

Страница 65: ...urrent parameter to Yes the output will be activated upon relevant phase of Fire condition in the zone and to No the output will remain inactive upon relevant phase of Fire condition in the zone and v...

Страница 66: ...ered digit When you press button and a number is already entered in the Go to field the output whose number is in the field will be selected If the number is 0 the first output assosiated to the zone...

Страница 67: ...umber use button press it and the last entered digit will be deleted The devices obtain numbers according to the following sequence from the first device in Loop 1 to the last device in Loop 1 from th...

Страница 68: ...on stage II in the zone Inspection time period of time that when you press button will be added to the remaining time for transition from Fire condition stage I to Fire condition stage II in a zone To...

Страница 69: ...ter the last pressing the cursor moves to the next position to the right If you press another button during this 1 second the cursor first moves one position to the right and then the new symbol is in...

Страница 70: ...to Insert digits when the LED Num is illuminated Move the cursor via buttons 4 and 6 analogically to buttons and when the LED Num is extinguished Delete a symbol via button Del analogically to button...

Страница 71: ...d you can enter a random 3 digit number for the device To edit the number press button and the last entered digit will be deleted Devices obtain numbers according to the following sequence from first...

Страница 72: ...essable output is pointed by arrow Buttons and in the right panel section are visualized if more that one addressable output is available and the Go to field in the heading and the digit buttons appea...

Страница 73: ...d in the right panel section are visualized if more than one free addressable output is available the Go to field and the digit buttons appear if free addressable outputs in more than one module are a...

Страница 74: ...dressable inputs The content of the text message is displayed too If no text message is set the numer is 0 this line remains empty To edit the parameter Text message use the digit buttons The pointer...

Страница 75: ...cursor moves to the next position to the right If you press another button during this 1 second the cursor first moves one position to the right and then the new symbol is inserted The maximum length...

Страница 76: ...te a symbol via button Del analogically to button Delete when the LED Num is extinguished The mode of operation of the additional keypad indicated by the LED Num can be changed via button Num Lock But...

Страница 77: ...Start the initialization via button and in the bottom line of the panel appears the message Wait please Upon unsuccessful initialization appears the following screen Upon successful initialization th...

Страница 78: ...e control panel Upon activation of the function the following warning screen appears Start the initialization via button and in the bottom line of the panel appears the message Wait please Upon unsucc...

Страница 79: ...in the Go to field the device whose number in the service zone is in the field will be selected If the number is 0 the first device in the service zone will be selected If the number is higher than th...

Страница 80: ...vices that shall be excluded from the service zone is reverted or the screen with the message The service zone is empty 13 7 4 Menu Exclude devices The menu allows the user to exclude or include separ...

Страница 81: ...ice is displayed in inversive colours Change the status by pressing button the status is changed alternatively from included to excluded and vice versa 13 7 5 Menu Check The menu is provided for check...

Страница 82: ...The devices obtain numbers according to the following sequence from the first device in Loop 1 to the last device in Loop 1 from the first device in Loop 2 to the last device in Loop 2 When you press...

Страница 83: ...colours When you press button or the activated monitored output is switched off and the other output is activated if not in fault condition Upon exit of the menu the activated monitored output is swit...

Страница 84: ...current addressable output is pointed by arrow When the data transfer is successful the device output will be activated Buttons and in the right panel section are visualized if more than one addressab...

Страница 85: ...display of the fire control panel When you enter the function the following screen appears When you press button that is in the middle of the display the check is being started the display changes its...

Страница 86: ...ersection a cross shall be pressed by the means of small size round tip pointer For point two and point three goes the same If the check performed at the third point is successful the function is exit...

Страница 87: ...e maximum length of the password is 10 symbols If you press a button after the 10 digit password is entered the exceeding symbol will not be accepted When you press button the last entered password wi...

Страница 88: ...s To save the record press button in the bottom line of the panel appears the message Wait please Upon unsuccessful operation appears the following screen When the records are successfully saved the m...

Страница 89: ...1 outputs none Fire Phase 2 outputs none Device parameters Addresses 1 t 125 in Loop 1 and addresses 1 t 125 in Loop 2 Zone 255 not included in a zone Device is On Addressable input parameters Address...

Страница 90: ...ondition are exited When in Remote Control Mode the panel does not provide service to fire alarm zones addressable devices monitored outputs and other periphery devices all outputs are off it is under...

Страница 91: ...nd arrangements When fire detectors and periphery devices are integrated in the system avoid arranging wires in closed loops it will reduce the control panel s resistance to electro magnetic interfere...

Страница 92: ...network Connection of interface devices to a local network is made via two serial interfaces CAN 2 0B using the terminals CAN1 and CAN2 17 4 Connecting addressable fie detectors Addressable fire dete...

Страница 93: ...s Menu Loop parameters see section 13 4 1 Loop status On or Off Maximum current in the loop 4 Exclude all unused devices in the loops if any Menu Exclude devices see section 13 7 4 5 Start clean initi...

Страница 94: ...loop Restore the loop so it complies with the configuration saved in the controlpanel and start initialization of the control panel Start clean initialization of the control panel Fault Exceeding numb...

Страница 95: ...mains fuse Appendix 3 Fault in backup batteries supply Indicators and are illuminated in steady yellow light the local sounder produces discontinuous signal information table with the number of fault...

Страница 96: ...2 Transportation The fire control panel shall be transported by vehicles in factory packing in the above stated environmental conditions and at sinusoidal vibrations with accelecartion amplitude not m...

Страница 97: ...pendixes Appendix 1 1 2 3 4 5 6 7 8 1 Common indicator for fire condition 2 Common indicator for fault condition 3 Indicator for System error 4 Indicator for Fault in power supply 5 Indicator for Disa...

Страница 98: ...uts Total Zones Devices Outputs Zones Status of zones Password Level 2 Disables Zones in test Real time clock Mode of operation Check LEDs and Buzzer Zones Devices Outputs Loop1 Loop2 Loop parameters...

Страница 99: ...UniPOS Interactive Fire ControlPanel IFS7002 Instruction Manual Page 99 Revision 2 05 Of 107 Appendix 2 continued b SetUp menu part 1...

Страница 100: ...UniPOS Interactive Fire ControlPanel IFS7002 Instruction Manual Page 100 Revision 2 05 Of 107 Appendix 2 continued b SetUp menu part 2...

Страница 101: ...anel IFS7002 Instruction Manual Page 101 Revision 2 05 Of 107 Appendix 3 Terminal with fuse Power supply Circuit board Base 7002 Circuit board Indication 7002 Backup battary 18Ah Backup battary 8Ah 1...

Страница 102: ...y closed contact Rel Fault relay output for fault condition C common contact NO normally open contact NC normally closed contact Out X leads for monitored output X positive lead negative lead earthing...

Страница 103: ...1 LoopX 1 Control panel IFS7002 First device FD7204 PowerL 1 PowerL 1 or FD7203 E Power line Signal line PowerL 2 PowerL 2 OUT IN IN OUT FD71XX LoopX 2 LoopX 2 OUT IN IN OUT FD7201 OUT IN IN OUT FD80...

Страница 104: ...ddress5 FD7203 7204 Address4 Address6 Address1 Address2 Address3 Address7 Address125max Address5 Address6 FD7203 7204 Address4 FD7203 7204 FD7203 7204 b Configuration of Fire Alarm Loops without branc...

Страница 105: ...ress K 2 Address 125max d Improper connection of Fire alarm loop branch the branch is connected between the control panel and an addressable device LoopX 1 LoopX 2 Control panel IFS7002 Address 1 Addr...

Страница 106: ...ecting Input output module to monitored output b Diagram for connecting Input output module to relay output Connection diagrams for Input output module Input output module Fire control panel IFS7002 o...

Страница 107: ...i f t ES C F 1 F 2 F 3 F 4 F 5 F6 F7 F 8 F 9 F 1 0 F 1 1 F12 Insert D el ete Scroll Print 1 2 3 4 5 6 7 8 9 0 _ 1 2 Alt Shif t Alt T ab RS232 MODEM MODEM 7150 7150 7110 7130 7120 7160 7120 7130 7110 7...

Отзывы: