Uninet iColor 300 series Скачать руководство пользователя страница 16


iColor


Premium


Transfer


Media


Instructions


iColor


premium


transfer


media


is


used


as


a


set,


comprising


of


a


‘Transfer


Sheet’


and


an


‘Adhesive


Sheet’.


Please


follow


the


steps


below


for


best


results:


1

.


Place


transfer


sheet


into


the


manual


sheet


feed


of


the


iColor


300


printer,


smoothest


side


up


(please


note


this


is


the


coated


side


of


the


sheet).


2

.


Set


the


printer


to


print


from


the


‘Multipurpose


Tray’


and


set


paper


type


to


‘Medium


Light’


and


set


size


to


A4.


*Remember


to


create


the


image


in


reverse


to


ensure


it


looks


correct


when


transferred


to


the


garment.


3.


Print


the


image.


4.


Once


image


is


printed,


place


the


adhesive


sheet


on


top


of


the


print,


white


(adhesive


coated)


side


down


the


image


and


the


adhesive


should


be


face

to

face.


5.


Fold


a


small


corner


of


the


adhesive


sheet


over,


prior


to


pressing


this


will


make


it


easier


to


peel


apart


after


pressing.


If


you


wish,


you


can


run


the


two


sheets


together


through


a


laminator


on


a


medium


heat


setting


prior


to


pressing

 ‐ 

this


will


ensure


all


air


bubbles


are


removed.


6.


Press


the


two


sheets


together


using


a


heat


press


at


248

260°F


for


30

40


seconds*


with


a


medium

high


pressure.


7.


Upon


opening


the


press


&


while


hot

 ‐ 

immediately


peel


the


adhesive


sheet


away


from


the


transfer


sheet


quickly


and


evenly,


peeling


in


a


smooth,


continuous


motion.


Leave


the


sheets


on


the


press


to


minimize


heat


loss.


8.


Discard


the


used


adhesive


sheet.


9.


Trim


the


edges


away


from


the


transfer


sheet


this


will


ensure


no


excess


adhesive


sticks


to


the


garment.


10.


Position


the


transfer


sheet


(print


side


down)


onto


the


garment


and


press


using


a


heat


press


at


248

260°F


for


30

40


seconds*


with


a


medium

high


pressure.


11.


Remove


the


garment


from


the


heat


press


and


allow


to


cool.


12.


Once


the


garment


is


cooled


(about


1


2


minutes),


carefully


peel


away


the


transfer


sheet


and


the


image


will


remain


on


the


garment.


Do


not


wait


too


long


for


this


step.


13.


Re

Pressing


the


image


into


the


shirt


is


important


for


wash


durability.


We


have


found


it


best


to


re

press


the


image


on


the


shirt


for


roughly


15

30


seconds.


Use


the


Kraft


paper


on


top


of


the


image


for


a


Matte


finish


and


the


Teflon


paper


on


top


of


the


image


for


a


gloss


finish.


At


that


point


while


the


shirt


is


still


on


the


press


and


still


hot;


lightly


stretch


the


material


to


allow


the


toner


to


move


into


the


fabric.


*The


temperature


and


duration


varies


slightly


based


on


the


heat


press


being


used


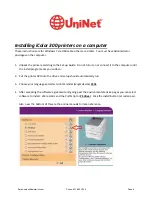
Содержание iColor 300 series

Страница 1: ...iColor 300 series User Manual ...

Страница 2: ...e 5 iColor Printer Software Installation Instructions Page 6 9 iColor Printer Settings Page 10 12 iColor 300 series White Print Instructions Page 13 iColor Transfer Media Information Page 14 iColor Transfer Media Instructions Page 15 iColor Printer Spec Sheet Page 16 iColor 300 series FAQ Page 17 Email sales icolorprint com Phone 631 590 1040 Page 1 ...

Страница 3: ...r color prints an additional print pass through the iColor 300WB White Printer or 300FW Fluorescent White Printer will be required different effects can be achieved by changing the sequence of print between the two machines For exciting design ideas and suggestions for using the 300CB for maximum effect please visit our website at www icolorprint com iColor premium transfer media has been optimize...

Страница 4: ... manual provided on CD enclosed will provide detailed instructions for full printer functionality please refer to the additional instruction leaflet provided to ensure iColor 300 replacement consumables are fitted correctly Please note that vector and line art images including text are likely to produce the best results For exciting design ideas and suggestions for using the 300WB for maximum effe...

Страница 5: ...der both visible and UV light color representation will differ from conventional color printing In order to add white elements to your color prints an additional print pass through the iColor 300WB White Printer or 300FW Fluorescent White Printer will be required different effects can be achieved by changing the sequence of print between the two machines For exciting design ideas and suggestions f...

Страница 6: ...er manual provided on CD enclosed will provide detailed instructions for full printer functionality please refer to the additional instruction leaflet provided to ensure iColor 300 replacement consumables are fitted correctly Please note that vector and line art images including text are likely to produce the best results For exciting design ideas and suggestions for using the 300FW for maximum ef...

Страница 7: ...rogram asks you to do so 2 Put the printer DVD into the drive and setup should automatically run 3 Choose your language and select printer model target device C331 4 After accepting the software agreement and going past the environmental advice pages you can select software to install We recommend the PostScript or PS driver Click the install button at red arrow Also near the bottom of this are th...

Страница 8: ...installation will proceed click Next after having the printer and cables as described 6 Click Easy Installation Local then Next Then you will see the box below Email sales icolorprint com Phone 631 590 1040 Page 7 ...

Страница 9: ...ers to easily choose the correct one for your work It is best to do this as they are installed how to do this is included below b Mark the USB ports and cables with these names to avoid problems if you move the computer printers It s best if each printer is always connected to its own USB port on the computer 2 Navigate from the start menu to the list of installed printers The Window 7 path is 3 R...

Страница 10: ... tab highlight the printers name and change it then click OK 5 Then continue with the install process above for the remaining printers renaming them as you go along Email sales icolorprint com Phone 631 590 1040 Page 9 ...

Страница 11: ...ese can be set as Printer Preferences from Devices and Printers or as Document Properties when printing Setting them as Printer Preferences means they will be the same the next time you use the printer 1 There are 4 tabs in the box Layout is basically Portrait or Landscape while Paper Quality is out first setting to change to use the Multipurpose Tray Email sales icolorprint com Phone 631 590 1040...

Страница 12: ...faults We suggest the print quality be set to Fine And under the Advanced button there is an option for Mirror Print to flip the image so it is left to right correct after transfer This is useful for some software that doesn t have this option The PCL Driver does not include this option Email sales icolorprint com Phone 631 590 1040 Page 11 ...

Страница 13: ...Here we find the Color Swatch Utility which is also available with the PCL Driver This allows you to print a range of colors to find settings matching the one you want The help button on it describes how to do this Email sales icolorprint com Phone 631 590 1040 Page 12 ...

Страница 14: ...ransfer of halftones Images that contain halftones or gradients can cause problems with self weeding transfer media This is because the background is assumed to be white and nothing is printed there It is usually easiest to use an image editing program to create a copy of the image in the brick red color above Select the entire image and change the color saving as a separate file Print the standar...

Страница 15: ...ansfer prints iColor media enables you to produce detailed quality images while dramatically reducing your production time Wash tested up to 100 washes at 104 F your images will remain durable and vibrant Designed to work with the iColor 300 series of specialty printers the iColor premium transfer media range will also work with many popular color laser printers please check with your printer manu...

Страница 16: ...30 40 seconds with a medium high pressure 7 Upon opening the press while hot immediately peel the adhesive sheet away from the transfer sheet quickly and evenly peeling in a smooth continuous motion Leave the sheets on the press to minimize heat loss 8 Discard the used adhesive sheet 9 Trim the edges away from the transfer sheet this will ensure no excess adhesive sticks to the garment 10 Position...

Страница 17: ... 48 5 Duty Cycle 45000 Power 120v Memory 128 Print Speed Color 23 Resolution 1200 x 600 Interfaces 10 100 TX Ethernet High speed USB v2 0 Paper Capacity 350 sheets 250 sheet universal tray 100 sheet multi purpose tray Optional Input 2nd 3rd universal tray 530 sheets each High Capacity Feeder 1 590 sheets Maximum Capacity 880 sheets with optional530 sheet 2nd paper tray Email sales icolorprint com ...

Страница 18: ...e pressing the transfer sheet and adhesive sheets together in order to avoid areas where the adhesive does not transfer to the toner in the first step when using 2 step paper This step is necessary to pre active the adhesive If you do not have a laminator available you can alternatively choose from these two options 1 Set the heat to 275 degrees for 45 seconds 2 Set the heat to 250 degrees for 30 ...

Отзывы: