background image

18

RG525

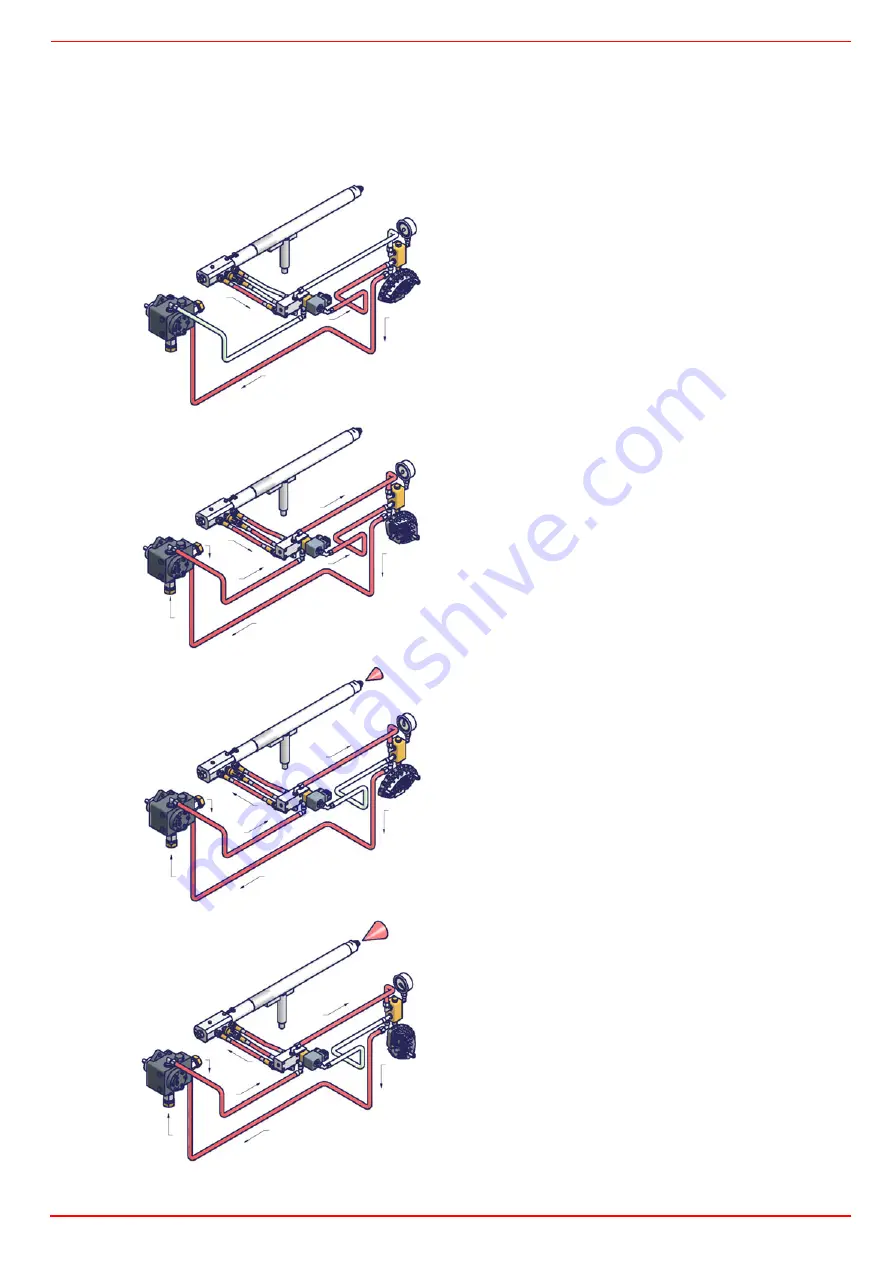
Oil circuit 

The fuel is pushed into the pump 1 to the nozzle 3 at the delivery pressure set by the pressure governor. The solenoid valve 2 stops the
fuel immission into the combustion chamber. The fuel flow rate that is not burnt goes back to the tank through the return circuit. The
spill-back nozzle is feeded at constant pressure, while the return line pressure is adjusted by means of the pressure governor controlled
by an actuator coupled to an adjusting cam. The fuel amount to be burnt is adjusted by means of the burner actuator according to the
adjustments set (see prevoius paragraph).

Fig. 12 - Stand-by

Fig. 13 -  Prepurge

Fig. 14 - Low flame

Fig. 15 - High flame

Key

1

Oil  pump

2

Oil solenoid valve

3

Nozzle

4

Adjusting cam

5

Pressure gauge

6

Pressure governor

1

2

3

4

5

6

1

2

3

4

5

6

1

2

3

4

5

6

1

2

3

4

5

6

Содержание RG510

Страница 1: ...MANUAL OF INSTALLATION USE MAINTENANCE RG91 RG92 RG93 RG510 RG515 RG520 RG525 Progressive Fully modulating Light oil burners M039214CC Rel 2 11 2010 BURNERS BRUCIATORI BRULERS BRENNER QUEMADORES ГОРЕЛКИ ...

Страница 2: ... rotation 19 ADJUSTING AIR AND LIGHT OIL FLOW RATE 20 Light oil nozzles 20 Adjustments brief description 22 Adjustment procedure 22 Oil Flow Rate Settings by means of Berger STM30 Siemens SQM40 actuator 22 Adjustment by the Siemens SQL33 actuator 25 Fully modulating burners 28 Calibration of air pressure switch 28 PART II OPERATION 29 OPERATION 30 Burner control panel 30 PART III MAINTENANCE 31 RO...

Страница 3: ...s electricity gas oil or other fuel Observe caution with hot burner components These are usually near to the flame and the fuel pre heating system they become hot during the unit operation and will remain hot for some time after the burner has stopped When the decision is made to discontinue the use of the burner the user shall have qualified personnel carry out the following operations a Remove t...

Страница 4: ...c or explosive mixtures DIRECTIVES AND STANDARDS Gas burners European directives Directive 2009 142 EC Gas Appliances Directive 2006 95 EC on low voltage Directive 2004 108 EC on electromagnetic compatibility Harmonised standards UNI EN 676 Gas Burners CEI EN 60335 1 Household and similar electrical appliances Safety Part 1 General requirements EN 50165 Electrical equipment of non electric applian...

Страница 5: ... fuel and air to perform clean and efficient combustion is activated by atomisation of oil into very small particles This process is achieved making pressurised oil passing through the nozzle The pump main function is to transfer oil from the tank to the nozzle in the desired quantity and pressure To adjust this pressure pumps are provided with a pressure regulator except for some models for which...

Страница 6: ...t A is inside the performance curve Fig 2 Data are referred to standard conditions atmospheric pressure at 1013mbar ambient temperature at 15 C Burner model identification Burners are identified by burner type and model Burner model identification is described as follows Type RG520 Model G PR S A 1 2 3 4 5 6 1 BURNER TYPE RG91 RG92 RG93 RG510 RG515 RG520 RG525 2 FUEL G Light oil 3 OPERATION Availa...

Страница 7: ...er consumption kW 5 6 7 0 9 0 Index of protection IP40 Approx weight kg 220 220 230 Operation Progressive Fully modulating Operating temperature C 10 50 Storage temperature C 20 60 Working service Intermittent BURNERS RG510 RG515 RG520 RG525 Output min max kW 1314 3953 1628 4884 2326 6977 2000 8000 Fuel Light oil Light oil rate min max kg h 111 333 137 411 196 588 169 674 Viscosity cSt 40 C 2 7 4 ...

Страница 8: ...During the first ignition the combustion head is set in order to find a compromise between the burner output and the generator specifications that is why the minimum output may be different from the Per formance curve minimum PRESSURE IN COMBUSTION CHAMBER mbar RG91 kW RG92 kW PRESSURE IN COMBUSTION CHAMBER mbar RG93 kW PRESSURE IN COMBUSTION CHAMBER mbar RG510 kW RG515 kW PRESSURE IN COMBUSTION C...

Страница 9: ...K L M N Omin Omax P W Y Z RG91 1345 1518 242 820 421 35 380 300 473 419 1045 422 419 434 238 268 360 513 M12 417 280 310 295 698 228 185 RG92 1339 1512 242 820 421 35 380 294 467 419 1045 422 419 434 266 296 360 513 M12 417 280 310 295 698 228 185 RG93 1339 1512 242 820 421 35 380 294 467 460 1045 422 460 434 266 296 360 513 M12 417 280 310 295 698 228 185 boiler recommended dril ling template bur...

Страница 10: ...68 1141 571 1313 671 642 329 369 540 496 M14 552 390 390 x 766 328 270 RG515 1451 1671 219 217 246 35 310 530 508 1141 571 1323 681 642 350 390 540 496 M14 552 390 390 x 766 328 270 RG520 1451 1671 219 207 250 35 310 530 508 1141 571 1323 681 642 370 410 540 496 M14 552 390 390 114 880 328 270 RG525 1511 1691 219 197 275 35 350 530 650 1161 571 1341 698 642 434 484 540 496 M14 552 390 390 172 938 ...

Страница 11: ...described on paragraph Overall dimensions 2 place the burner to the boiler lift it up and handle it according to the procedure described on paragraph Handling the burner 3 place the 4 stud bolts 5 according to the burner s drilling plate described on paragraph Overall dimensions 4 fasten the 4 stud bolts 5 place the ceramic fibre plait on the burner flange 6 install the burner into the boiler 7 fi...

Страница 12: ...t oil supplying circuits ATTENTION The lhandling operations must be carried out by specialised and trained personnel If these opera tions are not carried out correctly the residual risk for the burner to overturn and fall down still persists To move the burner use means suitable to support its weight see paragraph Technical specifications The unpacked burner must be lifted and moved only by means ...

Страница 13: ...ation can be considered self ble eding If provided the inside by pass plug must be installed to avoid air and fuel passing through the pump Burners come out from the factory provided for double stage systems They can be suited for single pipe system recommended in the case of gravity feed as decribed before Fig 5 Suction circuit Key 1 Manual valve 2 Light oil filter 3 Light oil feeding pump 4 One ...

Страница 14: ...ucting them After filling the tank wait before starting the burner This will give any suspended impurities time to deposit on the bottom of the tank thus avoiding the possibility that they might be sucked into the pump On initial commissioning a dry operation is foreseen for a considerable length of time for example when there is a long suction line to bleed To avoid damages inject some lubricatio...

Страница 15: ... Max return pressure 5 bar Rotation speed 3600 rpm max Suntec T Viscosity 3 75 cSt Oil temperature 0 150 C Minimum suction pressure 0 45 bar to prevent gasing Maximum suction pressure 5 bar Rated speed 3600 rpm max Key 1 Inlet G3 4 2 Pressure gauge port G1 4 3 Vacuum gauge port to measure the inlet vacuum G1 4 4 To pressure adjusting valve G3 4 Pressure adjustment Remove cap nut 1 and the gasket 2...

Страница 16: ...p provided 1 remove the closing nuts A and R on the inlet and return connections of the pump 2 screw the rotating nut of the two flexible hoses on the pump being careful to avoid exchanging the inlet and return lines see the arrows marked on the pump that show the inlet and the return see prevoius paragraph Suntec TA Suntec T R A R A ...

Страница 17: ...eeded at constant pressure while the return line pressure is adjusted by means of the pressure governor controlled by an actuator coupled to an adjusting cam The fuel amount to be burnt is adjusted by means of the burner actuator according to the adjustments set see prevoius paragraph Fig 8 Stand by Fig 9 Prepurge Fig 10 Low flame Fig 11 High flame Key 1 Light oil pump 2 Light oil solenoid valve 3...

Страница 18: ...zle is feeded at constant pressure while the return line pressure is adjusted by means of the pressure governor controlled by an actuator coupled to an adjusting cam The fuel amount to be burnt is adjusted by means of the burner actuator according to the adjustments set see prevoius paragraph Fig 12 Stand by Fig 13 Prepurge Fig 14 Low flame Fig 15 High flame Key 1 Oil pump 2 Oil solenoid valve 3 N...

Страница 19: ...T while connecting electric supply wires to burner s teminal block be sure that ground wire should be longer than phase and neutral ones Progressive burners Fig 16 Probes connection Fig 17 Fan motor and pump motor rotation Once the electrical connection of the burner is executed remem ber to check the rotation of the motor The motor should rotate according to the direction shown by the Arrow attac...

Страница 20: ...H FLAME RETURN PRESSURE bar LOW FLAME RETURN PRESSURE bar BERGONZO A3 20 11 13 5 recommended FLUIDICS WR2 UNIGAS M3 25 19 20 7 recommended Tab 1 Fig 20 Atomisation angle according to the return pressure _________ Flow rate FLOW RATE kg h DIMENSIONS Min Max 40 13 40 50 16 50 60 20 60 70 23 70 80 26 80 90 30 90 100 33 100 115 38 115 130 43 130 145 48 145 160 53 160 180 59 180 200 66 200 225 74 225 2...

Страница 21: ...21 Fig 21 ...

Страница 22: ... check the pump motor rotation and keep pressing for some seconds until the oil circuit is charged 3 bleed the air from the M pressure gauge port Fig 22 by loosing the cap without removing it then release the contactor Fig 22 4 Before starting the burner up drive the high flame actuator microswitch matching the low flame one in order to let the burner ope rates at the lowest output to achieve safe...

Страница 23: ... the pump adjusting screw VR see Fig 22 as to get the nozzle pressure at 25bar Fluidics nozzles see diagram on page 20 10 in order to get the maximum oil flow rate adjust the pressure reading its value on the PG pressure gauge without changing the air flow rate set during the gas operation adjustments see prevoius paragraph checking always the combustion parameters the adjustment is to be performe...

Страница 24: ...mum output point 14 as for the point to point regulation in order to set the cam foil shape move the low flame microswitch cam III a little lower than the maximum position 90 15 set the TAB thermostat to the minimum in order that the actuator moves progressively towards the low flame position 16 move cam III low flame towards the minimum to move the actuator towards the low flame until the two bea...

Страница 25: ... next picture see chapter OPERATION on page 30 5 Start the burner up by means of the thermostat series and wait unitl the pre purge phase comes to end 6 the burner starts up with the actuator on the ignition position set it to the MAN manual mode by the MAN AUTO selector ignition position read on the air damper index ID1 see picture on page 24 7 disconnect the TAB thermostat removing the wire from...

Страница 26: ...gh flame position 12 To adjust the air flow rate in the high flame stage loose the RA nut and screw VRA as to get the desired air flow rate moving the rod TR towards the air damper shaft the air damper opens and consequently the air flow rate increases moving it far from the shaft the air damper closes and the air flow rate decreases Note once the procedure is perfomed be sure that the blocking nu...

Страница 27: ... foil shape accor ding to the combustion values read 18 Once the cam foil shape is defined reconnect the TAB thermostat reconnecting the wire to the terminal no 6 or setting the RWF40 burner modulator to AUTO or the CMF switch to 3 only for fully modulating burner 19 Turn the burner off then start it up again 20 Once the pre purge time comes to end drive the burner to the high flame stage by the T...

Страница 28: ...r information about the regulating modulator see the attached manual Calibration of air pressure switch when provided To calibrate the air pressure switch proceed as follows Remove the transparent plastic cap Once air and gas setting have been accomplished startup the burner During the pre purge phase o the operation turn slowly the adjusting ring nut VR in the clockwise direction until the burner...

Страница 29: ...FUNCTIONING OF THE BURNER THEREFORE ANY OPERATION OF THE APPLIANCE MUST BE PREVENTED WHICH DEPARTS FROM THE INSTALLATION OPERATIONS OR WHICH HAPPENS AFTER TOTAL OR PARTIAL TAMPERING WITH THESE E G DISCONNECTION EVEN PARTIAL OF THE ELECTRICAL LEADS OPENING THE GENERATOR DOOR DISMANTLING OF PART OF THE BURNER NEVER OPEN OR DISMANTLE ANY COMPONENT OF THE MACHINE OPERATE ONLY THE MAIN SWITCH WHICH THR...

Страница 30: ...on of the flame post ignition time and at the end of this time is de energised light H off 7 After the ignition the actuator moves to the high flame position for some seconds then the operation begins and the burner switches to high flame or to low flame according to the plant demand 8 The high low flame operation is shown by the F LED turning on off Burner control panel Keys A ON OFF main switch ...

Страница 31: ...ulators clean adjust and replace if necessary page 33 remove and clean the oil nozzles IMPORTANT do not clean the nozzles using metallic or sharp utensils use only solvents or steam at the end of maintenance operations refit the burner turn it on and check the combustion If in doubt replace the defec tive nozzle s In case of intensive use of the burner the nozzles must be replaced at the end of th...

Страница 32: ...uum cleaner to scrape off the scale use a metallic brush Note to replace the combustion head reverse the procedure described above Removing the oil gun Once the combustion head is removed as described before remove the oil gun as foloows 1 unscrew the connectors from the oil pipes E in figure using 2 spanners to avoid loosening the connections attached to the distri butor block 2 loosen the screw ...

Страница 33: ... electrodes and replace them referring to the values quoted on Fig 29 Cleaning and replacing the detection photoresistor When cleaning the photoresistive detector always use a clean cloth If necessary remove it from its slot to replace it ATTENTION avoid the ignition electrodes to get in touch with metallic parts blast tube head etc otherwise the boiler s operation would be compromised Check the e...

Страница 34: ... as follows 1 turn the burner main switch to 0 Off position 2 disconnect the power mains 3 close the fuel valve of the supply line Burner disposal In case of disposal follow the instructions according to the laws in force in your country about the Disposal of materials series 9x LMO series 5xx LAL25 Minimum current intensity with flame LMO 45µA LAL25 8µA Maximum current intensity without flame LMO...

Страница 35: ...CLE DURING OPE RATION MAIN SWITCH OPEN LINE FUSE INTERVENTION MAX PRESSURE SWITCH FAULT FAN THERMAL CUTOUT INTERVENTION AUXILIARY RELAIS FUSES INTERVENTION CONTROL BOX FAULT SERVOCONTROL FAULT SMOKEY FLAME IGNITION TRANSFORMER FAULT IGNITION ELECTRODE DIRTY OR WRONG POSITIONED DIRTY NOZZLE FUEL SOLENOID VALVE DEFECTIVE PHOTORESISTOR DIRTY OR DEFECTIVE HI LO FLAME THERMOSTAT DEFECTIVE WRONG POSITIO...

Страница 36: ...7 FLEXIBLE HOSES L 385 3 8 2340088 2340088 2340088 ADJUSTING CAM FOIL 2440013 2440013 2440013 ACTUATOR mod SIEMENS SQL 2480040 2480040 2480007 ACTUATOR mod BERGER STM30 2480090 2480090 2480090 ACTUATOR mod SIEMENS SQM40 24800A5 24800A5 24800A5 PHOTORESISTOR mod SIEMENS QRB 2510003 2510003 2510003 COUPLING 2540019 2540019 2540019 PRESSURE GOVERNOR 2570054 2570054 2570077 BURNER MODULATOR 2570112 25...

Страница 37: ...089 2340089 ADJUSTING CAM FOIL with BG PRO governor 2440013 2440013 2440013 2440013 ADJUSTING CAM FOIL with BGH PRO governor 2440054 ACTUATOR mod SIEMENS SQL 2480007 2480007 2480007 2480007 ACTUATORL mod BERGER STM30 2480090 2480090 2480090 2480090 ACTUATORL mod SIEMENS SQM40 24800A5 24800A5 24800A5 24800A5 PHOTORESISTOR mod SIEMENS QRB 2510003 2510003 2510003 2510003 MOTOR PUMP COUPLING 2540019 2...

Страница 38: ...T 13 5 PRESSURE PLUG 16 1 FAN WHEEL 9 5 ADJUSTING CAM 13 6 INLET 16 2 MOTOR 9 5 1 ADJUSTING CAM FOIL 13 7 SCREW 17 1 BOARD 9 6 ACTUATOR 13 8 INSPECTION GLASS 17 2 COVER 9 7 LEVERAGE 13 9 AIR PRESSURE SWITCH PIPE 17 3 1 POWER CONTROLLER 9 8 ROD 13 10 1 THREADED GAS PIPE 17 3 2 FRONT CONTROL PANEL 9 9 CAM 13 10 2 AIR PRESSURE SWITCH 17 3 3 LIGHT 9 10 ROD 13 10 3 PRESSURE SWITCH BRACKET 17 3 4 LIGHT ...

Страница 39: ...39 ...

Страница 40: ...shbutton Pt100 Pt100 temperature probe SD 0 4 20mA Probe connection with signal 0 20mA 4 20mA SD 0 10V Probe connection with signal 0 10V SD PRESS Pressure probe SD TEMP Temperature probe SIEMENS LAL2 25 SIEMENS control box SIEMENS RWF40 SIEMENS modulator SQM STM SQL Air damper actuator ST Thermostats or pressure switches serie TA Ignition transformer TAB High low flame thermostat if fitted remove...

Страница 41: ... deactivating the diagnostic functions The multicolour LED is the key indicating element for both visual diagnosis and interface diagnosis s Red l Yellow o Green Key m Off l Yellow o Green s Red Diagnosis of cause of fault After lock out the red fault signal lamp remains steady on In that condition the visual diagnosis of the cause of fault according to the error code table can be activated by pre...

Страница 42: ...tat or pressurestat SB Safety limit thermostat Si External primary fuse W Limit thermostat or pressure switch Z Ignition transformer t4 Interval from flame signal to release BV2 TSA Ignition safety time tw Waiting time for oil pre heating B Time of flame establishment C Operating position D Controlled shut down by R µC1 Microcontroller 1 µC2 Microcontroller 2 1 2 6 7 4 5 10 11 12 W SB R L N M Z BV...

Страница 43: ... 6 lateral threaded knockout holes for cable entry glands Pg11 or M20 Operation Flame detector and flame simulation test are made automatically during burner off times and the prepurge time t1 If loss of flame occurs during operation the burner control will initiate lockout If automatic repetition of the startup sequence is required the clearly marked wire link on the plug in section of the LAL mu...

Страница 44: ...hed flame leaking fuel valves faulty flame super vision circuit Interruption of startup No OPEN signal at terminal 8 from the chan geover end switch a Terminals 6 7 and 15 are live until fault has been corrected P Lockout No air pressure indication at the beginning of the air pres sure check Air pressure failure after the air pressure check Defect in the flame supervision circuit Interruption of t...

Страница 45: ...t terminal 7 start delay time for M2 t8 Duration of startup sequence excluding t11 and t12 t10 Interval from startup to the beginning of the air pressure check t11 Air damper running time to the OPEN position t12 Air damper running time to the low fire position MIN t13 Permissible afterburn time t16 Interval to the OPEN command for the air damper t20 For self shutdown of the sequence switch A t11 ...

Страница 46: ......

Страница 47: ......

Страница 48: ...d and data subject to change Errors and omissions excepted C I B UNIGAS S p A Via L Galvani 9 35011 Campodarsego PD ITALY Tel 39 049 9200944 Fax 39 049 9200945 9201269 web site www cibunigas it e mail cibunigas cibunigas it ...

Отзывы: