12
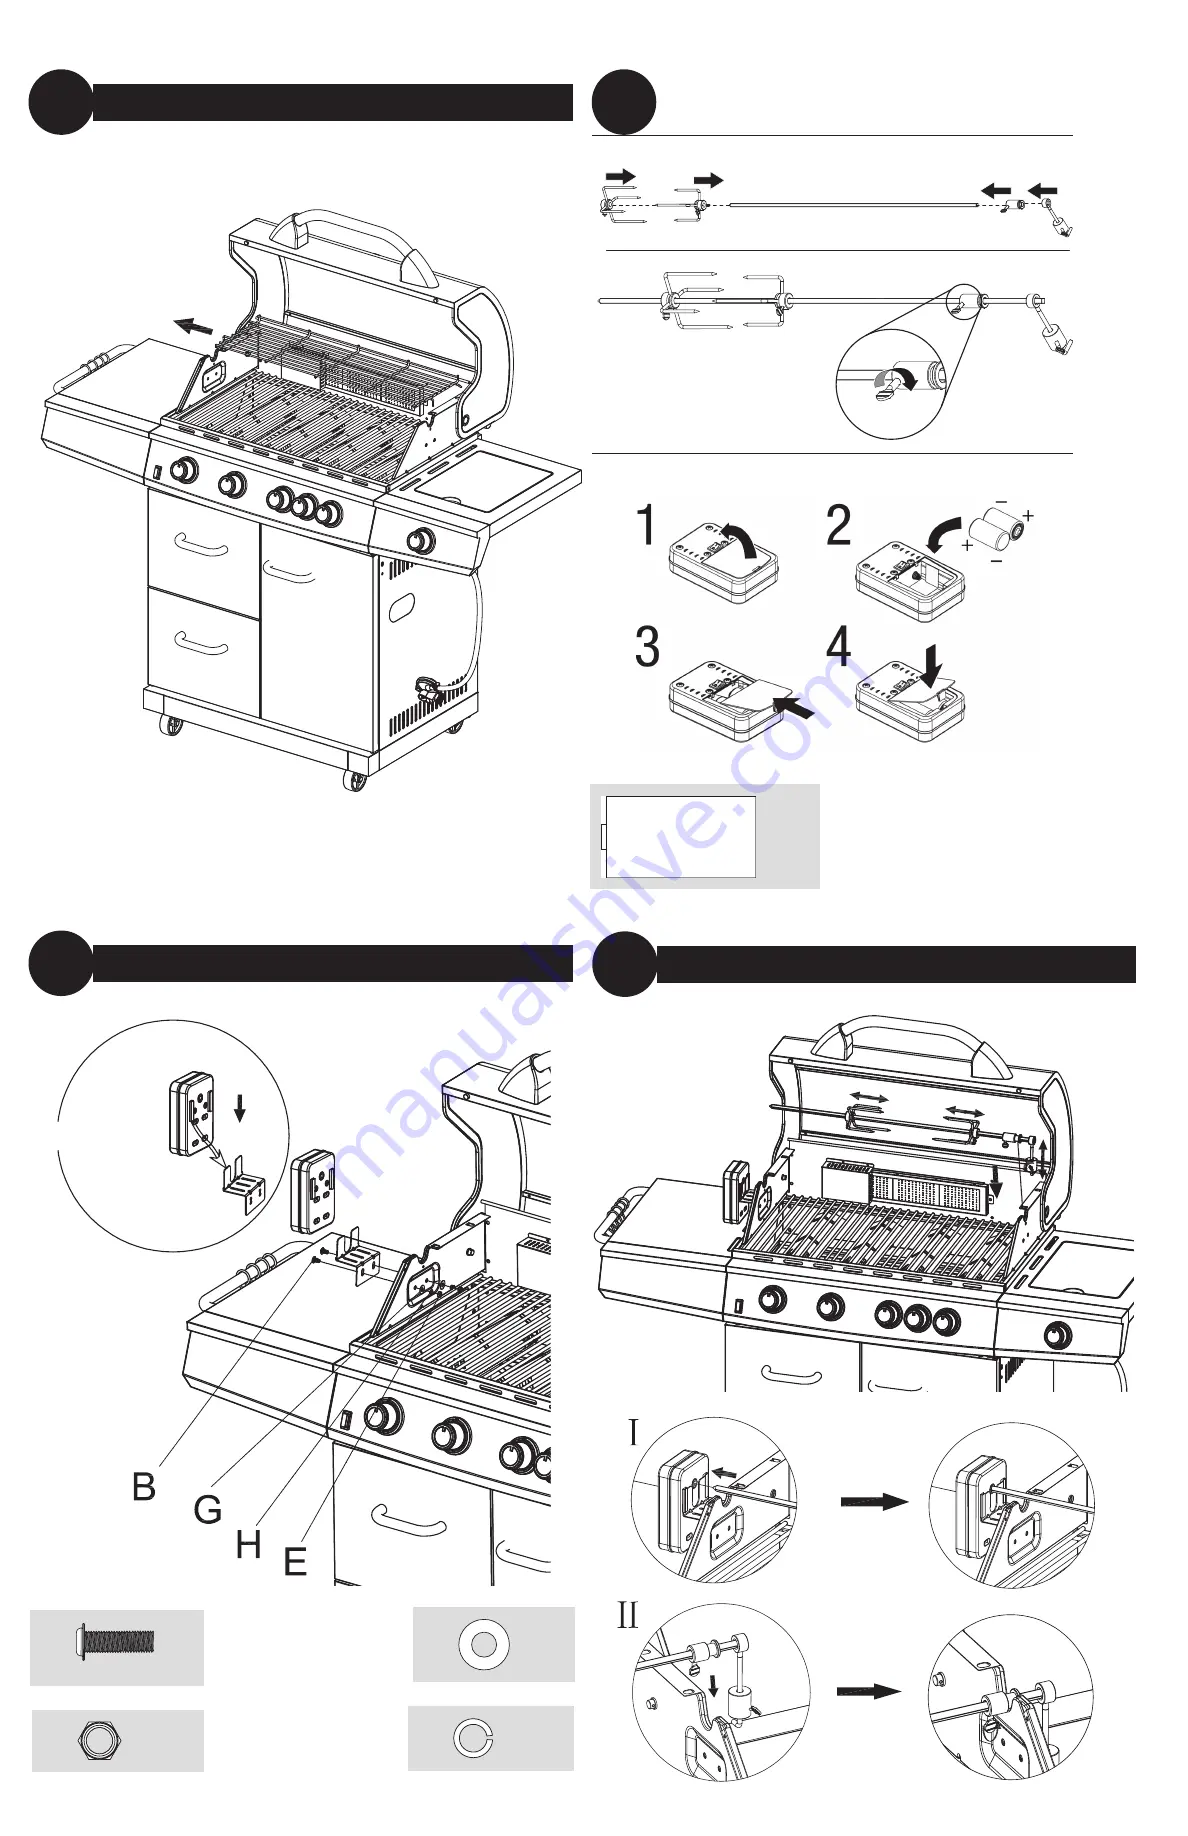
Remove Warming Rack
1
2
Insert Rotisserie Rod
4
Attach Rotisserie Motor Support and Rotisserie Motor
3
Assemble Rotisserie Rod
Insert D Batteries (Not Included)
Assembly Instructions – Rotisserie
E
x 2
G
H
B
Страница 1: ...ropane patio gas cylinders Model No GBC1765WL U ASDA Spec Code 16B 02 17 042 This barbecue will become very hot do not move it during operation ATTENTION Never operate this appliance unattended If you...
Страница 2: ...o use butane use a suitable 28 30 mbar butane regulator certified to BS EN 16129 Please consult your LPG dealer for information regarding a suitable regulator for the gas cylinder W W Gas Cylinder a T...
Страница 3: ...mage the product W W Never light the appliance with the HOOD in the closed position W W Do NOT place empty cooking vessels on the appliance while in operation W W Use caution when placing anything on...
Страница 4: ...Upper Front Frame Support 37 Magnet 38 Bottom Shelf 39 Locking Caster 2 40 Caster 2 41 Drawer Handle 3 42 Drawer Door 2 43 Basket Support 4 44 Basket 2 Hardware Not Included D Batteries 2 pcs Tools Re...
Страница 5: ...mplete each step in the order presented To complete assembly you will need 1 Leak detection solution instructions on how to make the solution are included in the Operating Instructions section of this...
Страница 6: ...6 Attach Basket Support 6 Attach Upper Lower Front Frame Support 5 Attach Drawer 8 Attach Drawer and Basket 7 A x 4 A x 6 B x 4 G x 4 B x 4 F x 4 G x 4 A x 8...
Страница 7: ...7 Attach Door Handle and Lighting Rod 9 Attach Door 10 Attach Temperature Gauge 12 Attach Lid Handle and Control Knob 11 F x 2 G x 2 G x 6 C x 6 H x 6...
Страница 8: ...bly 13 Attach Left Right Side Shelf Front Panel 14 Attach Left Side Shelf 15 Secure Right Side Shelf 16 Note Leave 5 mm of bolt threads exposed D x 2 D x 2 Note Leave 5 mm of bolt threads exposed G x...
Страница 9: ...9 Secure Left Side Shelf 17 Secure Right Side Shelf 18 Attach Side Burner Valve 19 Attach Side Control Knob Seat 20 D x 3 D x 3 A x 2...
Страница 10: ...10 Attach Side Control Knob 21 Attach Side Burner Side Burner Grid and Igniter Wire 22 Insert Heat Plate 23 Insert Cooking Grid and Warming Rack 24 A x 2...
Страница 11: ...11 Insert Grease Tray and Grease Cup 25 Insert AA Batteries 26 Insert and Connect Battery Box 27 I x 4 I...
Страница 12: ...arming Rack 1 2 Insert Rotisserie Rod 4 Attach Rotisserie Motor Support and Rotisserie Motor 3 Assemble Rotisserie Rod Insert D Batteries Not Included Assembly Instructions Rotisserie E x 2 G x 2 H x...
Страница 13: ...onnecting the Snap on compact to a cylinder valve 1 Connect regulation rubber hose to the barbed stem on the regulator Tip Lubricate the barbed stem with water to help connect the regulator hose to th...
Страница 14: ...tion and proceed Operating Main Burners First Use 1 Make sure all labels packaging and protective films have been removed from the grill 2 Remove manufacturing oils before cooking on this grill for th...
Страница 15: ...rner as a grill W W CAUTION Maximum weight for side burner and side shelf is 15 kgs W W CAUTION Using pots larger than 6 quarts or 240 mm diameter in capacity could exceed weight limit of the side bur...
Страница 16: ...on around grill Wear a flame retardant BBQ mitt 2 Do NOT use accessory attachments on the rotisserie that were not supplied by the manufacturer This may cause injuries Do NOT use this appliance for ot...
Страница 17: ...position Figure 16 Turning Off 1 Push grill light button to OFF position Figure 15 2 Disconnect battery box cord Note battery cord should always be unplugged when not in use Replacing the batteries Se...
Страница 18: ...h as an opened paper clip 11 Inspect burners for any damage cracks or holes If damage is found replace with new burner s from manufacturer 12 Reinstall burners checking to insure that gas valve orific...
Страница 19: ...Exchange refill or replace gas cylinder Overfilling prevention device may have been activated 1 Turn control knobs to OFF 2 Wait 30 seconds and light grill 3 If flames are still too low reset the over...