background image

11

11

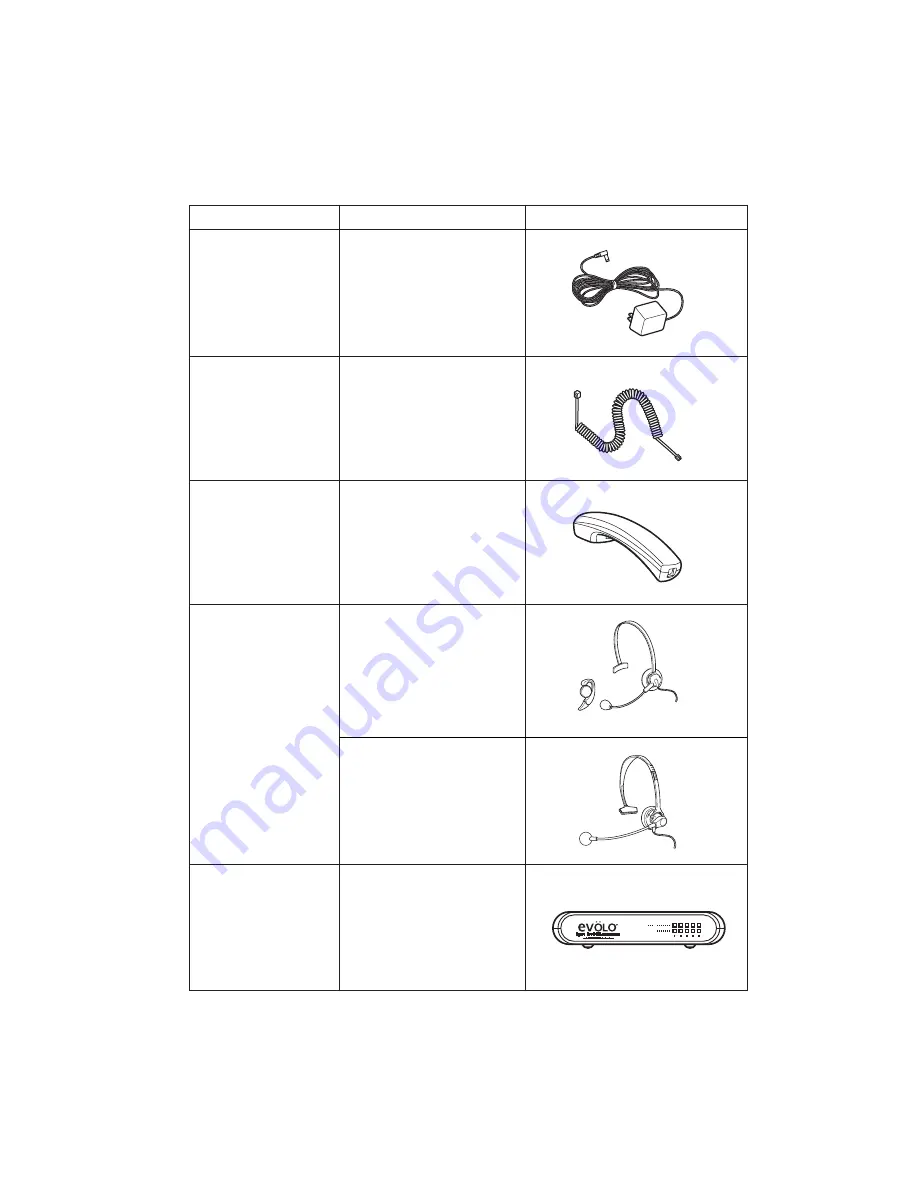
Optional & Replacement Equipment

The following equipment is available for use with your UIP300 IP Phone. 
The table below provides a description and Stock Number.

Table 1-2 Optional & Replacement Equipment 

Description

Part Number

Equipment Diagram

AC Adapter

1

AD300

Cord

UIPA3035

Handset

UIPA3030

Headset EXP9530

EXP9730

5 Port 10/100 

PCS500

Ethernet 

1.

This product is intended to be supplied by a listed direct plug-in power unit marked “Class 2” or

“LPS” and rated 48VDC with minimum 0.25A output.

Содержание UIP300

Страница 1: ...UIP300 Toshiba CS UIP300 Guide User ...

Страница 2: ...a detailed description of the telephone LCD displays and features Basic telephone operations and features are explained Setup and configuration instructions are also provided Uniden is a registered trademark of Uniden America Corporation Strata is a registered trademark f of Toshiba Corporation SCS UG UNIDEN VA June 2003 ...

Страница 3: ...Y OF NON INFRINGEMENT OF THIRD PARTY RIGHTS THE WARRANTY OF YEAR 2000 COMPLIANCE AND THE IMPLIED WARRANTIES OF MERCHANTABILITY AND FITNESS FOR A PARTICULAR PURPOSE THE ENTIRE RISK AS TO THE QUALITY AND PERFORMANCE OF THE SOFTWARE IS WITH YOU NEITHER TAIS NOR ITS SUPPLIERS WARRANT THAT THE FUNCTIONS CONTAINED IN THE SOFTWARE WILL MEET YOUR REQUIREMENTS OR THAT THE OPERATION OF THE SOFTWARE WILL BE ...

Страница 4: ...efective or missing parts as are causing the malfunction with new or refurbished parts at their option If TAIS or one of its authorized dealers does not replace or repair such parts the retail customer s sole remedy will be a refund of the price charged by TAIS to its dealers for such parts as are proven to be defective and which are returned to TAIS through one of its authorized dealers within th...

Страница 5: ... The equipment is hearing aid compatible The act of monitoring or recording telephone conversations under certain circumstances may violate federal or state statutes Consultation with your legal counsel prior to engaging in such practices would be advisable Industry Canada ICES 003 This class B digital apparatus complies with Canadian ICES 003 Users should not attempt to make such connections them...

Страница 6: ...this can result in the risk of fire or electrical shock 10 Never push objects of any kind into this product through cabinet slots as they may touch dangerous voltage points or short out parts that could result in a risk of fire or electrical shock Never spill liquid of any kind on the product 11 To reduce the risk of electric shock do not disassemble this product Contact qualified service personne...

Страница 7: ...to radio communications However there is no guarantee that interference will not occur in a particular installation If this equipment does cause harmful interference to radio or television reception which can be determined by turning the equipment off and on the user is encouraged to try to correct the interference by one or more of the following measures Reorient or relocate the receiving antenna...

Страница 8: ...ructions General Information 12 Attaching the Footstand to the Telephone 12 Connecting the Telephone 13 Chapter 3 Basic Operations General Information 14 Telephone Operations 14 Standby 14 Originating Calls 15 Using the Handset 15 Using the Phone Book 15 Using On Hook Dialing 16 Receiving Calls 16 Answering Calls Using the Handset 16 Answering Calls Handsfree 16 2 Line Operation 16 Accessing Line ...

Страница 9: ... Basic Setup Menu Options 23 Call Log Submenu 23 Choose a Call Log Record 24 Delete a Single Call Log Record 24 Retrieve Date Time information of a Call Log Record 25 Delete All Records in Any Call Log Group 25 Phone Book Submenu 26 Searching Telephone Records 27 Name Search 27 Quick Search 28 Telephone Configuration 33 Call Duration 34 Local Date Time 35 Ringer Tone 36 LCD Contrast 36 Function Ke...

Страница 10: ...Structure 23 Figure 4 2 Actions Applicable to Phone Book Records 26 Figure 4 3 Normal Phone Book Record Data Input Sequence 29 Figure 4 4 Phone Configuration Menu 33 Figure 4 5 Function Keys 37 Figure 4 6 Web Login Screen 38 Figure 4 7 User Main Page 39 Figure 4 8 Phone Settings 40 Figure 4 9 Function Key Configuration 41 Figure 4 10 Phone Book Configuration 42 Figure 4 11 Password Change 43 ...

Страница 11: ...ill be connected to a softswitch This chapter describes the features of the UIP300 IP Phone and protocols that are used LCD Message Waiting Indication Menu Cancel Del Select Up Down Arrow Keys Function Keys 5 Redial Conference Transfer Hold Line 1 Line 2 Mute Volume Up Down Speakerphone and Headset Figure 1 1 The UIP300 IP Phone ...

Страница 12: ... and speed dial Redial Hold Mute Call Waiting Call Transfer 3 way Conference and Do Not Disturb DND Display Caller ID Name On hook dialing Handsfree talking DTMF generation 8 ringer tones VoIP Specific Features The following features are specific to the VoIP function H 323 standard complaint Voice Codec G 711 µ Law and A Law G723 1A 6 3kbits s G729AB E 164 dialing Acoustic Echo Cancellation AEC G ...

Страница 13: ...ing Works as backspace key when there is one or more digit s Deletes the entire character string or digit s if this key is pressed and held for two seconds or longer Cancels the operation in the setup menu and returns to the previous menu Navigation up and down Keys Primarily used to navigate up or down the Setup Menu Volume up and down Keys Used for adjusting the volume louder or softer Telephone...

Страница 14: ...hen not in use Slow blinking When incoming call comes thru Line 2 Fast blinking Function Keys Speed Dial Turned on when the N A Whenever any of the Voice Mail key is pressed and it following occurs remain on for 5 seconds after it is 5 seconds turned on When it returns to on hook A different speed dial key is pressed Do Not Disturb While DND is activated N A While DND is off DND Specifications The...

Страница 15: ... and Stock Number Table 1 2 Optional Replacement Equipment Description Part Number Equipment Diagram AC Adapter 1 AD300 Cord UIPA3035 Handset UIPA3030 Headset EXP9530 EXP9730 5 Port 10 100 PCS500 Ethernet 1 This product is intended to be supplied by a listed direct plug in power unit marked Class 2 or LPS and rated 48VDC with minimum 0 25A output ...

Страница 16: ...e user to tilt the telephone at either low or high angle or to wall mount the telephone The adjustments are clearly marked on the footstand with arrows indicating the direction that the footstand should be attached the bottom of the telephone for the desired height or wall mounting To attach the footstand to the telephone determine the desired adjustment and align the tabs on the footstand with th...

Страница 17: ...port is located on the back side of the telephone The AC adapter is not included with the UIP300 Refer to Chapter 1 Product Description Optional Replacement Equipment on page 11 for the part number for the AC adapter Do not connect the UIP300 to a standard telephone line Connection to LAN Straight Connection AC Adapter Connection Figure 2 3 Connecting to LAN Figure 2 2 Plugging Handset Cord into T...

Страница 18: ...olume Telephone Operations Standby When the telephone is powered on Initializing is shown while the telephone is starting up The last character on the LCD rotates indicating that the software is still running Before the telephone switches to standby mode the firmware version is shown on the LCD for five seconds below is an example for the firmware version 1 00 Initializing Firmware Version arl 00 ...

Страница 19: ...originate a call using the handset 1 Pick up the handset the telephone is off hook 2 Dial the telephone number or extension number or the IP address of the called party Using the Phone Book To originate a call using the phone book 1 Press to access the phone book Refer to Phone Book on page 19 for instructions for adding editing or deleting Phone Book entries 2 Once the phone book is displayed use...

Страница 20: ...e line LED flash Users can answer the call using the handset or handsfree using the speakerphone Answering Calls Using the Handset To answer an incoming call 1 Pick up the handset 2 Begin the conversation Answering Calls Handsfree To answering an incoming call 1 Press the Speaker Headset key or press the line key the handset remains in the cradle 2 Begin the conversation 2 Line Operation The UIP30...

Страница 21: ...s Handset Headset Speakerphone Ringer Volume Handset Volume Control To change the volume on the handset With the handset off hook press increase or decrease to adjust the volume The volume of the handset changes as the keys are pressed If no activity is detected for one second the volume setting screen disappears and returns the LCD to the original display and the volume setting is saved Speakerph...

Страница 22: ... adjusted if the headset is plugged in Ringer Volume Control To change the ringer volume With the telephone on hook press increase or decrease to adjust the volume The volume of the ringer changes as the keys are pressed If no activity is detected for one second the volume setting screen disappears and returns the LCD to the original display and the volume setting is saved Headset Volume Ringer Vo...

Страница 23: ... telephone detects that the headset is plugged in the voice path of the speakerphone and the microphone used by the speakerphone is disabled and the speaker and microphone inside the headset is activated Receiving a Call Using Handsfree When the telephone rings the user can press the Speaker Headset key or the line key with the flashing LED without picking up the handset The Speaker Headset LED go...

Страница 24: ...iously programmed for speed dialing Users can press a speed dial key after going off hook with the handset or with the speakerphone If the user presses a speed dial key while on hook the telephone immediately goes off hook with the speakerphone and starts dialing the number Do Not Disturb DND Do Not Disturb allows users to ignore all incoming calls The calling party hears a busy tone or an announc...

Страница 25: ...in the gateway system and will be invoked by sending a pre assigned DTMF String to the system when the Redial key is pressed Mute Mute can be used during a conversation To activate mute Press the Mute key The user s voice is muted however the user can still hear the other parties participating in the call The Mute LED goes on to remind the user that their voice is being muted To deactivate mute Pr...

Страница 26: ... to be a part of the same conversation To make a conference call at least one line must be available 1 Press Conference key This puts remote party on hold by the system 2 Enter followed by the destination party s telephone number 3 When connected to the third party press Conference key and then 5 to start the conference call Call Waiting This feature allows a user to answer an incoming call while ...

Страница 27: ...configure the UIP300 The main setup and configuration menu is the Setup Menu This menu consists of three submenus and displays information about the UIP300 Call Log Menu This submenu is used to set operations relating to incoming and missed call log information Phone Book Menu This submenu is used for setting up any operations relating to memory dial records Configuration Menu This submenu include...

Страница 28: ...hoose one of the two possible actions Delete and Date Time Each call log record has a number shown at the top right corner to show the receiving order 1 is the latest record The larger the number the older the record it is 24 Setup Menu Call Logs 1 4 Delete a Single Call Log Record If user continues from the end of the section Choose a Call Log Record press the Select key 1 Press the navigation ke...

Страница 29: ...ll of a call log record If user continues from the end of the section Choose a Call Log Record press the Select key 1 Press the navigation key to change the action to the Date Time action 2 Press the Select key The following info will be displayed 1st line Name 2nd line The date and time of the call log Delete All Records in Any Call Log Group Besides two call log groups the Call Log Menu also con...

Страница 30: ... 4 The phone will delete all records inside the chosen call log group One of the log delete successful messages below depending on the log type will be displayed for 1 second Incoming Log Deleted Missed Log Deleted All Logs Deleted Call Log Delete Logs 3 3 Confirm Delete No Cancel Yes Select Phone Book Submenu The phone book feature allows users to store up to 50 telephone records The Phone Book f...

Страница 31: ...ords by entering a name or the first letter of a name There are two types of searches name search and quick search This quick access operation applies to dialing only If the user has already entered a character on the LCD pressing the has no affect Enter Name UPPER If the phone book is empty user will see the message Phone Book is Empty for one second To access the Phone Book menu use the or arrow...

Страница 32: ...resulted record user can navigate to different records using and keys Peterson John 98173334444 After the actual search is performed the first record that matches the input string appears on the first line of the LCD display Quick Search This search is used to quickly navigate the phone book by pressing a digit key This is another way to quickly perform a name search To perform a quick search 1 Fr...

Страница 33: ...imes 4 times 5 times 6 times 7 times 8 times 1 sec Select Select Enter Name Back to Phone Book Submenu Record Saved Enter Phone Number Enter Name Barbara Anderson lower 2 After user chooses Add from the Phone Book Menu the name input screen is displayed User can enter a name for the record Press the Select key when input is done If the Phone Book is full when user tries to add a new record Phone B...

Страница 34: ...reen will be displayed for 1 second Then it will return to the Phone Book Menu with the Add item menu If the name of the entry already exists in the Phone Book the following message will be shown and ask user to replace the existing entry If user selects Yes the old entry will be deleted and the new entry will be saved If user selects No it will return to the Step 2 to allow user to change the nam...

Страница 35: ...ord to complete your task Delete Phone Book Records 1 From the Phone Book Menu choose the Delete item using the and navigation keys and press the Select key After choosing Delete from the Phone Book Menu and pressing the Select key user is given two choices to delete Delete One by One and Delete All 2 Use and navigation keys to select between erasing a single record or all records The currently se...

Страница 36: ...e Phone Book Menu If Cancel Del key is pressed the delete will be aborted and the display will return to the two delete choices Delete One by One and Delete All Confirm Delete All No Cancel Yes Select All Records Deleted Delete a Single Record 3a If Delete One by One is chosen it will bring the user to the first record in the phone book User may get to a desired record quickly by performing a Quic...

Страница 37: ...his menu the Cancel Del key operates in the following manner When there is are one or more character s the Cancel Del key operates as a delete key When there are no characters the Cancel Del operates as a back key It takes you one level back to the previous screen During editing when there are more than one character use the and keys to move left and right Phone Configuration Ringer Tone LCD Contr...

Страница 38: ...Phone Configuration 4 Press the Select key to enter the Phone Configuration menu This allows access to the Phone Configuration functions Call Duration 1 Call Duration is the first option from the Phone Configuration menu press Select to proceed with modifying it Call Duration is displayed on the LCD with the current setting To change the setting use the or keys then press Select Configuration Menu...

Страница 39: ...k is performed for each data field If the date is not valid a warning message is displayed for one second Date and time information is obtained from a local SNTP server However if a local SNTP server is not available then the date and time is obtained from a public SNTP server If the user configures the local date and time that information is maintained until the next time an SNTP server is polled...

Страница 40: ...tone can be heard for three seconds When the desired ring tone is displayed press Select LCD Contrast There are 10 levels of adjustment for the display contrast To access the LCD Contrast option and set the desired contrast level 1 From the Phone Configuration menu use the or keys to access the LCD Contrast option then press Select 2 Adjust the contrast level by pressing the or keys As the keys ar...

Страница 41: ...yed Function Key Five function keys are available Each of these keys can be assigned to one of four possible features Do Not Disturb DND Speed Dial Voice Mail and No Feature Assigned To access and program a function key 1 From the Phone Configuration menu use the or keys to access the Function Key option then press Select 2 The telephone prompts the user to press the desired Function Key When the ...

Страница 42: ... settings not available using the telephone Microsoft Internet Explorer v 4 0 or higher must be used User Configuration To access the web based setup and configuration program 1 Start the web browser from a PC that is connected to the same IP network as the UIP300 2 Check the IP address on the telephone and enter that IP address in the web browser eg http 169 254 1 10 3 When the Enter Network Pass...

Страница 43: ...ettings allows telephone functions to be configured Function Keys allows function keys to be configured Phone Book allows users to set up a personal telephone book Password Change allows users to change their password Click on any of the four links to view or edit the selection Refer to Figure 4 7 User Main Page ...

Страница 44: ... Call Waiting Tone Enable Disable Ringer Tone Tones 1 8 Figure 4 8 Phone Settings On the Phone Settings screen change the settings and then click Submit The new settings are stored in the flash memory of the UIP300 and the page is refreshed with the updated setting If Refresh is clicked before Submit the values posted in the page are reset ...

Страница 45: ...ked before Submit the values posted in the page are reset The Speed Dial key assignment is only available for a telephone number and not an IP address If Speed Dial is selected the speed dial number must be entered in the corresponding phone number field If Voice Mail is selected the telephone number of the Voice Mail server must be entered Users cannot assign Voice Mail or DND to more than one fu...

Страница 46: ...lete field click the arrow on the pulldown menu and select Add 3 Click Submit To edit an existing entry in the Phone Book 1 Check the box of the record to be edited 2 Enter the new Name or new Phone Number in the appropriate fields on the screen 3 Beside the Add Edit Delete field click the arrow on the pulldown menu and select Edit 4 Click Submit Figure 4 10 Phone Book Configuration Enter the to i...

Страница 47: ...ord Figure 4 11 Password Change To change the password 1 Enter the old password in the Current User Password field 2 Enter the new password in the New User Password field The password consists of 6 10 digits If the password entry is not valid an error message is displayed To correct the password click Back to User Password Change and reenter the passwords If the user password change is successful ...

Страница 48: ...650 790 5 660 269 5 661 780 5 663 981 5 671 248 5 696 471 5 717 312 5 732 355 5 754 407 5 758 289 5 768 345 5 787 356 5 794 152 5 801 466 5 825 161 5 864 619 5 893 034 5 912 968 5 915 227 5 929 598 5 930 720 5 960 358 5 987 330 6 044 281 6 070 082 6 125 277 6 253 088 2003 Uniden America Corporation Fort Worth Texas Contain additional foreign articles Made in China ...

Отзывы: