background image

11

Advanced Operation (cont’d)

II. Get to Know the Main Menu

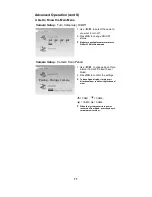
Camera Setup 

- Turn Camera(s) On/Off

1. Use 

 / 

 to select the camera 

you want to turn off.

2. 

Press 

OK

 to change ON/OFF 

status.


#

Make sure available cameras are set to 

ON for SCAN or Quad mode.

Camera Setup

 - Camera Scan Period

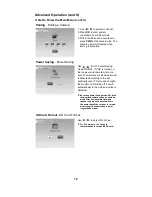
Pairing - Pairing a Camera

1. Use


 / 


to change Scan Time 

interval from OFF/5 sec/15 sec/

Quad.

2. 

Press 

OK

 to confirm the settings.


#

To leave Quad display, simply press 

directional keys to enter single channel 

view.

 = CAM1;     = CAM2;

  = CAM3;     = CAM4;


#

When the system enters into power 

save mode from Quad, press any key to 

resume monitor view.

Содержание UBW2101

Страница 1: ...ms are missing or damaged contact our Customer Care Line immediately Never use damaged products Need Help Get answers 24 7 at our website www uniden com 3 5 LCD Portable Wireless Baby Monitoring Syste...

Страница 2: ...ic shock from lightning avoid handling any electronic devices except battery powered ones during an electrical storm x x Use only the power cord and or batteries indicated in this manual Never dispose...

Страница 3: ...warnings x x Allow for proper ventilation when units are in use Do not cover the camera or receiver with any object such as a blanket Do not place it in a drawer or in any location which would muffle...

Страница 4: ...Advanced Operation 9 I Get to Know the Display Icons 9 II Get to Know the Main Menu 10 System Setup Time Setting Factory Defaults 10 Camera Setup Turn Camera s ON OFF Camera Scan Period 11 Pairing a...

Страница 5: ...ck 11 Power Adapter 12 Goose Neck Mount Stand LCD Monitor Receiver 1 Battery Indicator 2 Power Indicator 3 Cursor up Channel switch 4 Cursor left Volume down 5 Cursor down Lullaby play button 6 Cursor...

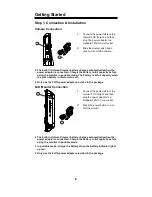
Страница 6: ...he battery is at full capacity when the green battery indicator turns off Only use the 5V 1A power adapter provided in the package LCD Monitor Connection 2 1 1 Connect the power cable to the monitor s...

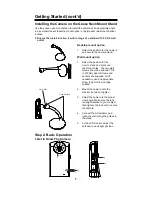
Страница 7: ...n 1 Select the position for the mount stand and mark out the mount holes The two wall screws should be spaced 1 5 8 in 40mm apart Screws and anchors are supplied but if necessary use an appropriate sc...

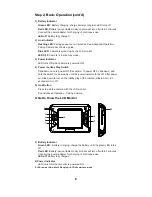
Страница 8: ...Slide down once to power ON the camera To power OFF slide down and hold the switch for 2 seconds until the power indicator turns off After power on slide down to turn on the lullaby play of the camera...

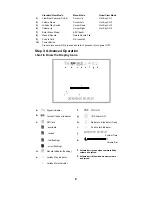
Страница 9: ...wer ON press and hold for 2 seconds to turn power OFF Step 3 Advanced Operation I Get to Know the Display Icons a Signal Indicator f VOX VOX ON b Current Channel Indicator g VOX Alarm ON c SD Card h B...

Страница 10: ...ghlighted 2 Use to highlight a menu option Press OK to enter the setting menu 3 Use to select a setting if necessary 4 Press ESC to go back or exit the menu System Setup Time Setting Set the date and...

Страница 11: ...le cameras are set to ON for SCAN or Quad mode Camera Setup Camera Scan Period Pairing Pairing a Camera 1 Use to change Scan Time interval from OFF 5 sec 15 sec Quad 2 Press OK to confirm the settings...

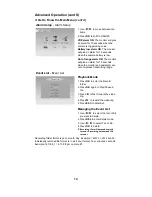
Страница 12: ...eiver and camera will come out of Power Save mode when sound is detected according to the set sensitivity level This means at night the monitor LCD will be off but will automatically turn on when a no...

Страница 13: ...igh sensitivity At OFF setting the VOX function is disabled VOX Setting Enable VOX Recording When set to ON the system will auto record for 30 seconds when the camera is triggered by voice Please set...

Страница 14: ...reless transmitting range Event List Event List Playback Mode 1 Press OK to enter the Record folder 2 Press OK again to Play Pause a file 3 Press to fast forward the video clip 4 Press to rewind the v...

Страница 15: ...crowave ovens or other high frequency electromagnetic waves Reinforced concrete walls large scale metal products and metal furniture should not be located near the camera or the monitor unit Do not pl...

Страница 16: ...le remove major obstacles in between the camera and monitor or relocate the camera to a different location Strong radio signal nearby Keep WiFi router away from the camera and or monitor Strong electr...

Страница 17: ...x Dispose of this equipment according to the instructions x x Do not open the receiver or mutilate the battery x x The rechargeable battery contained in this receiver may explode if disposed of in a f...

Страница 18: ...receiver x x Plug the equipment into an outlet on a circuit different from that to which the receiver is connected x x Consult the dealer or an experienced radio television technician for additional s...

Страница 19: ...ipping handling incurred by warrantor or its representatives in connection with the performance of this warranty Warrantor at its option may replace the unit with a new or refurbished unit THE LIMITED...

Страница 20: ...20...

Страница 21: ...21...

Страница 22: ...2012 Uniden America Corporation Printed in China...

Отзывы: