background image

Sheet

Using the handset menu

To open the handset menu, press and hold 

[cid/menu]

 for two 

seconds.
The arrow pointer on the left side of the line shows which menu item is 
currently highlighted. Use 

[ / ]

 to move the pointer up and 

[ ]


to move the pointer down. 
If the phone beeps and stays on the same line, it means you have 
reached the top or bottom of the list.
Press 

[select/channel]

 to rotate through the available options for the 

highlighted menu item. 
Press 

[END]

 to exit the menu.

Note: You can find detailed information on the handset menu in section 3 

on Setting Up Your Phone and section 4 on Using Your Phone.

(HS1 display)

 Ringer  :Type A
 Ring. Vol.:High
 Auto Talk  :Off
 CIDCW      :On
 Area Code  :
 Dial    :Tone
 Language   :Eng

(HS1 display)

 Ringer  :Type A
 Ring. Vol.:High
 Auto Talk  :Off
 CIDCW      :On
 Area Code  :
 Dial    :Tone
 Language   :Eng

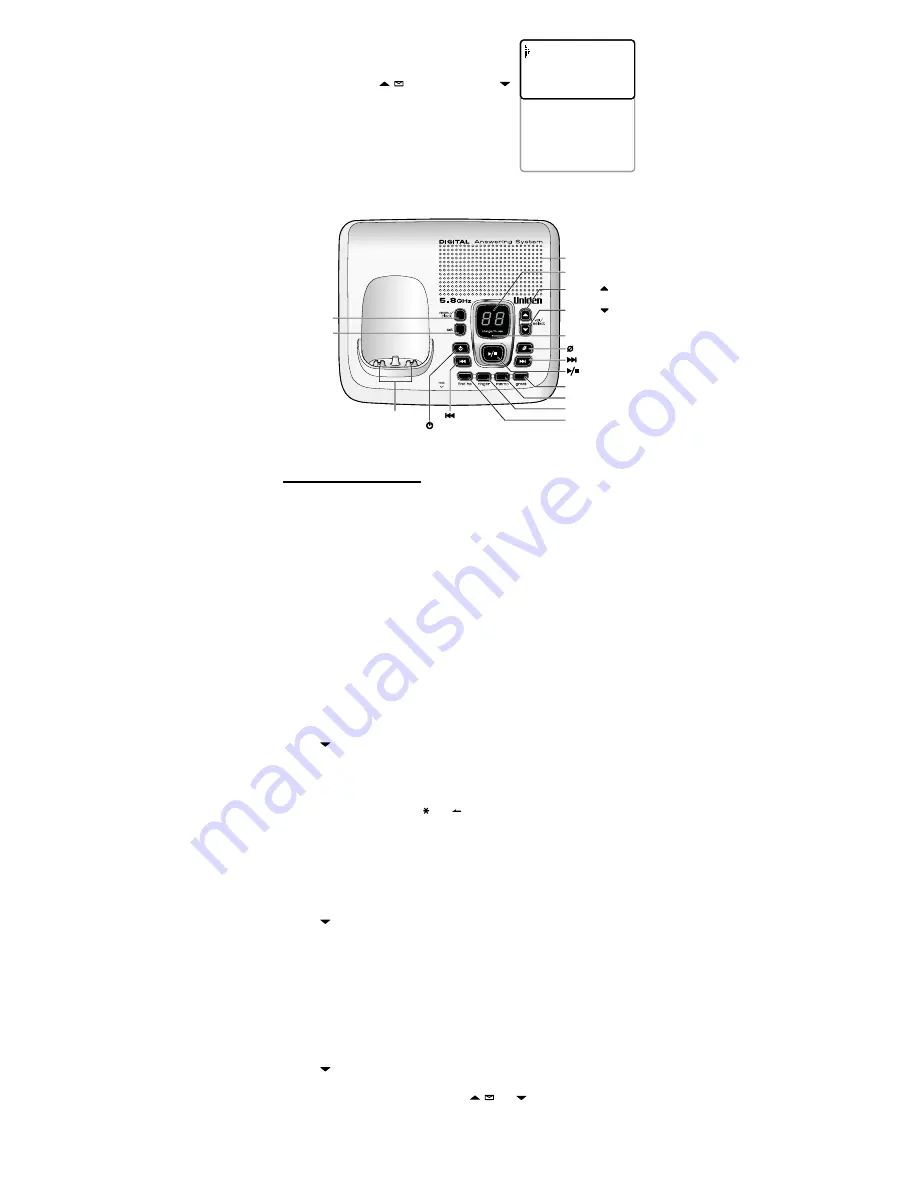
2-4. Parts of the Base

Note: For information on the base menu, see section 7 on Using Your Answering system.

vol/select/      

 key

(volume/select/up)

vol/select/      

 key

(volume/select/down)

      key (delete)

menu/clock 

key

set 

key

        key (skip)

Speaker

          key (play/stop)

ringer 

key

find hs

 key

memo 

key

Message counter LED

greet 

key

charge/in use LED

Charging contacts

        key (repeat)

key

(answering sysytem on/off)

vol/select/      

 key

(volume/select/up)

vol/select/      

 key

(volume/select/down)

      key (delete)

menu/clock 

key

set 

key

        key (skip)

Speaker

          key (play/stop)

ringer 

key

find hs

 key

memo 

key

Message counter LED

greet 

key

charge/in use LED

Charging contacts

        key (repeat)

key

(answering sysytem on/off)

You might change two handset-specific options --ringer type and ringer volume -- and one base setting – 
ringer volume --more often, depending on the situation. There’s another option, area code, that you should only 
set if you can use seven-digit dialing (see section 5-3 on Using Seven Digits Instead of Ten).

3-1. System Options (from HS1 only)

These options can only be changed from handset 1 (HS1). After changing these settings, you must put HS 1 
back in the base cradle to activate them.

Changing from tone to pulse dialing (DIAL) 

Your phone can communicate with the telephone network in two different ways: tone dialing or pulse dialing. 
These days, most phone networks use a method called tone dialing, so your phone comes programmed for tone 
dialing. 
If your phone company uses pulse dialing, you need to change your phone’s dial settings. If you don't get a dial 
tone or can't connect to the telephone network, follow the steps below to modify your phone’s settings:

Make sure you have Handset 1 (HS 1).
With the phone in standby, press and hold 

[cid/menu]

Press 

[ ]

 to move the pointer to DIAL.

Press 

[select/channel]

 to set the phone to pulse dialing.

Press 

[END]

 and 

put the handset back in the base

. Handset 1 communicates the new setting to the 

base, and the base activates the setting on any other handsets.

Note: If you use pulse dialing and you need to send DTMF tones during a call (if you're using an automated 

response system, for example), press 

[ /tone/ ]

 to temporarily switch to tone dialing. When the call 

ends, the phone automatically returns to pulse dialing mode.

Activating Caller ID on Call Waiting (CIDCW)

You must subscribe to Caller ID service through your local telephone provider to use this feature.

Caller ID allows you to see the name and number of the calling party before you answer the phone. Caller ID on 
Call Waiting (CIDCW) lets you see the name and number of a call that comes in when you are on the line. 

Make sure you have Handset 1 (HS 1).
With the phone in standby, press and hold 

[cid/menu]

Press 

[ ]

 to move the pointer to CIDCW. 

Press 

[select/channel]

 to toggle and turn on Caller ID on Call Waiting.

Press 

[END]

 and 

put the handset back in the base

. Handset 1 communicates the new setting to the 

base, and the base activates the setting on any other handsets.

3-2. Handset-specific Options

These options can be set differently on each handset. You can also set these options while another handset is 
using the phone.

Setting the display language (LANGUAGE)

The handset menus can use English (ENG, default), French (FR) or Spanish (ESP).

With the phone in standby, press and hold 

[cid/menu]

Press 

[ ]

 to move the pointer to LANGUAGE.

Press 

[select/channel]

 to select ENG, FR. or ESP.

When the display shows the language you want, use 

[ / ]

 and 

[ ]

 to move the pointer to another 

menu item.
OR
If you’re finished, press 

[END]

 to return the handset to standby.

Note:  To change the language used by the answering system, see Section 7-1 on Setting Up the Answering 

System.

1)
2)
3)
4)
5)

1)
2)
3)
4)
5)

1)
2)
3)
4)

3) Setting Up Your Phone

Your phone has four basic options that you need to set up first. You should only have to set these options once, 
and you may not have to change any of them: 

Dial mode (tone or pulse dialing)
CIDCW (Caller ID on Call Waiting)


Language
Auto talk 


Содержание DXAI8580 Series

Страница 1: ...800 874 9314 voice orTTY Accessibility information can be found on our website www uniden com under the Accessibility link If your call is received outside of our business hours leave us a message and we will call you back Central StandardTime Detailed customer service hours are available at www uniden com 2007 Uniden America Corporation FortWorth Texas Contains additional foreign articles Printed...

Страница 2: ...red and black wires on the battery pack connector with the sticker in the handset s battery compartment 3 Place the cover over the battery compartment and slide it up into place Push the battery connector in firmly You should hear it click into place Red Black 1 3 Plug in the Base and Charging Cradle You can put the charging cradles for additional handsets anywhere they can get power They do not h...

Страница 3: ...the TEL LINE jack on the rear of the base 11 10 Connect the telephone cord to a telephone wall jack Route the cord through the hole in the stand and into the molded wiring channel To telephone wall jack Telephone cord supplied ToTEL LINE 9 Connect the telephone cord to the TEL LINE jack on the rear of the base 11 10 Connect the telephone cord to a telephone wall jack Route the cord through the hol...

Страница 4: ...tions in this manual are used for explanation purposes and may differ from the actual unit Multi Handset System Extra Handset s Charging Cradle s Included Hearing Aid Compatible Tone or Pulse Dialing see section 3 1 Caller ID on CallWaiting see section 3 1 Trilingual Menu Displays English Spanish or French see section 3 2 AutoTalk see section 3 2 RingerVolume Control Handset see section 3 2 Base s...

Страница 5: ...u need to change your phone s dial settings If you don t get a dial tone or can t connect to the telephone network follow the steps below to modify your phone s settings Make sure you have Handset 1 HS 1 With the phone in standby press and hold cid menu Press to move the pointer to DIAL Press select channel to set the phone to pulse dialing Press END and put the handset back in the base Handset 1 ...

Страница 6: ...s off the voice prompt announces Ringer off Press ringer immediately to switch to the next volume level As you switch to the next volume level the base sounds the ringer at that level and shows that level in the message counter display When you hear the ringer volume level you want to use stop pressing ringer Note If you turn the ringer volume off the base won t ring The handsets will ring accordi...

Страница 7: ...headset remove the headset jack cover and insert the headset plug into the headset jack When you connect a headset the earpiece and speakerphone are automatically muted If you want to re activate the earpiece or speakerphone remove the headset plug You will still make and receive calls as usual just use your headset to talk to the caller once the call connects You can purchase headsets from our we...

Страница 8: ...ting a record from one handset will not delete the record from any other handsets If you get an incoming call or page the operation is canceled To delete one Caller ID record To delete all the Caller ID records With the phone in standby press cid menu Use or to find the Caller ID record you want to delete Press delete transfer The display asks you to confirm To delete the record leave the pointer ...

Страница 9: ... displays the name and phone number saved for that phonebook entry If the entry has no number the handset displays EMPTY PRESS SELECTTO EDIT If the number you picked wasn t the right phonebook entry just use and to scroll through the phonebook entries Stop scrolling when you see the phonebook entry you want If you don t know the number of the phonebook entry you re looking for Press memory to open...

Страница 10: ...Select English E French F or Spanish S This doesn t affect the handset display Press The system beeps and returns to standby Press to save the setting Press Press Press Press Press to save the setting to save the setting to save the setting to save the setting Press Time Security code Ring time Record time Message alert Language to use to use to use to use to use to to save the setting 1 Select th...

Страница 11: ...nently deleted Not available Playing old messages After you listen to your new messages press again to play your old messages After you listen to your new messages press followed by 2 to play your old messages Ending the message review Press The phone returns to standby Press 5 to stop Press END to return to standby Turning off the message alert tone When all new messages are played back the messa...

Страница 12: ...voice prompts again 1 then 0 Skip a message 0 then 3 Start stop recording a voice memo 0 then 7 Delete a message 0 then 4 Start stop recording a personal greeting 0 then 8 Enter the command again to stop the recording When you are finished just hang up The answering system automatically returns to standby Note For your convenience a removable remote operation card is printed at the back of this ma...

Страница 13: ...ndset says Unavailable Moving the handset closer to the base Seeing if another handset is on a call or checking messages Two handsets can t communicate to the base at the same time Making sure the base is plugged in Changing the handset to base code See section 10 3 I can t transfer calls Changing the handset to base code See section 10 3 I can t get two handsets to talk to the caller Only one han...

Страница 14: ...eps below Handset Base Remove the battery cover and leave it off for ventilation Disconnect the battery pack Leave the battery cover off and the battery pack disconnected for at least three days Once the handset is completely dry reconnect the battery pack and the battery cover Recharge the handset s battery pack for 15 to 20 hours before using 1 2 3 4 Disconnect the AC adapter from the base cutti...

Страница 15: ...e a remote risk of electric shock from lightning 3 Do not use the telephone to report a gas leak in the vicinity of the leak 4 Use only the power cord and batteries indicated in this manual Do not dispose of batteries in a fire They may explode Check with local authorities for possible battery disposal instructions 5 Do not disassemble any component of this product SAVETHESE INSTRUCTIONS CAUTION R...

Страница 16: ...ons not sold by Uniden C improperly installed D serviced or repaired by someone other than an authorized Uniden service center for a defect or malfunction covered by this warranty E used in any conjunction with equipment or parts or as part of any system not manufactured by Uniden or F installed or programmed by anyone other than as detailed by the owner s manual for this product STATEMENT OF REME...

Отзывы: