background image

7

4.  Scroll to 

On

 and press 

.

5.  Press 

M

 to leave that Menu page.

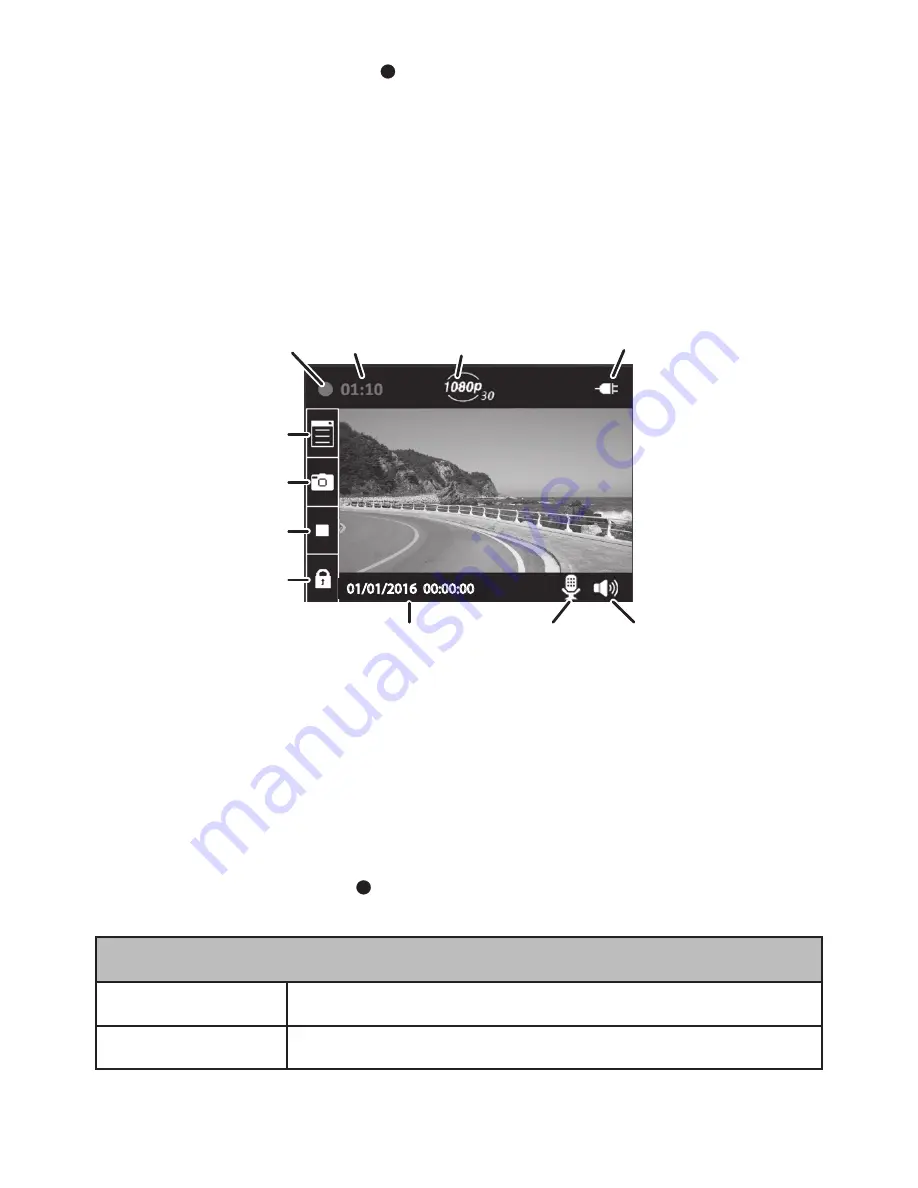
SCREEN DESCRIPTION

The following image describes the areas and icons seen on 

the recording screen. The 4 icons on the left side of the screen 

correspond to the 4 keys on the device (see page 2).

Recording 

LED

Recording 

Duration

Video

Resolution

Power 

Source

Menu

Snapshot

Stop

Lock File

Date and Time

Microphone

Sound

01/01/2016  00:00:00

OPERATION

USING THE MENUS

Press 

M

 to access the Menu system. Use 

 and 

 to scroll through 

the selections and press    to accept that selection. 

System Configuration

Date/Time

Adjust the device’s date/time (see page 6).

LCD Setting

Set when the screen goes into Sleep mode.

Содержание DC4

Страница 1: ...DC4 AUTOMOTIVE VIDEO RECORDER Issue 1 March 2016 Printed in China 2016 Uniden America Corporation Irving Texas OWNER S MANUAL iWitness...

Страница 2: ...block the driver s view of the road or side mirrors Do not install it where it will interfere with airbag deployment Pay attention to the road Don t operate or focus on any device while driving Be sur...

Страница 3: ...INSTALL THE DC4 4 Installation Considerations 4 CONNECT TO POWER 5 INITIAL SETUP 5 Set Language 6 Set Date and Time 6 Set Automatic Recording 6 SCREEN DESCRIPTION 7 OPERATION 7 USING THE MENUS 7 RECOR...

Страница 4: ...LANE DEPARTURE WARNING SYSTEM 11 MAINTENANCE 13 TROUBLESHOOTING 14 SPECIFICATIONS 15 FCC INDUSTRY CANADA INFORMATION 16 ONE YEAR LIMITED WARRANTY 17...

Страница 5: ...Collision Detection F 1 9 Lens Loop Recording Lane Departure Warning System Built In Microphone Recording to microSD card Parking Assist Mode WHAT S IN THE BOX Camera Recorder Car Adapter 8G microSD c...

Страница 6: ...levision to view recorded files HDMI cable not included MiniUSB Port Connects the device to the power source Menu Accesses the Menu system While recording press and hold to turn the microphone on and...

Страница 7: ...rrent recording as an emergency file and stores in the Emergency folder While recording Press and hold to calibrate LDWS see page 4 While viewing a snapshot Press to zoom SD Card Slot Insert microSD c...

Страница 8: ...esponsibility to mount the DC4 in compliance with local laws INSTALL THE DC4 Installation Considerations Install the device in the area around the rear view mirror Be sure the device is installed wher...

Страница 9: ...d the camera securely and lift the suction clamp CONNECT TO POWER 1 Connect the car adapter s miniUSB plug to the DC4 s miniUSB port 2 Connect the cigarette lighter adapter plug to the vehicle s cigar...

Страница 10: ...M to access the Menu system 2 Press to scroll to System Configuration and press 3 Press to scroll to Date Time and press 4 Use to adjust the date and press to move to the next section 5 Repeat Step 4...

Страница 11: ...n the device see page 2 Recording LED Recording Duration Video Resolution Power Source Menu Snapshot Stop Lock File Date and Time Microphone Sound 01 01 2016 00 00 00 OPERATION USING THE MENUS Press M...

Страница 12: ...es On or Off Exposure Setting Adjust display brightness Function Settings Automatic Recording If set to On automatic recording starts when the engine turns on Collision Detection Adjust G Sensor sensi...

Страница 13: ...lay Play back video and display photos Delete Erase video or photos Format Card Erase all files in memory card About Display firmware version RECORDING BASICS Automatic Manual Recording You can set th...

Страница 14: ...arking mode where the vehicle s engine is turned off and Parking mode is active Parking Mode Parking mode lets you set recording parameters for a parked car Menu Function Settings Parking Mode The Par...

Страница 15: ...insert an HDMI cable not included to connect the device to your television This lets you watch your video files on the televison screen View on PC Connect the DC4 to your PC using a miniUSB to USB cab...

Страница 16: ...d stop recording To start recording press To stop recording press Start an emergency recording If the DC4 is not recording press twice once to begin recording and once to start emergency recording If...

Страница 17: ...u to press to shut off immediately If you do NOT press the device will go into Collision Recording or Motion Detection mode Menu Function Setting Parking Mode after 10 seconds Set the date and time 1...

Страница 18: ...e drive Navigate to it and locate the files you want to save 3 Copy the files to your PC MAINTENANCE Use common sense when caring for your DC4 Be sure the lens remains clean and free of debris Do not...

Страница 19: ...the microSD card is locked Unlock it if so Video is unclear Clean the lens and the windshield You cannot access menus If you are recording and press M the menus should display If you are still record...

Страница 20: ...on 16M 12M 10M 8M 5M 3M Video Codec H 264 avc1 Audio Codec PCM FCC INDUSTRY CANADA INFORMATION This device complies with part 15 of the FCC Rules Operation is subject to the following two conditions 1...

Страница 21: ...ifications not expressly approved by the party responsible for compliance could void your authority to operate the equipment Cet appareil est conforme aux normes RSS exemptes de licences d Industrie C...

Страница 22: ...arrantor or its representatives in connection with the performance of this warranty Warrantor at its option may replace the unit with a new or refurbished unit THE LIMITED WARRANTY SET FORTH ABOVE IS...

Страница 23: ...roduct Include evidence of original purchase a note describing the defect that has caused you to return it The Product should be shipped freight prepaid by traceable means to warrantor at Uniden Ameri...

Страница 24: ......

Отзывы: