background image

20

SPECIAL FEATURES

REMOTE VIEWING VIA APP

You can download Uniden Baby Watch Plus app to remotely view the camera. 
To set up the baby monitor camera, please make sure it’s successfully installed and 

powered on, and that the status indicator on the camera is flashing red slowly.
The flashing RED (slow) status means that your camera is ready to be paired to the 

Baby Watch Plus App.

Prerequisites

•  You must have an available Wi-Fi-enabled Smartphone (Android or iOS 

smartphone).

•  The BW614PTR camera and your smartphone must be within the same Wi-Fi 

network range for initial setup (ideally within 3m from the router).

•  Wi-Fi router connection is 2.4GHz and password if any. 

1.  Search and download the free Baby Watch Plus app from the App Store for iOS 

devices or Play Store for Android devices. You will need to create an account 

specifically for the Baby Watch Plus app. If you already have an account with 

Baby Watch Plus app, log in account and skip to Step 6.

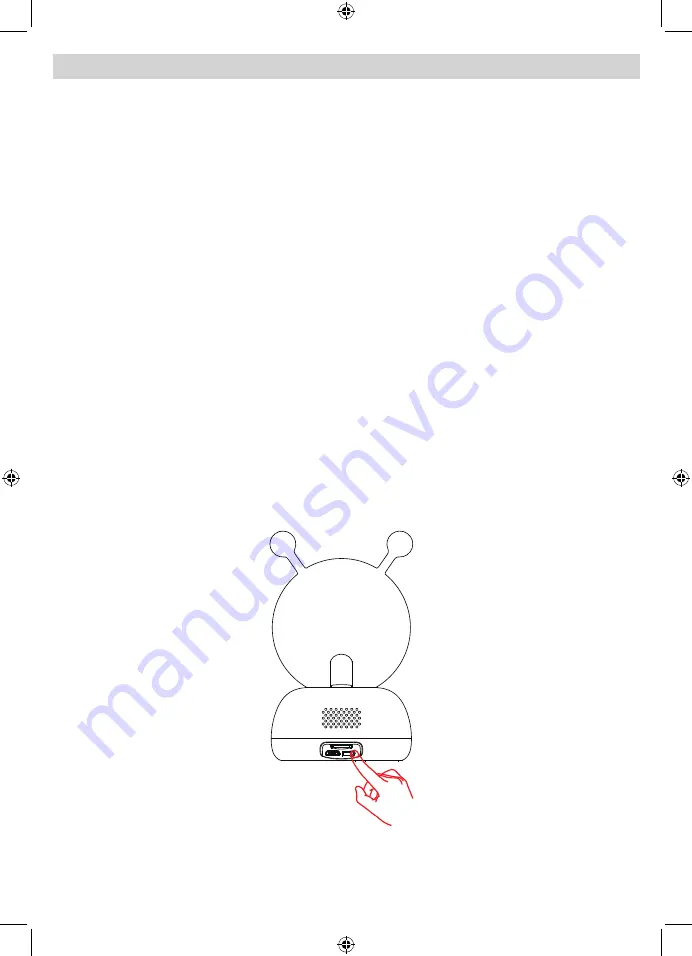
2.  When the status indicator on the camera starts flashing red slowly, the camera 

is ready to be paired with the Wi-Fi network. If the status indicator is not red 

or flashing quickly, press and hold the reset button for 5 seconds, wait for the 

status indicator to flashing red slowly. 

* Please note that app screenshots are for reference only. User Interface for iPhone and 

Android Phones might differ in terms of icons layout and functionality and may change 

without notice. 

As the Baby Watch Plus app is constantly under development to enrich user experience, the icons/

screens shown may vary slightly from the actual app. 

Press and hold for 

5 seconds

Содержание BW6141R Series

Страница 1: ...1 BW6141R Series For more exciting new products please visit our website Australia www uniden com au 5 0 LCD Portable Wireless Baby Monitoring System ...

Страница 2: ...s indicated in this manual Never dispose of any batteries in a fire they may explode Check with local codes for possible special disposal instructions Never tug or pull on any power cord be sure to leave some slack in the cord when placing your equipment and always use the plug to unplug cord from the wall outlet Never leave power cords where they can become crushed cut or frayed when running powe...

Страница 3: ...ound or interfere with the normal flow of air Warning to Parents and Other Users To avoid damage to your equipment follow these simple precautions Do not drop puncture or disassemble any part of the equipment There are no user serviceable parts inside Do not expose the equipment to high temperatures and avoid leaving the equipment in direct sunlight for more than a few minutes Heat can damage the ...

Страница 4: ...AMERAINSTALLATION 11 PAIRING 13 USINGTHEBABYMONITOR 13 PANANDTILT 13 VOLUMEANDBRIGHTNESS 13 PHOTO 13 VIDEO 13 GALLERY 14 LULLABIES 14 CAMERA 15 SYSTEM MENUS 16 SPECIAL FEATURES 20 REMOTE VIEWING VIA APP 20 LIVEVIEW 25 HISTORY 26 TROUBLESHOOTING 27 SPECIFICATION 28 TWO YEARLIMITEDWARRANTY 30 ...

Страница 5: ...w uniden com au for Australian model WHAT S IN THE BOX All trademarks are registered trademarks of their respective owners BW6100 Monitor BW614PTR Camera AC Adaptor Screws Anchors USB Cable Reset Pin Model Name 5 0 Monitor Camera Adaptors BW6141R 1 1 2 x USB Cable 2 x AC Adaptor BW6141R 1 1 2 3 x USB Cable 3 x AC Adaptor Refer to the table below ...

Страница 6: ...6 GETTING STARTED Camera 7 4 6 8 9 5 1 2 3 ...

Страница 7: ...Microphone Captures sounds for the area near the camera 5 PAIR Press and hold until the prompt tone is heard to start pairing Video Press to activate video call feature through the app Camera requires internet connection 6 Speaker Produces the sound transmitted from the monitor 7 MicroSD Card Slot Insert microSD card up to 128GB to record video 8 Reset Insert and hold the reset pin until the promp...

Страница 8: ...8 Monitor 4 1 2 3 7 6 5 8 9 10 11 12 15 13 14 16 17 ...

Страница 9: ... To pan and tilt the camera BW61 series Menu Navigate menu and adjust the settings 8 OK Press to confirm 9 TALK Activate Intercom function 10 Return Press to return back one level Press and hold to stop playing lullaby 11 Antenna Receives video and audio signals from the camera s 12 POWER Press and hold to turns on the monitor on Press and hold until a screen prompt appear on the screen to shut do...

Страница 10: ...t source in view of the camera ceiling or floor lamps Carefully plan where and how the camera will be positioned and where you will route the cable that connects the camera to the power adaptor When you are positioning the camera bring the monitor along it s much easier to get the camera into the right position when you have the display handy Check the image on the monitor before you install the c...

Страница 11: ...extend the antenna Insert one end of the micro USB cable to the micro USB port on the side of the monitor Connect the other end of the USB cable into the USB power adaptor Connect the USB power adaptor into a 240 volt AC standard indoor power outlet Press and hold the POWER button to turn the unit on or off Let the monitor charge for 6 hours prior to first time use so the built in rechargeable mon...

Страница 12: ...e transmission range If the camera is not paired to the monitor or additional camera is added please pair the camera to the monitor Pairing the camera to the monitor 1 Press the Menu button on the monitor and select Camera Management 2 Press and hold the pairing button on the camera until you hear the prompt tone 3 Press OK button on the display screen to start pairing Unpair the camera from the m...

Страница 13: ...nd DOWN direction buttons to adjust monitor speaker volume or press LEFT and RIGHT direction buttons to adjust monitor brightness Photo Take a photo to capture an interesting scene of your baby Please ensure a micro SD Card is inserted to take a photo Press Menu button on the monitor select and press OK to take a photo Video Manually record video to capture an interesting scene of your baby Please...

Страница 14: ...o press OK to play or pause in the preview mode Press Return button to exit preview or return to main menu Lullabies The monitor comes with four lullabies including white noise audio Play the lullabies to sooth your baby when baby is crying or sleeping 1 Press Menu button on the monitor select and press OK enter the interface 2 You can control play stop repeat or shuffle the lullabies from the mon...

Страница 15: ...enu button on the monitor select and press OK enter the interface 2 Select the camera channel you wish to view Grey out icon indicates that the camera is not available for viewing You may also select camera cycle icon to rotate the camera view between camera 1 and camera 2 ...

Страница 16: ...d humidity level around the camera as a reference only If the temperature or humidity falls outside of a preset range the system alerts you Temperature and humidity alert range lets you set that range 1 Press the MENU button on the monitor and select Humiture Detection 2 Press UP and DOWN direction buttons to select options between temperature range humidity range and out of range reminder and pre...

Страница 17: ... Mode Set the monitor to automatically enter sleep mode according to the length of time set to increase the monitor standby time Any of the detection triggered will turn the LCD back on If none of the detection is active press the power button on the monitor to turn the LCD back on 1 Press the MENU button on the monitor and select Sleep Mode 2 Select the time length desired for the monitor to ente...

Страница 18: ...e micro SD Card 1 Press the MENU button on the monitor and select SD Card Management 2 Press OK to format the micro SD Card 3 Press LEFT and RIGHT direction buttons to change options between Yes or No and then press OK to proceed with the selection Wallpaper Set the wallpaper of the monitor from the system gallery or you may upload your preferred wallpaper to the micro SD card and select your favo...

Страница 19: ... Reset 2 Press OK to reset the monitor 3 Press LEFT and RIGHT direction buttons to change options between Yes or No and then press OK to proceed with the selection Device Information 1 View the monitor and camera firmware version 2 Press the MENU button on the monitor and select Device Information 3 Press LEFT and RIGHT direction buttons to toggle between the monitor and camera firmware informatio...

Страница 20: ...by Watch Plus app from the App Store for iOS devices or Play Store for Android devices You will need to create an account specifically for the Baby Watch Plus app If you already have an account with Baby Watch Plus app log in account and skip to Step 6 2 When the status indicator on the camera starts flashing red slowly the camera is ready to be paired with the Wi Fi network If the status indicato...

Страница 21: ... for the first time you will see the login page Tap the Sign Up button to create a new Baby Watch Plus account 3 Enter your email address you wish to register with and check the user agreement privacy policies Tap Next button to continue ...

Страница 22: ...nd you ll be all set Your Baby Watch App account has now been created 5 On the devices tab to add a device tap the button on the middle of the screen or on the top right hand side of the screen if you already have shared access or a paired device 2021 05 01 15 00 00 ...

Страница 23: ... pin for 5 seconds to reset the camera and set it up within 2 minutes When the camera is flashing slowly the camera is ready to set up tap Next to continue 7 Enter the Wi Fi password of the selected Wi Fi network and tap Next to confirm the Wi Fi name and password Tap Ok to continue Please note that the camera only supports 2 4GHz Wi Fi connection and the Wi Fi SSID and password must not exceed 24...

Страница 24: ...se place the QR code on screen towards the camera lens at a distance of about 15 20cm to let the camera scan the QR code After you hear the voice prompt from the camera please press Next to continue 9 Please wait while the app is configuring your camera Once completed you ll be prompted to name your camera and tap Done to start the Live View ...

Страница 25: ... Scroll to the right Back Date Time Tap to switch streaming resolution Device Settings Streaming rate Wi Fi Strength Full Screen Mode Local Recording Pan and Tilt Motion Alert Take Snapshot Two way talk View and set the temperature and humidity alerts Play repeat or shuffle lullabies Access local gallery ...

Страница 26: ...ck video to local gallery Access local gallery View playback file timeline Please note that a SD Card is needed and inserted to the camera for the lullabies to download and playback Only the event recording and Full Day recording are saved in the SD Card Any event history is saved in the SD Card Local recording and snapshot are saved to the phone gallery ...

Страница 27: ...e picture has become choppy The picture may become choppy when experiencing a lower frame rate Try moving the camera closer to the monitor removing obstructions between the monitor and camera adjusting the monitor and antenna to vertical position The monitor picture has frozen Use the reset pin included to reset the monitor The monitor turns off Press POWER to turn it back on again You can t recor...

Страница 28: ...nitor up to 150m Line of sight Smart Home Google Assistant Alexa Storage Supports up to 128GB micro SD Card Power Input 5V 1A Operating Temperature Range 10 C 40 C 14 F 104 F Operating Humidity Range Within 80 Relative Humidity MONITOR Display 5 0 LCD Resolution 1280 x 720 Two way Audio Yes Storage Supports up to 128GB micro SD Card Battery Capacity 3000mAh Battery Life Up to 5 hours Power Input 5...

Страница 29: ...29 ...

Страница 30: ...rchase for a Product first purchased either in Australia or New Zealand and will expire as indicated below from the date of original retail sale Product 2 Year Accessories 90 Days If a warranty claim is made this warranty will not apply if the Product is found by Uniden to be A Damaged or not maintained in a reasonable manner or as recommended in the relevant Uniden Owner s Manual B Modified alter...

Страница 31: ... goods fail to be of acceptable quality and the failure does not amount to a major failure This warranty is in addition to and sits alongside your rights under either the COMPETITION AND CONSUMER ACT 2010 Australia or the CONSUMER GUARANTEES ACT New Zealand as the case may be none of which can be excluded Procedure for Obtaining Warranty Service Depending on the country in which the Product was fi...

Страница 32: ...32 2022 Uniden Australia Pty Ltd Printed in PRC v1 0 ...

Отзывы: