Uniden 2165 Скачать руководство пользователя страница 25

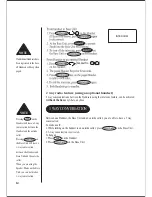
Turning the answering system on/off:

1.  To turn the answering system on, press                    . 

The current greeting message will be played.

2.  To turn the answering system off, press                    .

“Answering System Off” is announced.

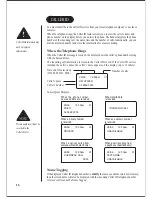
Setting Up Your Answering System

Setting your greeting:

When you receive a call, the answering system automatically plays either a preset message or
your own greeting.

Recording a personal outgoing message (Greeting):

1.  Press and hold                   until you hear a tone. 

Start recording your message immediately after 
you hear the tone end.

2.  When you finishing recording your message, press
                       or              . A tone sound and your message

play back on the phone. You can record a greeting of up
to 30 seconds.

You can use your answering system to leave a voice memo message for others who use the
phone, or to announce a special message to callers when you’re away from your phone.

Features

Digital Tapeless Recording

15 minutes of Recording Time

Selective Greeting (Outgoing Message)

Remote Message Retrieval and Room Monitor

Toll Saver

Digital Tapeless Recording allows you to quickly review, save or delete the messages. You’ll
never have to worry about a tape wearing out, jamming or resetting improperly.
The Integrated answering system is easy and convenient to use, but please read through all of
the instructions carefully.
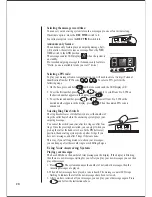
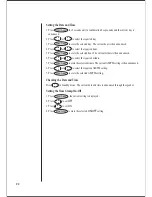
ANSWER SYSTEM

redial/p

volume

voice memo

greeting

speaker status

delete

play

1

2

3

abc

def

4

5

6

ghi

jkl

mno

pin

time/3way

ans on/off

memory

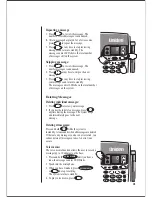
Choosing between the two outgoing messages:

1.  Press                   to play the outgoing message.
2.  Press                   again while the message is playing. This switches between the two 

options.

redial/p

volume

voice memo

greeting

speaker status

delete

play

1

2

3

abc

def

4

5

6

ghi

jkl

mno

pin

time/3way

ans on/off

memory

Preset message:

The following message is pre-recorded -
“Hello, no one is available to take your call. Please leave a message after the tone”

19

Содержание 2165

Страница 1: ...DSS 2155 2165 Digital Spread Spectrum provides the longest range the clearest sound and the best privacy GUIDE QUICK START...

Страница 2: ...e phone should not be near and areas you should avoid AVOID Television sets and other electronic appliances AVOID Microwave ovens AVOID Computers AVOID Moisture AVOID Other Cordless phones 3 AVOID con...

Страница 3: ...5 DSS2165 Start Here Quick Start Guide ii Raise the antenna plug the AC Adaptor into AC Adaptor cord AC Adaptor cord Installing the Base Unit DSS2155 DSS2165 Charge Cradle DSS2165 only Plug theAC adap...

Страница 4: ...e Base Unit or the Charge Cradle and charge them uninterrupted for 12 hours NOTE Connect the battery plug to the socket at the rear of the battery compartment Make sure the plug is the right way round...

Страница 5: ...lease the key Record your greeting while speaking within 15cm of the base When finished press again greeting greeting Making a Call Pick up the Handset and press to low off line Dial the phone number...

Страница 6: ...ng Time the number of rings before the Answering System answers the call Set Ring Time to T S 9 rings Record Time the length of time a caller may record a message Set Record Time to 1 minute RING TIME...

Страница 7: ...Out of Range Key Lock Unlock Call Waiting Flash Storing Phone Numbers Names Making Calls with Memory Dialing Editing a Stored Name Phone Number Rocket Dial Storing and Editing Rocket Dial Making Call...

Страница 8: ...jack Belt clip slot Battery compartment Memory key Talk key Rocket C wait key Handset aerial Handset speaker Display screen 1 2 3 4 5 6 7 8 9 Flash Registration key CID key Volume control keys Alpha N...

Страница 9: ...key Speaker Alpha numeric keypad Repeat Skip keys Pin key Speaker LED In use charge LED Greeting key Handset charge contacts Charge Cradle AC Adaptor input DSS2165 only 34 35 36 37 38 39 40 41 42 43...

Страница 10: ...e Identification 60 Caller ID Memories 59 Alpha Memory Dialing Maxi Sound Extra Loud Handset Volume Control Rocket Dial One Touch VIP Dial One Touch Call Waiting Handset Capable Date and Time Stamp l...

Страница 11: ...rd and other printed materials TIP NOTE To attach the belt clip To remove the belt clip INSTALLINGTHE BELTCLIP l Gently pull one side of the beltclip to release l Press the beltclip against the rear o...

Страница 12: ...he base ringer on or off with the base ringer switch Base Speaker Volume To control the speaker volume of the base press or as desired Earpiece volume Pressing or during a call will change the earpiec...

Страница 13: ...ck up handset 2 1 Enter the phone number TALK LOUD 1 3 4 9599 3355 example 9599 3355 Press Pick up Handset TALK LOUD 1 2 3 4 1 9599 3355 example Enter the phone number Press 9599 3355 Press 1 Enter th...

Страница 14: ...s 3 Press the key on the called Handset and the transfer is completed 0 TALK MID 1 TRANSFER TO HAND 1 INCOMING CALL TALK MID 1 7 1 handset No 8 The last three phone numbers dialled can be quickly redi...

Страница 15: ...n be accessed after talk has been pressed During a call noise will increase if you move your handset too far from your base unit If the range limit of your base unit is exceeded your call will termina...

Страница 16: ...ring a number always include your area code eg 02 so name tagging will operate refer page 16 3 Press STORE NAME is displayed If this screen appears the selected memory location has a number already st...

Страница 17: ...rom talk mode 1 Press 2 Press 3 Enter a two digit number to select the memory location of the desired phone number The selected phone number is displayed Then the number is dialed TALK LOUD 1 TALK LOU...

Страница 18: ...or select another memory location to edit delete MEMORY STORE 01 FRED 02 JOHN SMITH EDIT MEMORY 01 DELETE MEMORY 01 GO BACK STORE NAME 01 FRED STORE NUMBER 01 0295993355 MEMORY 01 STORED MEMORY STORE...

Страница 19: ...03 KAY JONES 1 Press and hold until MEMORY STORE is displayed 2 Press and or enter a two digit number to select the memory location you would like to edit 3 Press the memory location number that you...

Страница 20: ...utside caller you are able to have a 3 way conversation To make a call 1 While talking on the handset to an outside caller press on the Base Unit 2 3 way conversation is activated To hang up 1 Press o...

Страница 21: ...cate each Handset a different number to enable functions such as Call Transfer After Registration the Handset number is shown on the Display screen either during a call or while the Handset is chargin...

Страница 22: ...ters Date and Time received DD MM HH MM 28 09 12 30pm 01 JIM STATEN 02 9599 3355 Number of calls Caller s name Caller s number Some typical Displays INCOMING CALL 28 09 12 30pm 01 FRED 02 9599 3355 Wh...

Страница 23: ...aller ID names numbers 1 Press 2 Press 3 Press or to indicate Yes or No 4 Press When you indicate Yes a tone sounds and all stored Caller ID messages are deleted When you indicate No a tone sounds and...

Страница 24: ...to be stored from the Caller ID list by pressing or 2 Press 3 Press or or enter a two digit number to select the memory location 4 Press a confirmation tone will sound The number is stored in memory...

Страница 25: ...om your phone Features Digital Tapeless Recording 15 minutes of Recording Time Selective Greeting Outgoing Message Remote Message Retrieval and Room Monitor Toll Saver Digital Tapeless Recording allow...

Страница 26: ...the base press and hold until a tone sounds and the LED displays 00 2 To set the first number press or repeatedly to scroll from 0 to 9 When the desired number appears in the display press 3 To set t...

Страница 27: ...tandby 4 To play voice memo press Repeating a message 1 Press to review the message The number of stored messages is announced 2 After a message has played for a few seconds press to repeat the messag...

Страница 28: ...nt minute is then announced 6 Press or to select the required minute 7 Press to store the selected minute The currentAM PM setting is then announced 6 Press or to select the required AM PM setting 7 P...

Страница 29: ...omatically returns to standby Remote room monitor You can call your answering system from any touch tone phone and monitor sound in the room where your base is installed 1 Call your telephone number 2...

Страница 30: ...24 Disconnect some telephones Re register the handset see page 15 Talk flashes No dial tone TROUBLE SHOOTING...

Страница 31: ...nufactured by Uniden PARTS COVERED This warranty covers for one 1 year the Base Charging Unit and Handset only All accessories AC Adaptor battery etc are covered for 90 days only STATEMENT OF REMEDY I...

Страница 32: ...2003 Uniden Australia Pty Limited Uniden New Zealand Limited FOR PURCHASING A UNIDEN PHONE THANK YOU...

Отзывы: