Unical 16,5 Скачать руководство пользователя страница 5

5

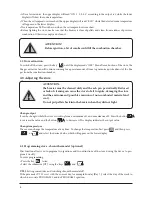
• When the stove is running, the surfaces, glass, handle and pipes become 

very hot: they must only be touched with adequate protection;

• Keep/preserve the pellets in dry and moisture free rooms;

• Keep both the fuel and any flammable material at an adequate safety dis

-

tance from the stove.

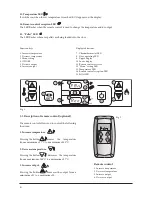
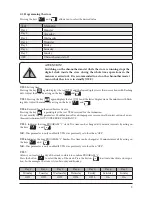
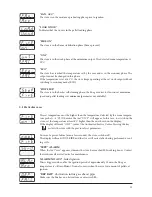
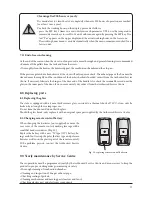
2.0 Function keys and display

Function keys

1. Increase temperature


The button allows you to increase the temperature from a minimum of 7°C to a maximum of 40°C.

2. Decrease temperature


The button allows you to decrease the temperature from a maximum of 40°C to a minimum of 7°C.

3. Setting button


Press the button to access the stove programming menu.

4. ON/OFF 


Press the key            for 2 seconds: the stove switches on or off.

5. Decrease output


The button allows you to decrease the output from a maximum of 5 to a minimum of 1.

6. Increase output 

The button allows you to increase the output from a minimum of 1 to a maximum of 5.

SET

!

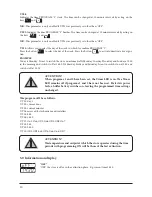
2.1 Display indications

7. Chronothermostat LED


Indicates that the weekly and/or daily programming is active.

8. “Smoke discharge” stove functioning LED

This is on when the stove is running.

9-10. Upper/lower display

Different stove operating modes are viewed on the display, as well as the temperature and work output set by 

the user.

Should the stove malfunction, the display shows the relative error message (see paragraph “Particular cases”).

11. Remote control receiver

Reception sensor of commands given by remote control.

12. “Menu” setting LED

The LED flashes when the desired temperature is set.

Содержание 16,5

Страница 1: ...it USER OPERATING INSTRUCTIONS 16 5 16 5 C...

Страница 2: ......

Страница 3: ...conomy and a longer operational life The careful designing and risk analysis performed by our company have produced a safe product Nonethe less before performing any type of operation it is recommende...

Страница 4: ...ty standards use only quality pellets rec ommended by the manufacturer The glass is equipped with a special air pass for self cleaning However it is not possible to avoid a light grey coating on the g...

Страница 5: ...the key for 2 seconds the stove switches on or off 5 Decrease output The button allows you to decrease the output from a maximum of 5 to a minimum of 1 6 Increase output The button allows you to incr...

Страница 6: ...er display 11 Remote control receiver 12 Menu setting LED 13 Temperature LED 14 Remote control reception LED 15 Pellet LED 1 2 3 7 8 9 10 11 15 14 13 12 4 5 6 Remote control 1 Increase temperature 2 D...

Страница 7: ...basket is positioned correctly All sections of the flue gas pipe must be able to be inspected If fixed it must have inspection openings for cleaning 2 4 Loading pellets into tank Pellets are loaded in...

Страница 8: ...Press the button to increase the value and the button to decrease it The display indicates the output value Change temperature The user can change the temperature at any time To change the temperatur...

Страница 9: ...ameters Modifications after an improper access require the intervention of an au thorised technician NOT COVERED BY WARRANTY UT05 Indicates the time PROGRAM 1 starts The time can be changed at 10 minu...

Страница 10: ...8 9 00 UT 09 23 00 UT 10 Off1 Off2 0n3 Off4 On5 On6 Off 7 ATTENTION The temperature and output at which the stove operates during the time periods with programming ON will be those of the last extinct...

Страница 11: ...temperature at least 4 C higher than the one shown on the display If the display still reads ON T contact the Authorised Service Centre Pressing the key restarts the stove with the previously set par...

Страница 12: ...e Centre Fig 3 manually rearmed thermostat 1 On off Switch 2 Power cable 3 Fuse F4AL250V 4 PC connection optional 5 Thermostat rearm button 6 Room temperature probe Medium mod 1 2 3 5 4 6 Large mod 1...

Страница 13: ...the bottom of the stove The two fans are completely independent one from another A gate valve regulates the air towards the front fan towards one rear duct or both rear ducts Two knobs at the top of...

Страница 14: ...in order like before the intervention placing the brazier properly Please follow the following cleaning operations carefully Failure to per form them can cause problems to arise in stove operation Op...

Страница 15: ...t supplied with the stove This opera tion is especially necessary the first times the stove is lit espe cially if pellets other than those recommended by the manu facturer are used The frequency of th...

Страница 16: ...ld endanger stove operation Poor quality pellets can however dirty the glass ATTENTION Do not try to light the stove if the glass is broken 7 9 Cleaning the exhaust system Until you have acquired reas...

Страница 17: ...changing the batteries not supplied remove the rear cover of the remote control making leverage with a small flat head screwdriver Fig 10 Replace the battery with a new N type 12V battery be ing care...

Страница 18: ...ing gaskets on pipes and flue gas extraction fan compartment Cleaning silicon tube connected to pressure switch Cleaning inspection and descaling of ignition resistance compartment replacement if nece...

Страница 19: ......

Страница 20: ...transcription or printing errors It reserves the right to modify its products as deemed necessary or useful without jeopardising their essential features 46033 casteldario mantova Italy tel 39 0376 5...

Отзывы: