

Thick
Scan
Metal
Scan
UT387C
Stud
Sensor
Stud
Scan
AC
Scan
Metal Scan
Note 1: Keep the device flat against the surface. When sliding the device, do not rock or press the
device hard.
Note 2: Do not touch the wall surface, otherwise the calibration data will be affected.
5) The bottom of the V groove corresponds to the midpoint of the stud, mark it down.
Caution: When the device detects both wood and live AC wires at the same time, it will light the
yellow LED.
Figure 5
3. Detecting metal
The device has an interactive calibration function, users can find the accurate position of metal in the
dry wall. Calibrate the instrument in the air to achieve best sensitivity, the most sensitive area of metal
in the dry wall can be found by times of calibration, the target metal is located in the center area where
the instrument indicates.
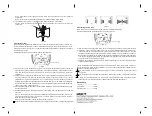
1)Selecting detection mode, move switch to Metal Scan (Figure 6)
Figure 6
2) Grip the UT387C at the handheld areas, position it vertically and flat against the wall. Move the switch
to Maximum Sensitivity, press and hold the power button. When calibrating, make sure the device is
away from any metal. (On metal scan mode, the device is allowed to be away from the wall for
calibration).
3) Calibration: Press and hold the power button, the device will calibrate automatically. (If the battery
icon keeps flashing, it indicates low battery power, replace the battery and power on to redo the
calibration). During the auto calibration process, LCD will display all icons (StudScan, ThickScan,
Battery power icon, Metal, Target indication bars) until the calibration is completed. If the calibration
is successful, the green LED will flash once and the buzzer will beep once, which indicates that user
can move the device to detect the metal.
4) When the device approaches the metal, the red LED will light up, the buzzer will beep and the target
indication will be full.
5) Decrease the sensitivity to narrow the scan area, repeat step 3. User can repeat times to narrow the
scan area.
Note 1: If the device doesn’t give a prompt of “calibration completed” within 5 seconds, there may be
a strong magnetic/electric field, or the device is too close to metal, users need to release the power
button and change a place to calibrate.
Note 1: Indication bar shown in below figure means there is metal.
Caution: When the device detects both metal and live AC wires at the same time, it will light the yellow LED.
4. Detecting live AC wire
This mode is same as metal detection mode, it can also calibrate interactively.
1) Select detecting mode, move the switch to AC Scan (Figure 8)
Figure 8
Figure 7
2) Grip the UT387C at the handheld areas, position it straight up and down and flat against the wall.
3) Calibration: Press and hold the power button, the device will calibrate automatically. (If the battery
icon keeps flashing, it indicates low battery power, replace the battery and power on to redo the
calibration). During the auto calibration process, LCD will display all icons (StudScan, ThickScan,
Battery power icon, Metal, Target indication bars) until the calibration is completed. If the calibration
is successful, the green LED will flash once and the buzzer will beep once, which indicates that user
can move the device to detect the AC signal.
4) When the device approaches the AC signal, the red LED will light up, the buzzer will beep and the
target indication will be full.
Both the StudScan and ThickScan modes can detect the live AC wires, the maximum distance of
detection is 50mm. When the device detects a live AC wire, the live hazard symbol appears on the
LCD while the red LED light is on.
Note: For shielded wires, wires buried in plastic pipes, or wires in metal walls, electric fields cannot
be detected.
Note: When the device detects both wood and live AC wires at the same time, it will light the yellow LED.
Warning: Do not assume there are no live AC wires in the wall. Before cutting off the power, do not
take actions such as blind construction or hammering nails that could be dangerous.
Accessory
1.Device ------------------------1 piece
2.9V battery --------------------1 piece
3.User manual -----------------1 piece


