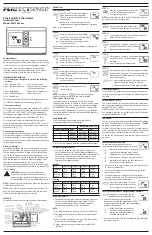


Table A
If the code letter
on your existing
Thermostat is:
Then mark the
wire with
label shown
And connect
to thermostat
terminal shown
Y, C or M
Air Conditioning Compressor
- or -
O
Reversing Valve operating in Cool mode.
(Single Stage Heat Pumps ONLY)
W or H
Heating
- or -
B
Reversing Valve operating in Heat mode.
(Single Stage Heat Pumps ONLY)
Y1
Heat Pump Compressor
(Single Stage Heat Pumps ONLY)
G or F
Fan
RC, VC
24 Volt Cool
RH, R, VR or 4
24 Volt
NOTE: Do not connect a Common wire (sometimes labeled
C) to any terminal on this thermostat. Tape up the wire and
do not use. This wire provides electricity to non-battery
powered thermostats.
Mount Wallplate and Thermostat
• Remove the wall plate from your thermostat by pressing
the release tab on the bottom of the thermostat. See
Figure 2.
Figure 2.
• Position wallplate on wall and pull existing wires through
large opening. Then level for appearance. Mark holes for
plastic anchors provided if your existing holes do not line
up with those on the wall plate.
• Drill holes with 3/16” bit and gently tap anchors into the
holes until flush with wall.
• Reposition wallplate to wall, pulling wires through large
opening. Insert mounting screws provided into wall
anchor and tighten. See Figure 3.
Figure 3.
NOTE: 5-Wire Systems
If your thermostat has one wire marked R or Rh (2, 3,
or 4-wire system), then leave the jumper wire between
the Rh and Rc terminals on the wallplate. Otherwise, if
you have separate Rh and Rc wires (5-wire system), then
remove the jumper wire between the Rh and Rc terminals.
Connect Wires and Mount Thermostat to Wallplate
• Match and connect the labeled wires to the appropriate
coded terminal screws on the wallplate. (See Figure
4 and 5.) Ignore any wires which may be present, but
which were not connected to the old thermostat.
• Refer to the Wiring Diagrams below to be sure your
system is wired correctly.
• If your system is a single stage heat pump and uses an
O or B wire, you must move the System Selector switch
inside the thermostat to the heat pump (HP) position.
If you have a normal furnace or electric system, leave
the switch in the Standard (STD) position. Refer to the
System Selector section for more information on this
switch.
• Be sure to tighten the terminal screws securely,
otherwise a loose wire could cause operational problems
with your system or thermostat.
• Push excess wires back into the hole to prevent
interference when installing the thermostat to the
wallplate.
• Make sure the System switch is set to OFF, and the Fan
switch is set to AUTO.
Two Year Limited Warranty
Robertshaw warrants to the original contractor installer or
to the original consumer user that each new PerfectSense
Product shall be free from defects in materials and
workmanship under normal use and service for a period
of two (2) years from the date of manufacture (“Warranty
Period”). If any Product fails within the applicable Warranty
Period, Robertshaw shall, at its sole option, repair or
replace the Product, provided that the Product is returned
to Robertshaw facility or designated agent within the
Warranty Period, with transportation charges prepaid, and
that the Product, upon examination by Robertshaw, is found
to conform to this warranty. The above warranty does not
apply to: i) batteries; ii) improper installation; iii) Products
that have been damaged, misused, neglected, mishandled,
or altered in any manner whatsoever, and/or; iv) defects or
damage that result from use of the Product in other than
its normal and customary manner or in any manner not
in accordance with Robertshaw recommendations and/or
instructions. Any and all costs of labor, thermostat removal,
or reinstallation are not covered under this warranty and
shall be the sole responsibility of the consumer or installer,
as applicable.
THE FOREGOING WARRANTY IS IN LIEU OF AND
EXCLUDES ALL OTHER WARRANTIES, WHETHER VERBAL
OR WRITTEN, EXPRESS OR IMPLIED INCLUDING, EXCEPT
TO THE EXTENT PROHIBITED BY APPLICABLE LAW,
THE IMPLIED WARRANTIES OF MERCHANTABILITY
AND FITNESS FOR A PARTICULAR PURPOSE. IN NO
EVENT SHALL ROBERTSHAW BE LIABLE TO CONSUMER,
CONTRACTOR OR ANY THIRD PARTY FOR ANY
CONSEQUENTIAL, INCIDENTAL, SPECIAL OR PUNITIVE
DAMAGES ARISING FROM OR RELATING TO USE OF
THE PRODUCT INCLUDING, BUT NOT LIMITED TO, LOSS
OF GOODWILL, LOSS OF PROFIT OR REVENUE, AND
PROPERTY DAMAGE, REGARDLESS WHETHER SUCH
LOSS OR DAMAGE IS BASED IN CONTRACT, WARRANTY,
TORT, NEGLIGENCE, STRICT LIABILITY, INDEMNITY,
PRODUCT LIABILITY, OR OTHERWISE AND EVEN IF
ROBERTSHAW HAS BEEN ADVISED OF THE POSSIBILITY
OF SUCH DAMAGES.
TROUBLESHOOTING
Problem
Solution
No display
1. Check battery connections and
batteries.
2. Remove the battery and wait for
about 1 minute, then replace
batteries.
Entire display dims
1. Replace batteries.
Auto fan does not
turn on properly
1. Move HG/HE selector to correct
position.
Heating or cooling does
not go on or off
1. Check that the System switch is
in the correct position (HEAT or
COOL).
2. There may be as much as a
4-minute delay before the
system turns on – wait and check
(Compressor protection delay).
3. Check your circuit breakers
and switches to ensure there is
power to the system.
4. Replace batteries.
5. Make sure your furnace blower
door is closed properly.
6. If your non-heat pump system
only uses 4 wires, be sure the
jumper wire is installed between
the Rh/B and Rc/O terminals.
7. Check the position of the System
selector switch: Standard or Heat
Pump.
8. If you have single stage heat
pump, be sure the jumper wire
is installed between the Y and W
terminals.
Erratic display
1. Remove the battery, hold any
key then replace the battery.
Reprogram.
Unit continues to operate
in the OFF position
1. Replace unit.
Thermostat permanently
reads HI, LO, or Er
1. Replace unit.
If you experience any other problems, contact Technical Support
service at: [email protected] or (800) 445-8299.
Customer Service Telephone 1.800.304.6563
Customer Service Facsimile 1.800.426.0804
Robertshaw®, Uni-Line® and PerfectSense
TM
are trademarks of Robertshaw,
its subsidiaries and/or affiliated companies. All other brands mentioned
may be the trademarks of their respective owners.
For Technical Service
Telephone 1.800.445.8299
www.uni-line.com
www.robertshaw.com
©2015 Robertshaw
10/15 – 352-00239-001
• Insert the bottom tabs on the thermostat body into the
slots at the bottom of the wallplate. Press the top of the
thermostat body to snap it into the wallplate. Refer to
Figure 6.
NOTE: Do not force the thermostat onto the wallplate,
as the terminal pins may be damaged. If it does not snap
properly, the thermostat may not work.
• Insert the two AA size alkaline batteries, observing the
polarity marked inside the battery compartment.
• Switch on the main power at the panel or furnace.
Figure 4.
Figure 5.
Figure 6.
Wiring Diagrams


